If you’re looking to bring some holiday magic into your kitchen, you absolutely can’t miss this Santa Cookie Recipe with Vanilla Frosting Recipe. These festive cookies come to life with a rich, buttery base and the kind of vanilla frosting that makes every bite feel like a special occasion. I’ve made these with friends and family countless times, and each batch feels like a celebration right out of the oven. Ready to dive in and make your holidays extra sweet? Let’s do this!
Why You’ll Love This Recipe
- Perfectly Buttery Base: The dough is soft but firm enough to hold shapes beautifully, making it ideal for festive cutouts.
- Versatile Vanilla Frosting: You can keep it simple or jazz it up with sprinkles, piping, and buttercream accents.
- Kid-Friendly Decorating: Decorating these together makes for some of the best holiday memories.
- Reliable and Accessible: Uses ingredients you probably already have and doesn’t require fancy baking skills.
Ingredients You’ll Need
Each ingredient here serves a special role in ensuring your Santa cookies come out just right. I love using room temperature butter and eggs because it gives the dough the perfect texture for rolling and cutting.
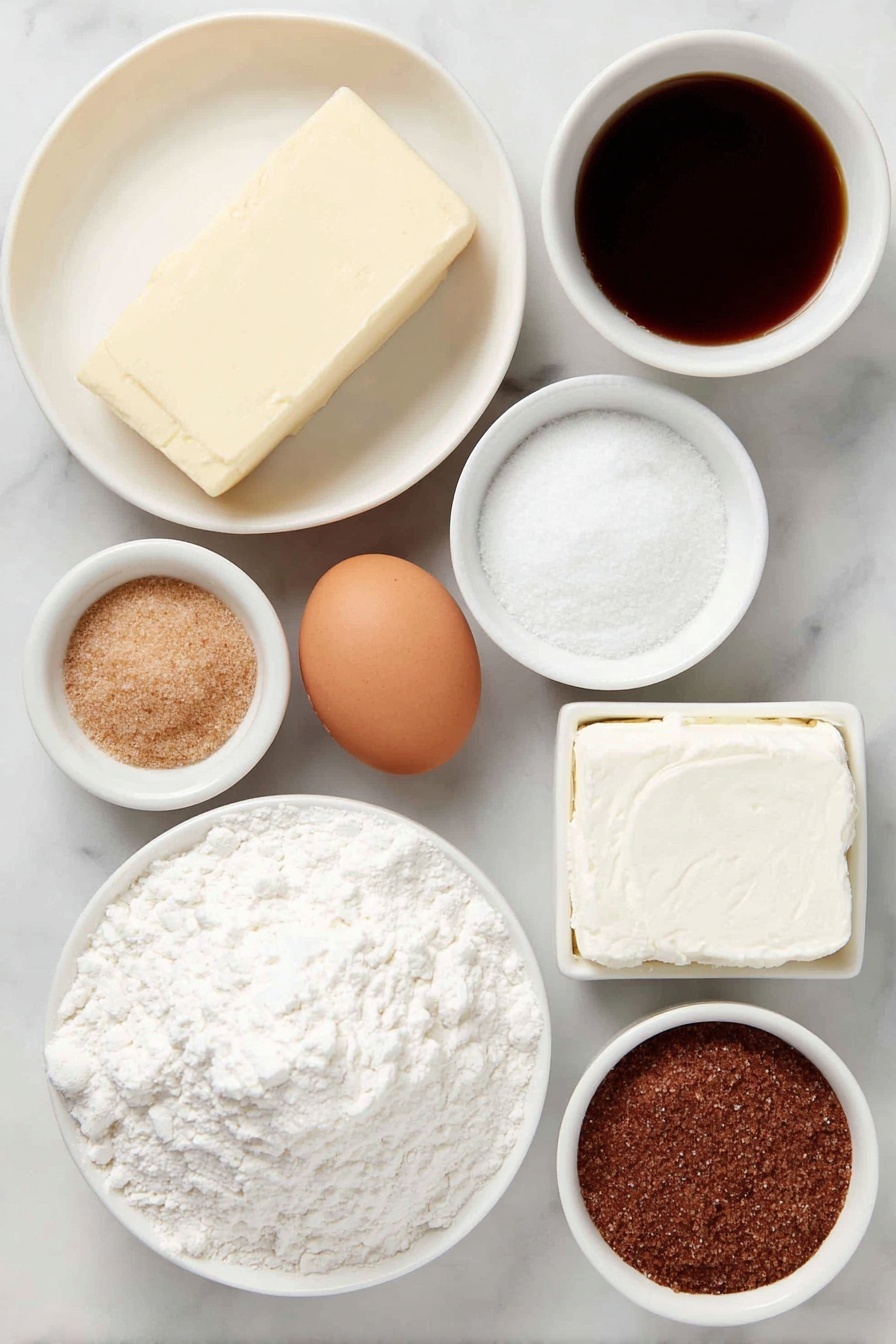
- Salted butter: Using salted adds a subtle depth to the cookies, balancing the sweetness beautifully.
- Light brown sugar: Adds moisture and a lovely caramel note that plain white sugar can’t replicate.
- Hazelnut liquor (optional): This little splash gives a festive twist if you want to get fancy, but feel free to leave it out!
- Vanilla extract: Quality vanilla makes a world of difference—I always reach for pure vanilla.
- Egg: Room temperature eggs help bind the dough without making it grainy or stiff.
- All-purpose flour: The backbone that holds the dough; sometimes a little extra helps if your dough feels sticky.
- Baking soda: Just enough to give a gentle rise without puffing up the shapes.
- Kosher salt: Enhances flavor and balances sweetness.
- Powdered sugar: For the smoothest vanilla frosting and buttercream.
- Cream cheese (optional for buttercream): Adds tang and a creamy texture, perfect for Santa’s beard.
- Assorted sprinkles and vanilla sugar: These add sparkle and fun to your decorated cookies.
Variations
I enjoy personalizing this Santa Cookie Recipe with Vanilla Frosting Recipe depending on the occasion or who’s eating. Feel free to swap out elements or add your own flair!
- Nut-Free Version: Simply omit the hazelnut liquor and add a splash of almond or vanilla extract instead; works just as well for kids with allergies.
- Colorful Frosting: I sometimes use gel food coloring to tint the frosting—reds for Santa’s hat, greens for Christmas trees, and blues for snowflakes.
- Gluten-Free Swap: I’ve tried this with a 1:1 gluten-free flour blend—just watch your dough’s consistency and add flour bit by bit.
- Spiced Variation: Adding a pinch of cinnamon or nutmeg to the dough brings a cozy warmth that’s perfect for winter evenings.
How to Make Santa Cookie Recipe with Vanilla Frosting Recipe
Step 1: Cream, Combine, and Form That Dough
Start by creaming the room temperature butter with brown sugar until the mixture’s light and fluffy—that usually takes about a minute in my stand mixer. It really helps create that melt-in-your-mouth texture. If you’re using hazelnut liquor, add it in now along with vanilla. Beat in the egg to bind everything together. When you add the flour, baking soda, and salt, don’t overmix; just beat until the dough comes together in a ball. If it’s too sticky to roll, sprinkle on 2 to 4 tablespoons more flour, but be cautious—too much flour can make your cookies tough.
Step 2: Roll, Cut, and Chill
Divide your dough in half and roll out each batch on a floured piece of parchment paper until about 1/4 inch thick. I always use parchment because it makes transferring the cookies to the baking sheet a breeze. Have plenty of flour ready—this is key to prevent the dough from sticking and tearing. Use festive cutout shapes like stars, snowflakes, and Christmas trees—you’ll love seeing how they come alive. Transfer the cookies carefully with a floured spatula onto a parchment-lined baking sheet. Then, here’s a trick I discovered: freeze the whole sheet of cut cookies for 20-30 minutes before baking. This keeps them from losing their beautiful shapes in the oven.
Step 3: Bake to Perfection
Slide your frozen cookie trays into the oven preheated to 350° F. Bake for 8-10 minutes, or just until the edges turn lightly golden—watch closely because overbaking dries them out. Let them cool on the baking sheet for 5 minutes so they firm up, then transfer to a wire rack to cool completely before decorating. This step is important to keep your frosting from melting off.
Step 4: Whip Up That Vanilla Frosting and Buttercream
For the vanilla frosting, beat together powdered sugar with vanilla and a tablespoon of water until it’s smooth and nicely drizzly. You can thin it out with just a bit more water if you want to pipe or fill in spaces easily. If you want to get fancy with Santa’s fluffy beard or other creamy accents, whip up the buttercream by combining softened butter and cream cheese until it’s extra fluffy, then beat in powdered sugar and vanilla until whipped and light—this makes a frosting that’s both rich and spreadable.
Step 5: Decorate Your Cookies and Make Them Shine
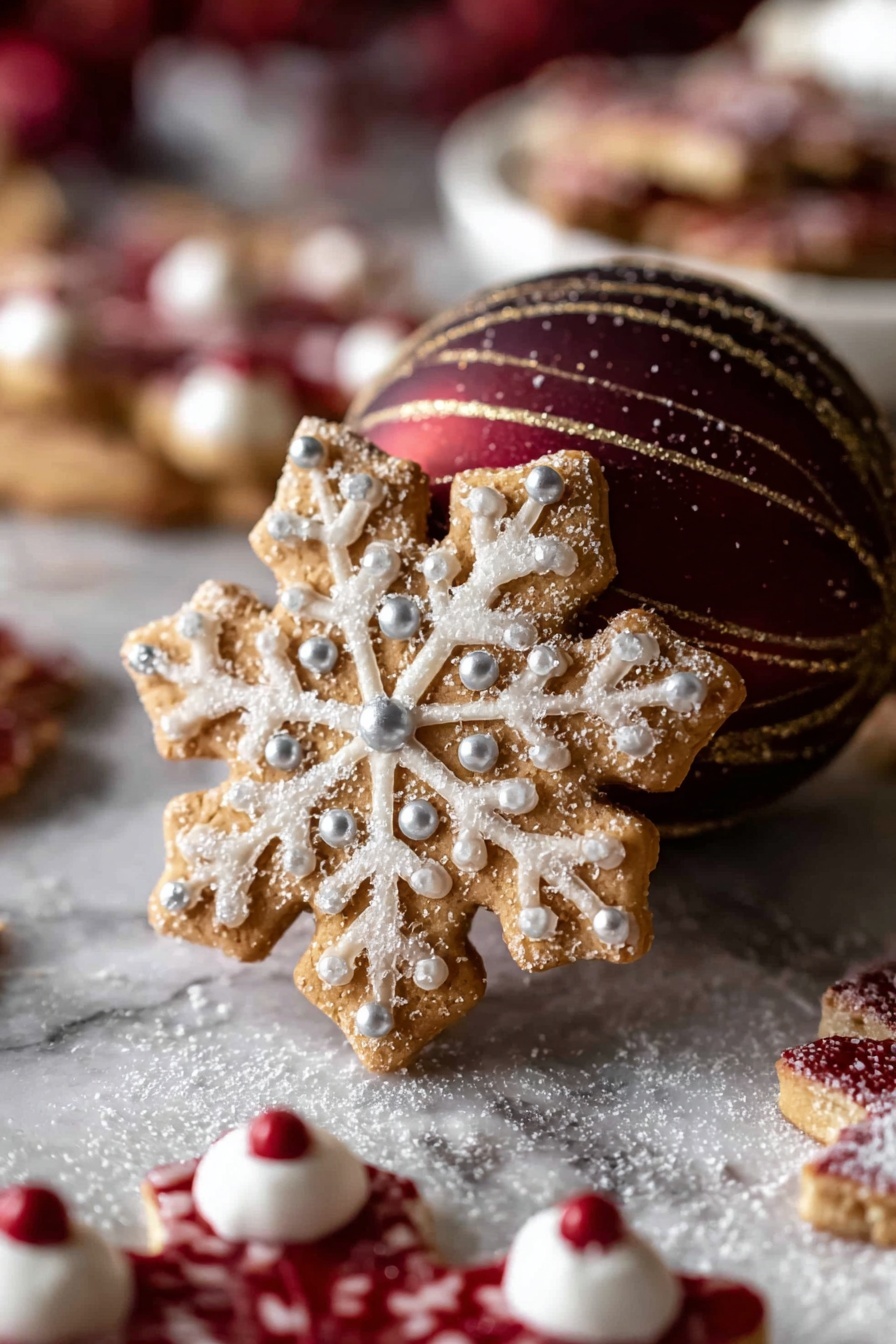
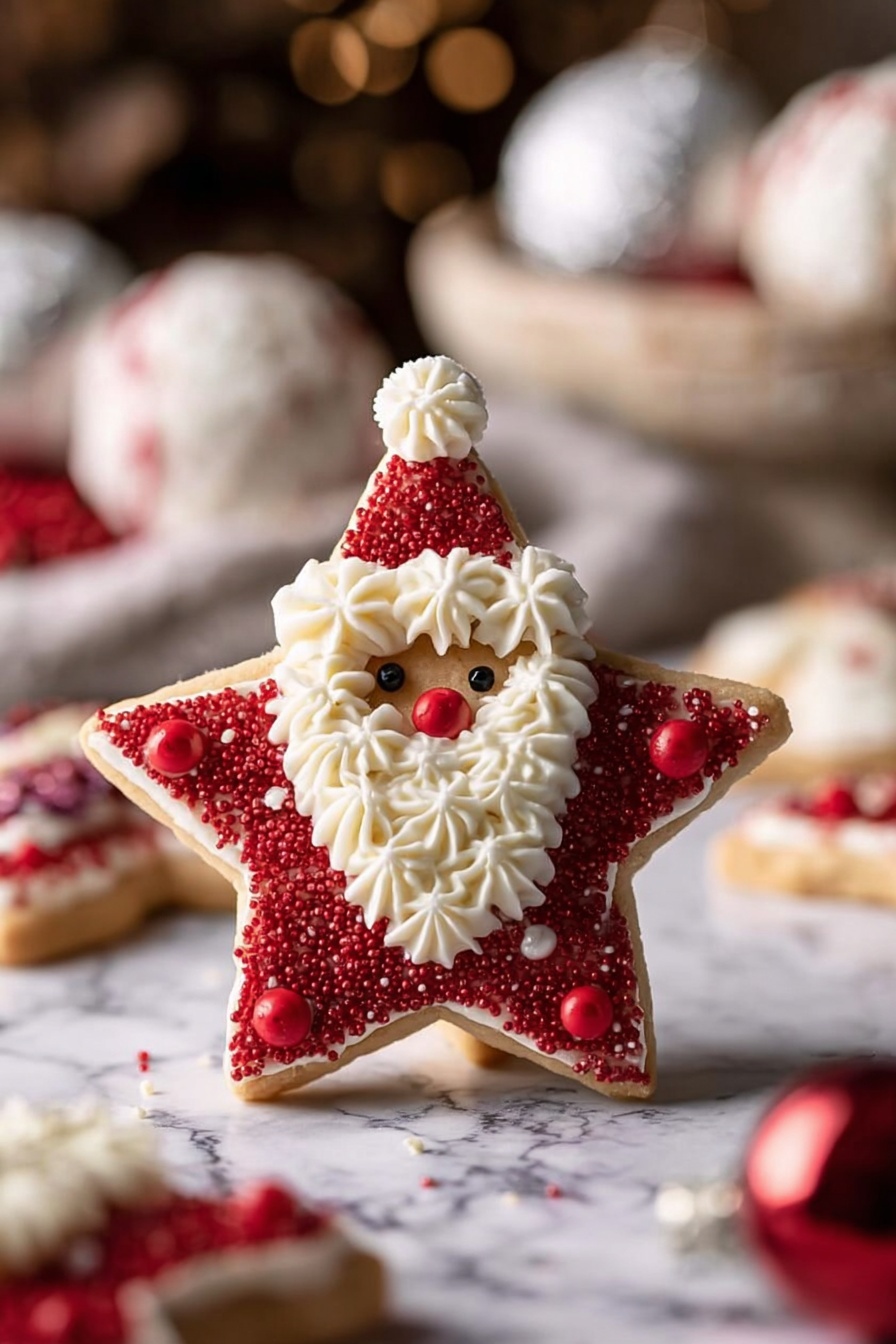
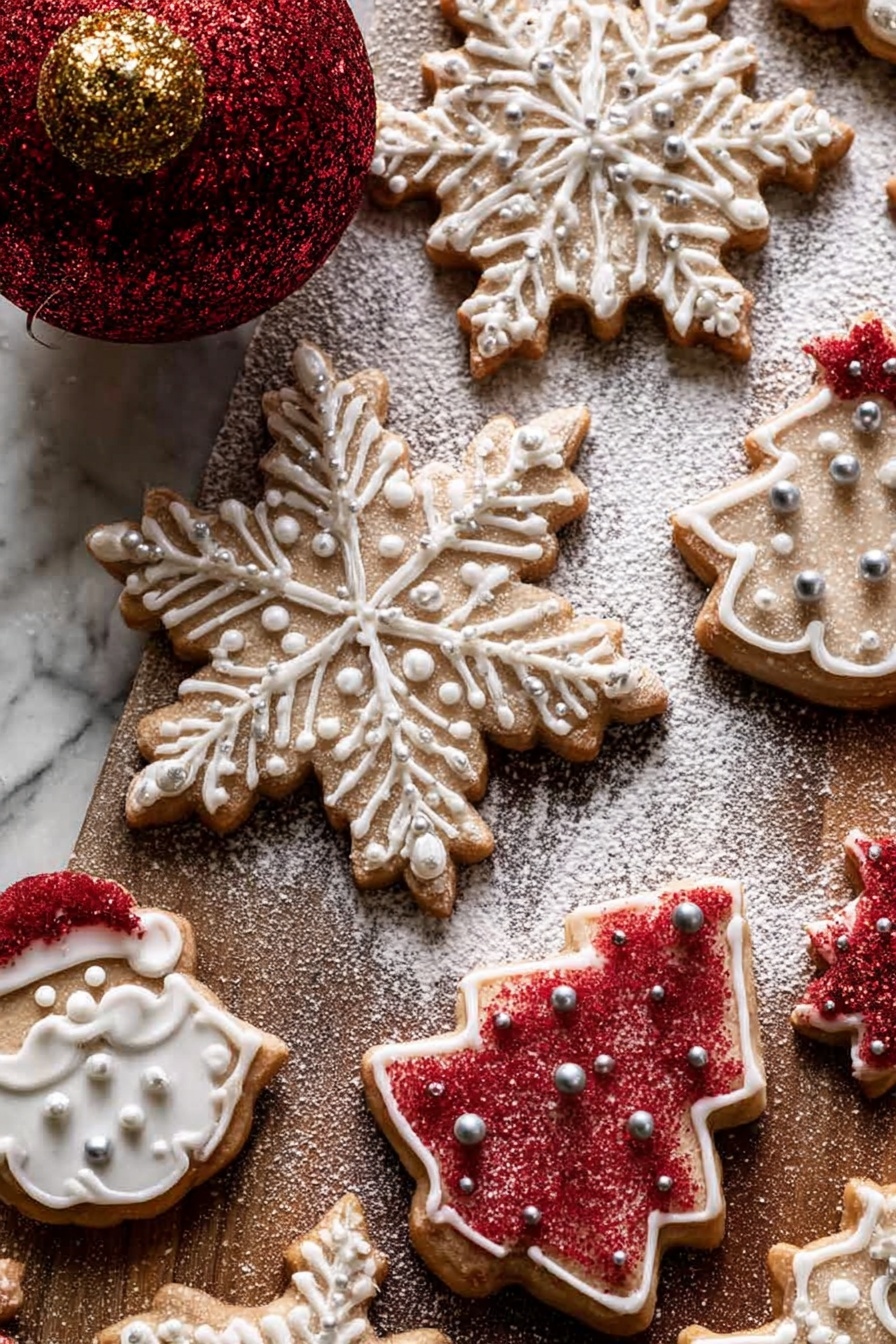
Now the fun part! Outline and fill your star-shaped cookies with the vanilla frosting, leaving a small triangle for Santa’s face. Press in red sprinkles for his suit and hat, then add tiny chocolate chips for eyes. I always use the buttercream for Santa’s beard because it’s smooth and thick—dip a piping bag or a Ziploc with a snipped corner to get the details right. For snowflakes, pipe crisp lines and dots to highlight their shapes, and sprinkle vanilla sugar on top for sparkle. Christmas trees get a base coat of vanilla frosting and a sprinkle of vanilla sugar as their festive snow dust.
Pro Tips for Making Santa Cookie Recipe with Vanilla Frosting Recipe
- Chill Your Dough Well: Freezing your unbaked cookies keeps the shapes crisp and prevents spreading during baking.
- Use Parchment Paper for Easy Handling: Rolling on parchment makes transferring cutouts onto bake sheets mess-free.
- Frosting Consistency Matters: Thicker frosting is better for piping detailed designs like Santa’s beard; thin frosting works great for filling larger areas.
- Don’t Skip Cooling Time: Decorating warm cookies will cause frosting to melt and colors to run—patience pays off!
How to Serve Santa Cookie Recipe with Vanilla Frosting Recipe
Garnishes
When serving, I love adding a sprinkle of extra vanilla sugar on top of the decorated cookies just before presenting. It catches the light beautifully and adds a subtle crunch. Mini chocolate chips or edible glitter can elevate your Santas even more—trust me, they’re little touches that make these cookies party stars!
Side Dishes
These cookies pair wonderfully with a warm drink—think creamy hot cocoa, spiced chai, or even a glass of cold milk for the traditionalists. For a festive spread, serve alongside other holiday treats like peppermint bark or gingerbread men for a cookie exchange that wows every guest.
Creative Ways to Present
I like arranging these Santa cookies on a festive platter lined with fresh pine sprigs or dusted with powdered sugar to resemble snow. Another idea? Wrap individual cookies in clear cellophane with a colorful ribbon—perfect for gifting neighbors or as party favors. If you’re feeling artsy, creating a cookie “scene” on a large board, with multiple shapes forming a Christmas village, always impresses the family.
Make Ahead and Storage
Storing Leftovers
You can keep decorated Santa cookies fresh in an airtight container at room temperature for up to a week. I usually layer parchment paper between cookies to prevent sticking and smudging. This method keeps those festive decorations intact and your cookies soft and delicious.
Freezing
I like to freeze undecorated cookie dough or baked cookies before decorating. Wrap the dough tightly or freeze fully baked cookies in a single layer in freezer bags. When you’re ready, thaw overnight in the fridge or at room temperature, then frost as usual. This trick saves time during busy holiday prep.
Reheating
If you want to enjoy your cookies warm, gently heat them in a 300°F oven for 5 minutes before frosting. For leftovers already decorated, avoid reheating as the frosting might melt. Instead, enjoy them at room temperature for the best texture and flavor.
FAQs
-
Can I make the dough ahead of time?
Absolutely! You can prepare the dough up to 2 days in advance. Wrap it tightly in plastic wrap and refrigerate. When you’re ready to bake, bring the dough to room temperature before rolling out for easier handling.
-
What if I don’t have hazelnut liquor?
No worries—it’s an optional ingredient! You can simply skip it or replace it with an extra teaspoon of vanilla extract. The cookies will still be deliciously festive.
-
How do I prevent the frosting from melting?
Always make sure your cookies are completely cool before frosting. If the cookies are warm, the frosting will melt and lose its shape. Setting cookies on a wire rack helps cool them evenly.
-
Can I use a piping bag to decorate the cookies?
Yes! I often use a small zipper bag with a tiny corner cut off as an easy, no-fuss piping bag. It’s great for detailed work like outlining Santa’s beard or snowflake patterns.
Final Thoughts
This Santa Cookie Recipe with Vanilla Frosting Recipe holds a special place in my holiday traditions—not just for the tasty cookies, but for all the laughter and creativity that go into decorating them. It’s simple enough to make with kids or friends and impressive enough to bring out at any festive gathering. Trust me, once you try these, they’ll become your go-to for every holiday season. So grab your rolling pin and frosting bag, and let’s make some memories!
Print
Santa Cookie Recipe with Vanilla Frosting Recipe
- Prep Time: 30 minutes
- Cook Time: 15 minutes
- Total Time: 45 minutes
- Yield: 22 cookies 1x
- Category: Dessert
- Method: Baking
- Cuisine: American
Description
These Santa Clause Cookies are delightful holiday treats featuring tender buttery sugar cookies decorated with vanilla frosting, buttercream, and sprinkles to resemble festive Christmas shapes like stars, snowflakes, and Christmas trees. The dough is easy to prepare with a subtle hint of hazelnut liquor for extra depth, and the frosting options allow for beautiful, creative decorating perfect for holiday celebrations.
Ingredients
Cookie Dough
- 1 1/2 sticks (3/4 cup) salted butter, at room temperature
- 3/4 cup packed light brown sugar
- 1 tablespoon hazelnut liquor (optional)
- 2 teaspoons vanilla extract
- 1 egg, at room temperature
- 2 cups all-purpose flour, plus an additional 2-4 tablespoons if needed
- 1/2 teaspoon baking soda
- 1/2 teaspoon kosher salt
Vanilla Frosting
- 2 cups powdered sugar
- Assorted sprinkles, vanilla sugar, and/or sanding sugar, for decorating
Vanilla Buttercream
- 1 stick (8 tablespoons) salted butter, at room temperature
- 2 ounces cream cheese, at room temperature (optional)
- 1 1/2 cups powdered sugar
Instructions
- Mix the Dough: In a large mixing bowl, cream together the butter and brown sugar until light and fluffy, about 1 minute. Add hazelnut liquor (if using) and vanilla extract and beat to combine. Add the egg and mix until fully incorporated. Gradually add flour, baking soda, and kosher salt and beat until dough forms a ball. If dough feels too wet for rolling, add 2-4 tablespoons more flour.
- Roll and Cut Cookies: Divide the dough in half. On a floured piece of parchment paper, roll out one half of the dough to about 1/4 inch thickness using sufficient flour to prevent sticking. Use cookie cutters (snowflakes, stars, Christmas trees, or other festive shapes) to cut shapes. Use a floured spatula to carefully transfer cookies to a parchment-lined baking sheet. Cover the baking sheet and freeze cookies until firm, about 20-30 minutes. Repeat rolling and cutting with leftover dough scraps.
- Bake the Cookies: Preheat your oven to 350°F (175°C). Bake the frozen cookies on the middle rack for 8-10 minutes or until just lightly golden around the edges. Let cool on the baking sheet for 5 minutes, then transfer to a wire rack to cool completely.
- Prepare Vanilla Frosting: In a medium bowl, beat together powdered sugar, hazelnut liquor (if using), vanilla extract, and 1 tablespoon water until smooth and drizzly. Add additional water 1 tablespoon at a time if needed to achieve drizzly consistency suitable for glazing.
- Make Vanilla Buttercream: In a bowl, beat butter and cream cheese together until light and fluffy, about 3-4 minutes. Add powdered sugar and vanilla extract; continue beating for an additional 2 minutes until whipped and creamy.
- Decorate Cookies: Using a piping bag or a small Ziploc bag with the tip snipped off, pipe vanilla frosting onto cookies. For Santa cookies, outline and fill a star-shaped cookie leaving one triangle unfilled for the face. Sprinkle red sanding sugar or sprinkles for the body and hat. Press mini chocolate chips for eyes and pipe buttercream for the beard. Add a red sprinkle for the nose. For snowflakes, pipe lines and dots to enhance shape and sprinkle with vanilla sugar if desired. For Christmas trees, fill the cookie with vanilla frosting then sprinkle with vanilla sugar. Allow frosting to set about an hour before serving.
Notes
- To pipe frosting, use a small sandwich-size Ziploc bag or a piping bag; snip a tiny bit off the corner for controlled piping.
- Vanilla sugar can be made by mixing 1/4 cup granulated sugar with 1/2 teaspoon vanilla bean powder or seeds from half a vanilla bean.
- If the dough is sticky, add additional flour gradually to achieve a manageable texture for rolling.
- Freezing cookies before baking helps them retain their shape and bake evenly.
- Buttercream frosting is optional but adds great texture and flavor contrast to the vanilla glaze.
Nutrition
- Serving Size: 1 cookie
- Calories: 150
- Sugar: 14g
- Sodium: 90mg
- Fat: 8g
- Saturated Fat: 4.5g
- Unsaturated Fat: 2.5g
- Trans Fat: 0g
- Carbohydrates: 18g
- Fiber: 0.5g
- Protein: 1.5g
- Cholesterol: 25mg


