If you’re looking for a cookie that perfectly captures the festive spirit with a cozy twist, you absolutely have to try this Vanilla Eggnog Cookie Recipe. I discovered this gem a few holiday seasons ago, and it quickly became my go-to for cookie exchanges, family gatherings, and just because moments. The warm vanilla notes combined with subtle eggnog spices make these cookies something truly special—and once you bake a batch, I promise you’ll agree they’re fan-freaking-tastic!
Why You’ll Love This Recipe
- Rich & Comforting Flavor: The brown sugar and warm spices combined with vanilla and eggnog create a cozy holiday treat you’ll crave all season.
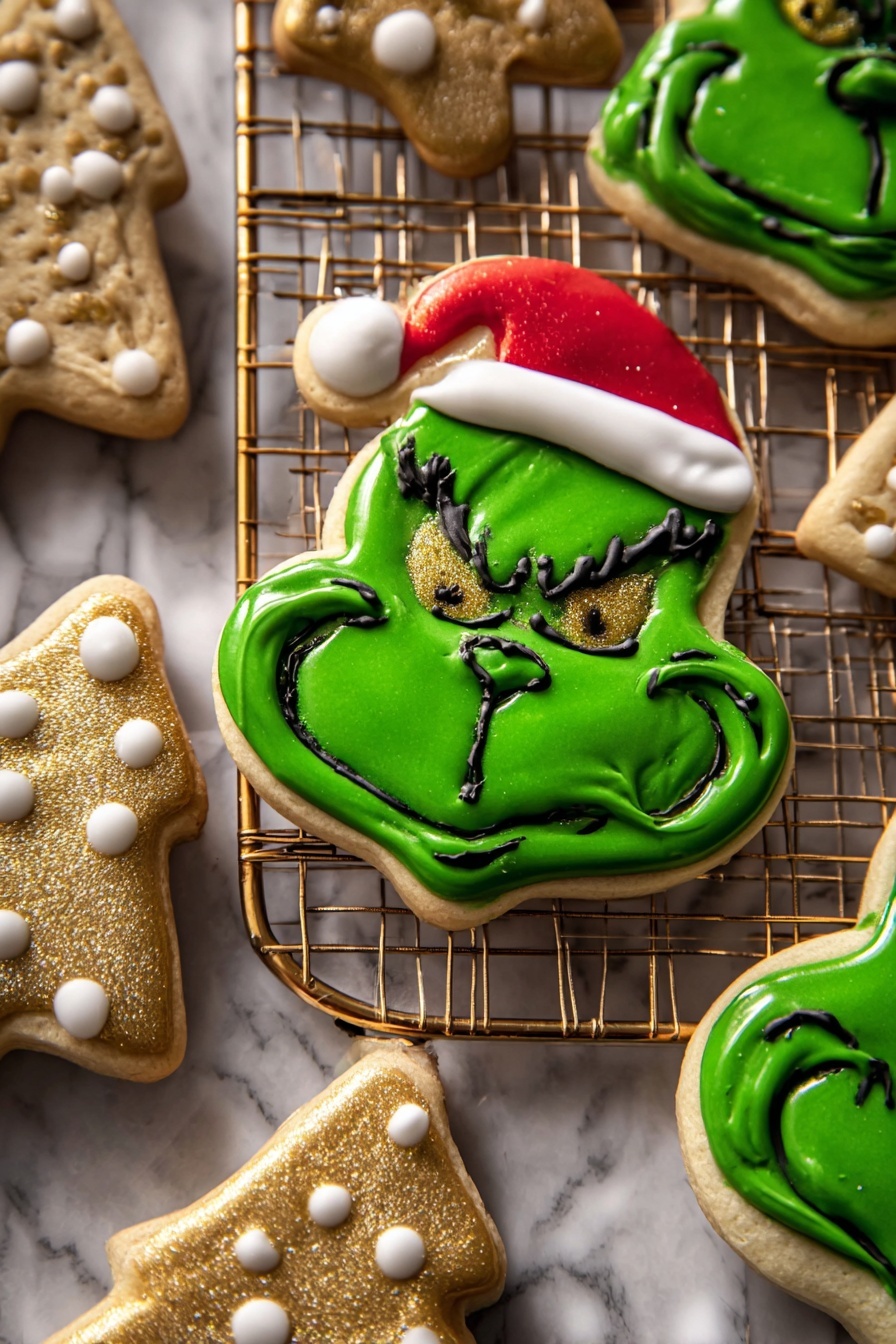
- Fun to Decorate: Whether snowflakes or Grinch shapes, decorating these cookies with spiced vanilla icing is half the joy.
- Perfect Texture: Soft yet sturdy enough to hold their shape, these cookies bake up just right every time—no guesswork.
- Great for Gift-Giving: They store well and freeze beautifully, making them perfect for holiday cookie tins or last-minute desserts.

Ingredients You’ll Need
I love how the ingredients all work together to create that signature vanilla eggnog flavor with a little boozy warmth (if you choose!). Plus, you probably have most of these in your pantry already, which makes this recipe even more inviting. A few tips along the way will help you shop smarter and bake with confidence.
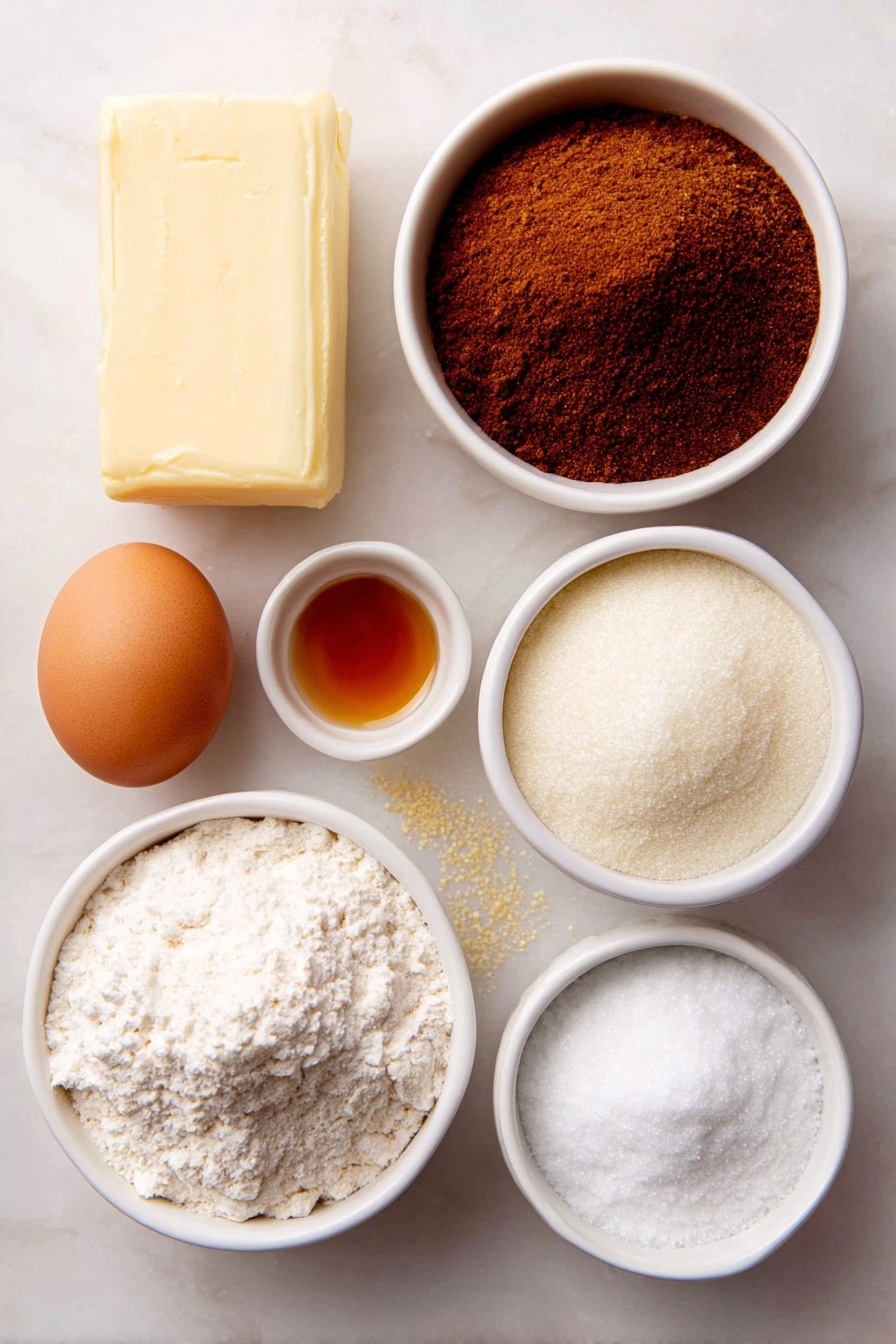
- Salted Butter: Make sure it’s softened to room temperature for easy mixing and perfect dough texture.
- Brown Sugar: I use packed brown sugar for that luscious molasses note; it really brings depth to the flavor.
- Egg: Use a room temperature egg to help the dough bind smoothly without getting tough.
- Bourbon (optional): This adds that perfect warm kick, but feel free to skip it if you prefer a non-alcoholic version.
- Vanilla Extract: Pure vanilla is a must here to highlight the eggnog flavor.
- All-Purpose Flour: You might need a little extra flour for rolling, so keep some on hand if your dough feels sticky.
- Cinnamon and Nutmeg: These spices bring authentic eggnog warmth; freshly grated nutmeg will really shine.
- Baking Soda: For just the right amount of lift—don’t skip this!
- Kosher Salt: A pinch balances all the sweetness and deepens the overall flavor.
- Powdered Sugar: For the spiced vanilla icing, which is a real crowd-pleaser when drizzled or piped on top.
- Eggnog: Enhances the glaze’s flavor—but milk or water works if you need a substitute.
- Decorations: I love edible gold dust and vanilla sugar for that extra festive sparkle.
Variations
While I adore the classic vanilla eggnog version, I like to switch things up depending on the occasion or who I’m baking for. Feel free to add your own twist to make this cookie recipe uniquely yours.
- Boozy or No Booze: When I first made these, I left out the bourbon to keep them kid-friendly—and honestly, the cookies were still deliciously festive.
- Gluten-Free Version: I’ve swapped the flour for a blend of gluten-free all-purpose flour with good results, though the texture is a bit more delicate.
- Spice it Up: Adding a pinch of ground cloves or ginger can give the cookies a subtle holiday kick, perfect if you love complex spice notes.
- Decorating Styles: Sometimes, I use colored royal icing or even dip half the cookie in melted white chocolate for a fancy touch.
How to Make Vanilla Eggnog Cookie Recipe
Step 1: Cream Butter and Sugar Until Fluffy
Start by beating the softened butter and brown sugar in a large bowl. I like to use a stand mixer for this part because it really gets the mixture light and fluffy, which helps create a tender cookie. Once combined, add your room temperature egg, then mix in the bourbon (if you’re using it) and vanilla extract. This step builds the flavor foundation, so don’t rush it!
Step 2: Incorporate Dry Ingredients to Form Dough
Next, whisk together the flour, cinnamon, nutmeg, baking soda, and salt in a separate bowl. Gradually add these dry ingredients to your wet mixture, beating just until combined. The dough should come together as a soft ball. If it feels too sticky to roll, sprinkle on an extra 2 to 4 tablespoons of flour—this little trick helped me avoid frustration several times!
Step 3: Roll, Cut, and Chill the Cookies
Divide your dough in half for easier handling. Roll each half out on a floured piece of parchment paper to about 1/4 inch thick. Trust me, using enough flour prevents sticking and tears. Now comes the fun part—cutting out your favorite holiday shapes. I adore snowflakes and Christmas trees for aesthetics, but the Grinch shape is always a hit at parties! Transfer your cut cookies to a parchment-lined baking sheet, then pop the sheet into the freezer for about 15 minutes to firm up the dough. This step keeps your cookies beautifully shaped while baking.
Step 4: Bake to Perfection
Bake the cookies at 350°F (175°C) on the middle rack for 8 to 10 minutes, until they’re just starting to turn golden around the edges. I like to watch carefully in those last couple minutes because overbaking can dry them out. Once baked, let the cookies cool completely on the sheet before moving on to decorating.
Step 5: Whip Up the Spiced Vanilla Icing
While your cookies cool, prepare the icing by whisking powdered sugar with vanilla and grated nutmeg in a medium bowl. Add eggnog (or milk/water) a tablespoon at a time until the glaze is smooth and pourable but not too runny. This icing is magic—you’ll want to drizzle or pipe it on for that perfect finishing touch.
Step 6: Decorate and Enjoy
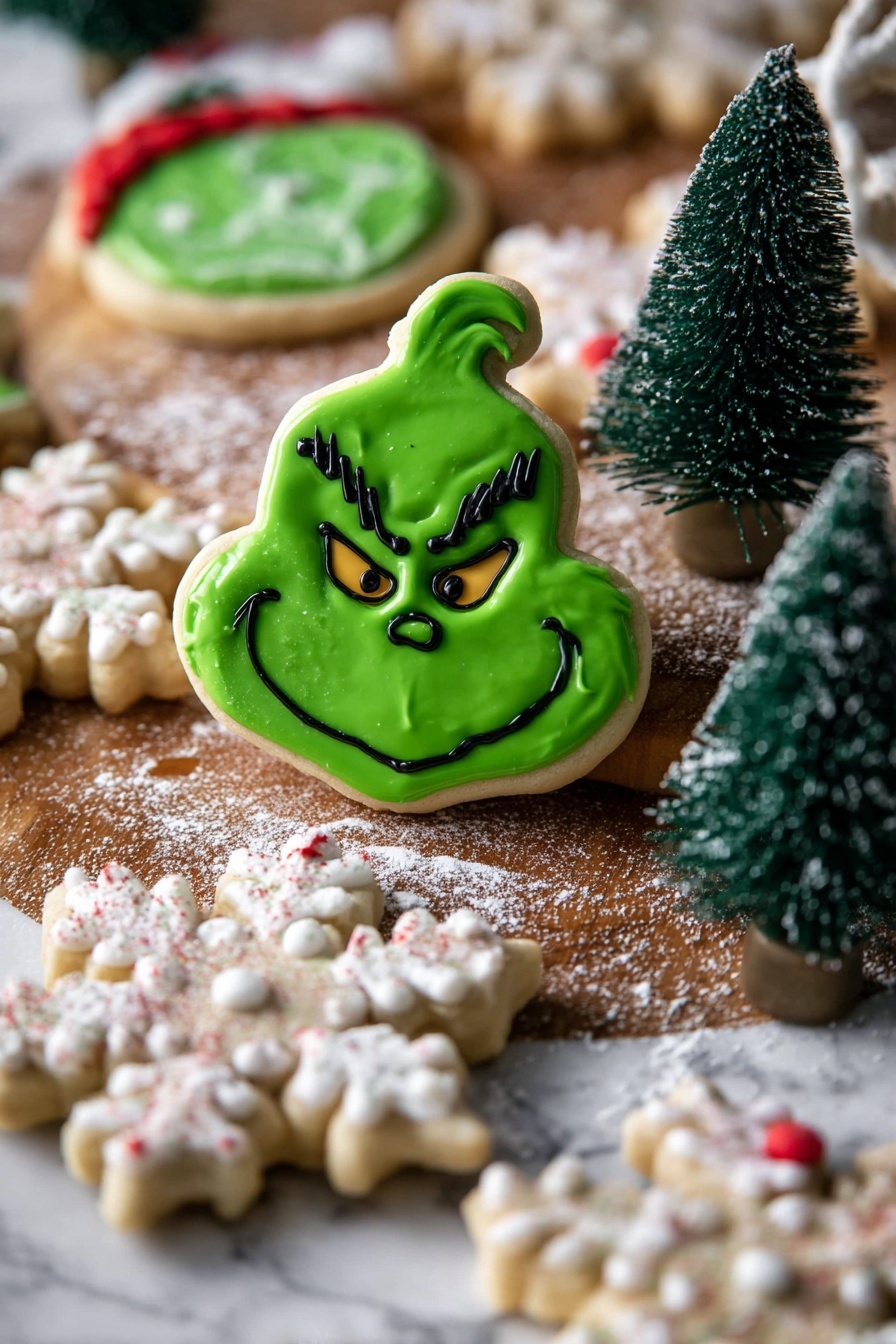
Use a spoon or piping bag to decorate your cookies. For snowflakes, I pipe lines and dots to amplify the shape; sprinkle with vanilla sugar for sparkle. Christmas trees get filled in with icing and then a dusting of vanilla sugar on top. For my favorite Grinch cookies, I get creative with edible gold dust for eyes and colored icing for details. Let the icing set for about an hour before serving.
Pro Tips for Making Vanilla Eggnog Cookie Recipe
- Room Temperature Ingredients: Always use room temperature butter and eggs to ensure your dough mixes evenly without lumps.
- Chilling is Key: Don’t skip the freeze time before baking—this prevents your cutouts from spreading and losing their shape.
- Flour Your Surface Well: I learned the hard way that a little extra flour on parchment keeps the dough from sticking and tearing when rolling and cutting.
- Go Easy on Baking Time: Pull cookies as soon as edges turn light golden—overbaking will make them dry and tough.
How to Serve Vanilla Eggnog Cookie Recipe
Garnishes
I usually keep things simple and elegant with a dusting of vanilla sugar or a sprinkle of edible gold dust. They add just the right amount of sparkle without overwhelming the delicate vanilla and eggnog flavors. For special occasions, I like to pipe additional pop of white icing or add tiny festive sprinkles to make them extra joyful.
Side Dishes
These cookies pair beautifully with a warm cup of spiced cider or a mug of rich hot chocolate. Around the holidays, I often set them out with a cheese board featuring creamy brie and tangy dried fruits for a little sweet-savory balance. Trust me, it’s a crowd-pleasing combo!
Creative Ways to Present
For holiday parties, I love arranging these cookies on a tiered platter with fresh pine sprigs and cranberries for a festive look. Wrapping them in clear cellophane with a pretty ribbon turns them into the perfect gift. Another fun idea: stack a few and tie with twine alongside a mini bottle of eggnog for a DIY cookie gift set.
Make Ahead and Storage
Storing Leftovers
I store these cookies in an airtight container layered with parchment paper to keep them fresh and prevent sticking. They stay soft and flavorful for up to a week this way, which is great when you’re making a big batch for gatherings.
Freezing
If you want to prepare these cookies in advance, freeze the unbaked cutouts on a lined baking sheet, then transfer them to a freezer bag. When you’re ready, bake straight from the freezer adding an extra minute or two to the baking time. Once baked and decorated, you can also freeze the iced cookies in a single layer with parchment between each and thaw at room temperature before serving.
Reheating
These cookies are best enjoyed at room temperature, but if you prefer them warm, pop one or two in the microwave for about 10 seconds. Just be careful not to overheat or the icing might soften or melt. I usually warm milk or eggnog alongside to sip while enjoying the warm cookie—it feels like a tiny holiday celebration.
FAQs
-
Can I make this Vanilla Eggnog Cookie Recipe without alcohol?
Absolutely! The bourbon is optional and can easily be omitted if you prefer a non-alcoholic version or are baking for children. The vanilla and spices provide plenty of flavor on their own.
-
How do I prevent my cookies from spreading?
Freezing the cut-out dough on the baking sheet for at least 15 minutes before baking is key. Also, avoid over-creaming the butter and sugar, and make sure not to add too much liquid during mixing.
-
Can I use regular sugar instead of brown sugar?
While you could, the brown sugar is important for adding that rich molasses flavor and moisture that make these cookies soft and flavorful. If needed, substitute with half white sugar and half molasses instead.
-
How long does the vanilla icing take to set?
It generally takes about an hour at room temperature for the spiced vanilla icing to set fully, so plan accordingly if prepping ahead.
Final Thoughts
This Vanilla Eggnog Cookie Recipe holds a special place in my heart, especially when the holiday season rolls around. Baking these with my family turns into a joyful tradition full of laughter, sweet scents, and creative decorating moments. You’ll enjoy how approachable the recipe is and how stunning the cookies look and taste. I hope you’ll give this one a try—it’s truly a delicious way to make memories and fill your home with festive warmth.
Print
Vanilla Eggnog Cookie Recipe
- Prep Time: 50 minutes
- Cook Time: 10 minutes
- Total Time: 1 hour 15 minutes
- Yield: 22 cookies 1x
- Category: Dessert
- Method: Baking
- Cuisine: American
Description
These Vanilla Brown Sugar Eggnog Cookies are a festive and flavorful holiday treat featuring a rich brown sugar dough infused with bourbon and warm spices, topped with a smooth spiced vanilla icing. Perfect for Christmas celebrations, the cookies can be cut into fun shapes like snowflakes, Christmas trees, and the Grinch, then decorated beautifully with icing, edible gold dust, and sprinkles.
Ingredients
Cookie Dough
- 1 1/2 sticks (3/4 cup) salted butter, at room temperature
- 3/4 cup packed brown sugar
- 1 egg, at room temperature
- 2 tablespoons bourbon (optional)
- 2 teaspoons vanilla extract
- 2 cups all-purpose flour, plus an additional 2-4 tablespoons if needed
- 1/2 teaspoon cinnamon
- 1/4 teaspoon grated nutmeg
- 1/2 teaspoon baking soda
- 1/2 teaspoon kosher salt
Spiced Vanilla Icing
- 2 cups powdered sugar
- 1 tablespoon vanilla extract
- 1/4 teaspoon grated nutmeg or cinnamon
- 1/2 cup eggnog (or use milk or water)
- Edible gold dust, vanilla sugar, and/or sprinkles for decorating
Instructions
- Make the Dough: In a large mixing bowl, beat together the room temperature butter and brown sugar until creamy. Add the egg and mix until well combined. Beat in the bourbon (if using) and vanilla extract. Add the flour, cinnamon, nutmeg, baking soda, and kosher salt, and continue to beat until the dough forms a cohesive ball. If the dough feels too wet to roll out, gradually mix in 2-4 tablespoons more flour until it is manageable.
- Prepare for Baking: Preheat your oven to 350°F (175°C). Line a baking sheet with parchment paper to prevent sticking and ensure even baking.
- Roll and Cut the Cookies: Divide the dough in half. On a floured piece of parchment paper, roll out the dough to approximately 1/4 inch thickness. Use holiday-themed cookie cutters such as Christmas trees, snowflakes, and the Grinch to cut shapes from the dough. Use a floured spatula to carefully transfer the cookies to the parchment-lined baking sheet. Cover the baking sheet and freeze the cookies for 15 minutes to firm up the dough, which helps maintain shape during baking. Roll out leftover scraps and repeat cutting as needed.
- Bake the Cookies: Place the baking sheet on the middle rack of the oven and bake the cookies for 8-10 minutes, or until they are just lightly golden around the edges. Remove from oven and allow to cool completely.
- Prepare the Spiced Vanilla Icing: In a medium bowl, whisk together the powdered sugar, vanilla extract, and grated nutmeg. Gradually add 1 tablespoon of eggnog (or milk/water) at a time, whisking until the icing is smooth and drizzly. Add more liquid if necessary to reach desired consistency.
- Decorate the Cookies: Use a piping bag or a Ziploc bag with a small corner snipped off to pipe the icing onto cooled cookies. Decorate with sprinkles, vanilla sugar, or edible gold dust as desired. For snowflake cookies, pipe lines and dots to enhance the design. For Christmas trees, fill in the shape with icing and sprinkle with vanilla sugar. For the Grinch, use edible gold dust for the eyes and add details like eyebrows and mouth with dyed icing. Allow the icing to set completely, about one hour, before serving.
Notes
- To pipe frosting onto cookies, place frosting in a small sandwich-size Ziploc bag or piping bag and snip a very small corner for controlled icing application.
- Vanilla Sugar can be made by mixing 1/4 cup granulated sugar with 1/2 teaspoon vanilla bean powder or the seeds from half a vanilla bean.
- Use holiday-themed cookie cutters such as snowflakes, Christmas trees, and the Grinch for festive shapes.
- Freezing the cut-out cookies before baking helps the shapes keep their detail.
Nutrition
- Serving Size: 1 cookie
- Calories: 150
- Sugar: 12g
- Sodium: 110mg
- Fat: 7g
- Saturated Fat: 4g
- Unsaturated Fat: 3g
- Trans Fat: 0g
- Carbohydrates: 21g
- Fiber: 0.5g
- Protein: 2g
- Cholesterol: 25mg
