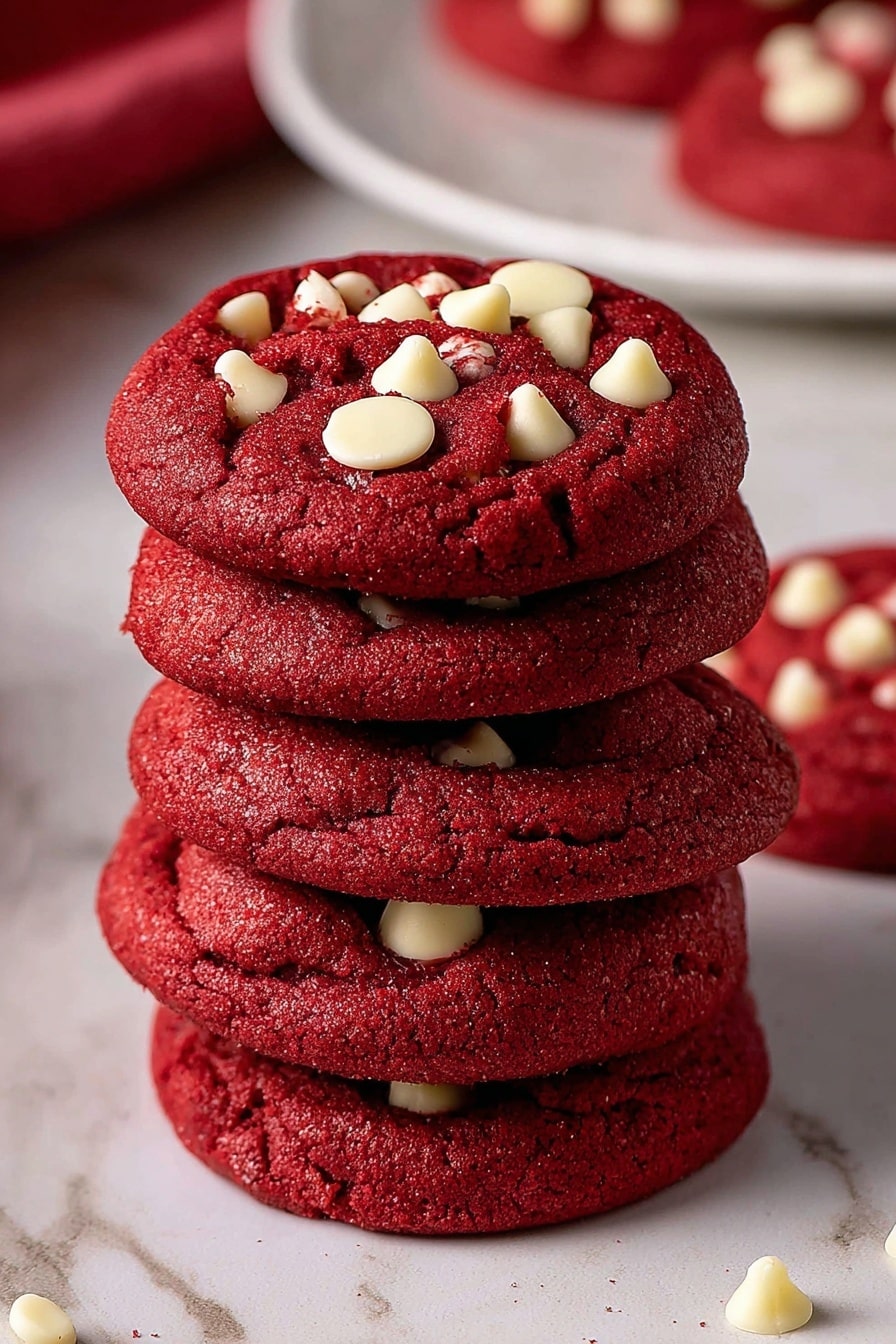
If you’re anything like me, you love a cookie that’s both visually stunning and absolutely delicious — that’s why this Red Velvet White Chocolate Cookies Recipe has become a go-to in my kitchen. It combines the classic rich, velvety flavor of red velvet with the sweet creaminess of white chocolate chunks, and trust me, once you try these, you’ll see why my family goes crazy for them. They’re soft, chewy, and colorful enough to brighten up any cookie tray or afternoon coffee break.
Why You’ll Love This Recipe
- Perfect Balance: The deep red cocoa flavor meets creamy white chocolate in every bite for a unique twist on traditional cookies.
- Soft & Chewy Texture: I love how these cookies stay tender inside, with just a slight crisp on the edges.
- Simple Ingredients: No fancy elements here, just pantry staples combined for a spectacular treat.
- Highly Customizable: You can tweak add-ins or swap white chocolate for other mix-ins depending on what you have on hand.

Ingredients You’ll Need
The magic of this Red Velvet White Chocolate Cookies Recipe really lies in a few simple, high-quality ingredients that work together to create those soft, colorful cookies you want to bake again and again. I recommend using real cocoa powder and a good quality white chocolate for the best flavor.
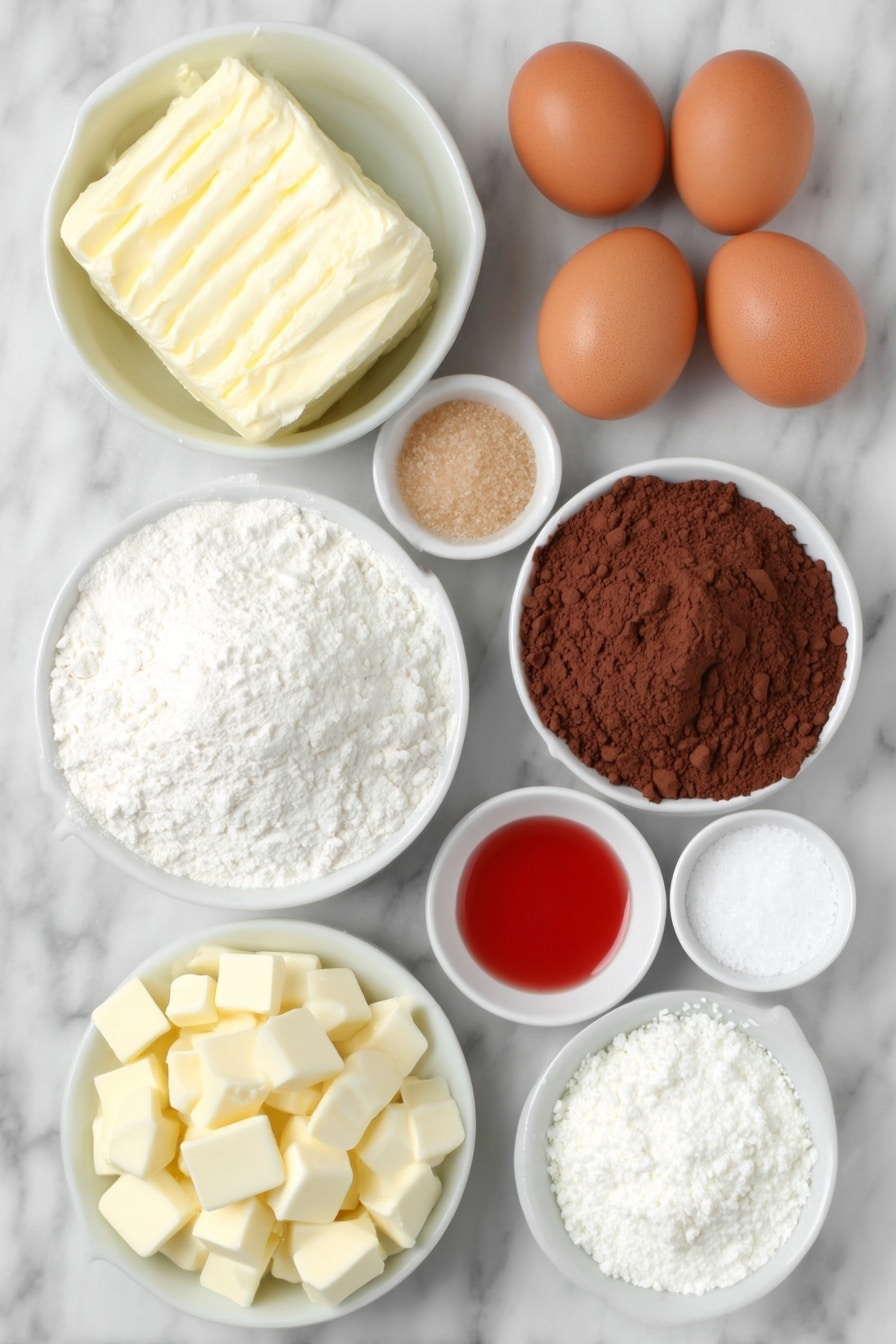
- Unsalted Butter: Softened to room temperature to easily cream with the sugars, giving the cookies that soft texture.
- Light Brown Sugar: Adds moisture and a subtle caramel note, helping keep the cookies chewy.
- Granulated Sugar: For sweetness and a touch of crispness on the edges.
- Large Eggs: I like to use them at room temp so the dough comes together smoothly.
- Vanilla Extract: Enhances the flavor with a warm note that balances the cocoa and red velvet taste.
- Red Food Coloring: This gives those cookies their iconic red hue — gel coloring works best for vibrant color without thinning the dough.
- All-Purpose Flour: The base of the dough, providing structure without toughness.
- Natural Cocoa Powder: Unsweetened cocoa powder is key for that classic red velvet flavor.
- Baking Soda: Helps the cookies rise and spread just right.
- Salt: Balances sweetness and enhances all those flavors.
- White Chocolate: Chopped into chunks or chips, these pockets of sweetness are what make these cookies extra special.
Variations
One of the things I really enjoy about this Red Velvet White Chocolate Cookies Recipe is how easy it is to customize. You can go classic, or give it your own spin depending on what you have in your pantry or how adventurous you’re feeling.
- White Chocolate & Macadamia Nuts: I once added toasted macadamia nuts and the crunch paired beautifully with the creamy white chocolate.
- Dairy-Free Version: Use dairy-free butter and white chocolate chips made from coconut milk to make these vegan-friendly.
- Red Velvet with Dark Chocolate Chips: For a deeper chocolate taste, swap white chocolate pieces with bittersweet chips—my chocolate-loving friends rave about this.
- Spiced Red Velvet: Add a pinch of cinnamon or chili powder to the dry mix for an unexpected warmth that really woke up my taste buds!
How to Make Red Velvet White Chocolate Cookies Recipe
Step 1: Prepping for Success
Start by preheating your oven to 350°F (175°C). Line a large baking sheet with a silicone mat or parchment paper — this prevents sticking and helps the bottoms stay soft rather than crunchy. It’s a simple step, but one that pays off every single time. I always make sure my butter is at room temperature before mixing; it creams more easily, which leads to that nice airy base for the dough.
Step 2: Cream Butter and Sugars
Using a hand mixer or stand mixer, cream together the softened butter with both the light brown sugar and granulated sugar. Beat on medium speed until the mixture looks light and fluffy, about 2 minutes. This aeration step is where your cookies get that amazing texture, so don’t rush it!
Step 3: Add Eggs, Vanilla & Color
Next, crack in the eggs one at a time, beating on low speed to keep the batter smooth but not overworked. Mix in the vanilla extract. Now for some fun: add the red food coloring and mix until the color is fully incorporated and vibrant. Gel food coloring works best here so you don’t add too much liquid.
Step 4: Combine Dry Ingredients
In a separate bowl, whisk together all-purpose flour, natural cocoa powder, baking soda, and salt. This ensures the cocoa and leavening agents are evenly distributed and prevents clumps in the cookie dough. I’ve learned the hard way that skipping this can make the texture uneven.
Step 5: Mix Wet and Dry Ingredients
Slowly add the dry ingredients into the wet mixture and beat just until combined — don’t overmix or you’ll end up with tough cookies. Then fold in about 1¼ cups of chopped white chocolate; these little pockets of sweetness are what make the cookies truly special. Save the remaining white chocolate to press on top before baking for that beautiful glossy finish.
Step 6: Shape and Bake
Use a medium cookie scoop or spoon to portion out 1.5 to 2 tablespoons of cookie dough. Roll each into a smooth ball with your hands — this helps keep the edges even and leads to prettier cookies. Place them spaced about 2 inches apart on your prepared baking sheet. Bake for 8-11 minutes. You want them slightly underdone and soft in the middle for the perfect chewy bite. After a minute out of the oven, gently press the reserved white chocolate pieces into each cookie for a gorgeous melty top.
Step 7: Cool and Enjoy
Let the cookies rest on the baking sheet for 5 minutes – this is key because they firm up a bit during cooling. Then transfer them to a wire rack to cool completely. If you sneak one warm (like I do), you’ll get a little melted white chocolate heaven!
Pro Tips for Making Red Velvet White Chocolate Cookies Recipe
- Use Gel Food Coloring: It gives you a vivid red without adding too much liquid, keeping your dough the perfect consistency.
- Don’t Overmix Dry Ingredients: Overmixing can make your cookies tough; mix just until the flour disappears.
- Roll Dough Balls by Hand: Rolling the dough gives the cookies their smooth edges and even shape, which really makes a difference in appearance.
- Monitor the Bake Time Closely: Aim for slightly underdone centers to keep cookies soft and chewy—you’ll thank me later!
How to Serve Red Velvet White Chocolate Cookies Recipe
Garnishes
I like to serve these cookies just as they are — those white chocolate chunks really shine on their own. But for a festive touch, especially around the holidays, sprinkling a pinch of coarse white sugar or edible glitter over the top before baking adds a little sparkle. You might also try a dusting of powdered sugar if you want a snowy look.
Side Dishes
These cookies are fantastic paired with a cold glass of milk or a cup of rich dark coffee. When I serve them at brunch, I’ll often throw out some fresh berries or a scoop of vanilla ice cream for a seriously indulgent combo that everyone appreciates.
Creative Ways to Present
For special occasions, I like to stack them in a clear glass jar tied with a red ribbon — they make such a pretty gift or centerpiece. You can also layer them between wax paper in colorful tins for a charming homemade gift idea. And if you’re feeling extra festive, drizzle a little melted white chocolate over the cooled cookies and add some festive sprinkles for a party-ready look.
Make Ahead and Storage
Storing Leftovers
Whenever we have leftovers (which doesn’t happen often!), I store them in an airtight container at room temperature, and they stay perfectly soft for about 3 days. If you want them to last longer, refrigerate for up to a week, but keep in mind they might lose some of that softness over time. I usually take them out a few minutes before serving to warm up slightly.
Freezing
I’ve had great success freezing the cookie dough balls before baking. Scoop the dough onto a lined baking sheet, freeze until firm (about 1-2 hours), then transfer the balls to a freezer bag. They’ll keep for up to 3 months. When you want fresh cookies, just thaw them in the fridge overnight and bake as usual — you’ll get that fresh-baked feeling any time!
Reheating
To reheat leftover cookies, I pop them in a microwave for about 10-15 seconds or warm them in a 300°F oven for 5 minutes. This refreshes the softness and slightly melts the white chocolate again — trust me, it’s worth the extra step.
FAQs
-
Can I use regular chocolate chips instead of white chocolate?
Absolutely! If you prefer milk or dark chocolate, you can swap out the white chocolate for your favorites. Just keep in mind it will change the flavor profile, making the cookie richer and less sweet.
-
Why are my red velvet cookies not red enough?
Using gel food coloring instead of liquid helps achieve a vibrant red color without thinning your dough. Also, some cocoa powders can darken the dough, so natural unsweetened cocoa powder is best.
-
Can I make this recipe gluten-free?
Yes! You can substitute the all-purpose flour with a gluten-free all-purpose blend that includes xanthan gum. Just be mindful that texture might vary slightly, but the cookies will still taste wonderful.
-
How can I tell when the cookies are done?
Look for edges that are just starting to brown with centers still soft and slightly underbaked. They’ll firm up as they cool, giving you that perfect chewy texture.
Final Thoughts
I absolutely love how this Red Velvet White Chocolate Cookies Recipe comes together so effortlessly yet delivers such incredible flavor and texture. When I first tried this recipe, I was surprised by how simple tweaks—like rolling the dough balls by hand and pressing extra white chocolate on top—made all the difference. I hope you enjoy baking and sharing these as much as I do with my family and friends. Go ahead and give it a try—you’ll be so glad you did!
Print
Red Velvet White Chocolate Cookies Recipe
- Prep Time: 15 minutes
- Cook Time: 10 minutes
- Total Time: 25 minutes
- Yield: 24–27 cookies 1x
- Category: Dessert
- Method: Baking
- Cuisine: American
Description
Delightfully soft and chewy Red Velvet Cookies bursting with rich cocoa flavor and creamy white chocolate chunks. These cookies feature a classic red velvet taste with a moist, tender texture, perfect for any occasion or holiday treat.
Ingredients
Wet Ingredients
- 1 cup unsalted butter, softened to room temperature
- ¾ cup light brown sugar, packed
- ½ cup granulated sugar
- 2 large eggs
- 2 teaspoons vanilla extract
- 1 tablespoon red food coloring
Dry Ingredients
- 2 ¾ cups all-purpose flour
- ¼ cup natural cocoa powder
- 1 teaspoon baking soda
- ¼ teaspoon salt
Add-ins
- 1 ½ cups white chocolate, chopped (or white chocolate chips)
Instructions
- Preheat Oven and Prepare Baking Tray: Preheat your oven to 350°F (175°C). Line a large half sheet baking tray with a silicone baking mat or parchment paper to ensure the cookies don’t stick and for easy cleanup.
- Cream Butter and Sugars: In a large mixing bowl, use a hand mixer or stand mixer to cream together the softened butter, light brown sugar, and granulated sugar on medium speed until the mixture is light and fluffy, which should take about 2 minutes. This step is crucial for the cookie’s texture.
- Add Eggs, Vanilla, and Food Coloring: Beat in the eggs and vanilla extract on low speed until fully incorporated. Then add the red food coloring and continue beating until the color is evenly distributed throughout the batter.
- Mix Dry Ingredients: In a separate medium bowl, whisk together the all-purpose flour, natural cocoa powder, baking soda, and salt. This combines the leavening and dry components evenly.
- Combine Wet and Dry Ingredients: Gradually add the dry ingredients to the wet ingredients and beat just until combined, careful not to overmix to maintain a tender dough. Fold in 1 ¼ cups of the chopped white chocolate using a spatula, reserving the remaining ¼ cup for the cookie tops.
- Shape the Cookies: Use a medium cookie scoop to portion out about 1.5 to 2 tablespoons of cookie dough. Roll each portion into a smooth ball with your hands for evenly shaped cookies. Place them on the prepared baking sheet, spacing them at least 2 inches apart to allow spreading.
- Bake and Add Toppings: Bake the cookies for 8 to 11 minutes, or until the edges are starting to brown and the centers look soft or slightly underbaked for a chewy texture. Remove from the oven and immediately press the reserved white chocolate pieces onto the tops of the cookies while they are still warm.
- Cool the Cookies: Allow the cookies to cool on the baking sheet for 5 minutes to set, then transfer them to a wire rack to cool completely. This prevents the bottoms from becoming soggy and helps them firm up properly.
Notes
- Storage: Store leftover red velvet cookies in an airtight container at room temperature in a cool, dry place for up to 3 days. Refrigeration extends shelf life to about one week but may reduce moisture.
- Freezing Cookie Dough: Scoop cookie dough balls onto a lined baking sheet and freeze for 1-2 hours until firm. Transfer frozen dough balls to a freezer bag and store for up to 3 months. To bake, thaw overnight in the refrigerator and bake as directed.
Nutrition
- Serving Size: 1 cookie
- Calories: 160
- Sugar: 14g
- Sodium: 110mg
- Fat: 8g
- Saturated Fat: 5g
- Unsaturated Fat: 2.5g
- Trans Fat: 0.1g
- Carbohydrates: 21g
- Fiber: 1g
- Protein: 2g
- Cholesterol: 30mg