Description
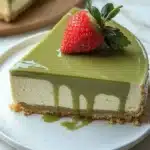
Indulge in the rich and creamy goodness of this no-bake pistachio cheesecake. A buttery biscuit crust holds a luscious pistachio-infused filling, topped with a decadent pistachio spread and fresh strawberries.
Ingredients
Units
Scale
CRUST:
- 200 grams biscuits
- 45 grams melted butter
CHEESECAKE FILLING:
- 500 grams cream cheese
- 150 grams pistachio spread
- 100 grams powder sugar
- 200 grams heavy whipping cream (35%)
DECORATE:
- 100 grams pistachio spread
- strawberry
Instructions
- Prepare the Biscuit Crust for Your No-Bake Cheesecake Start by crushing biscuits in a food processor, blender, or even with a rolling pin. Once the biscuits are finely crushed, melt the butter in the microwave or stovetop. Add the melted butter to the crushed biscuits and mix them together until the mixture resembles wet sand. This forms the base of your no-bake cheesecake, which will be both buttery and crispy when set. Make sure the crumbs are evenly coated with butter to create a solid crust. No-bake pistachio cheesecake crust made with broken biscuits and melted butter, ready for the creamy pistachio filling
- Press the Biscuit Crust into the Pan and Freeze Grease your cheesecake pan lightly to ensure easy removal later. Pour the prepared biscuit crust mixture into the pan, then press it down firmly, making sure to spread it evenly across the bottom and up the sides slightly. This helps create a solid, even crust. Once pressed, place the pan in the freezer while you prepare the creamy pistachio cheesecake filling, allowing the crust to firm up before adding the filling. Pressed pistachio cheesecake crust in a pan, ready to be frozen for a firm and stable base.
- Prepare the Creamy Pistachio Cheesecake Filling In a clean and dry bowl, add the room-temperature cream cheese and smooth pistachio spread. Mix them together until fully incorporated, ensuring a creamy and smooth texture. This will form the rich, flavorful base of your no-bake pistachio cheesecake filling. The mixture should be smooth and free of lumps for a perfect cheesecake consistency. Creamy cream cheese and pistachio spread in a bowl, ready to be mixed for a smooth and delicious no-bake pistachio cheesecake filling.
- Whip the Heavy Cream for the Perfect Texture In a clean, dry, and cold bowl, pour the heavy cream and add the powdered sugar. Whip the mixture until it reaches soft peaks and is almost whipped. Be careful not to over-whip it, as it will continue to whip once you fold it into the cheesecake filling. This step ensures a light and airy texture for the creamy no-bake pistachio cheesecake. Set it aside until ready to combine with the rest of the ingredients. A bowl of freshly whipped cream, ideal for making a creamy no-bake pistachio cheesecake filling.
- Fold in the Whipped Cream for a Light and Fluffy Filling Carefully fold the whipped cream into the cream cheese and pistachio spread mixture in three parts. Be gentle while folding to retain the airiness of the whipped cream and keep the no-bake pistachio cheesecake light and fluffy. Avoid over-mixing, as this will deflate the filling and affect the texture. The goal is a smooth, airy filling that will set perfectly when refrigerated. No bake pistachio cheesecake filling in a bowl, creamy and fluffy texture, pistachio flavor, easy no-bake cheesecake recipe
- Chill the No-Bake Pistachio Cheesecake to Set Pour the creamy pistachio cheesecake filling into the prepared pan with the chilled biscuit crust. Smooth the top using a spoon to create an even layer. Once smoothed, cover the pan with a tray or plastic wrap to prevent any contaminants from reaching the cheesecake. Place the pan in the refrigerator and let it chill for at least 8 hours, or overnight, to allow the cheesecake to fully set and develop its rich flavors. No-bake pistachio cheesecake with a smooth creamy filling on a crunchy crust, ready to be refrigerated and set.
- Garnish and Serve Your No-Bake Pistachio Cheesecake Once the no-bake pistachio cheesecake has fully set, pour the pistachio spread over the top, tilting the pan to let it flow evenly across the surface. For a decorative touch, add fresh strawberries or sprinkle crushed pistachios for extra flavor and a beautiful presentation. Slice and serve this creamy, indulgent dessert that’s sure to impress!
Notes
- Make sure the cream cheese is at room temperature for smoother mixing.
- Feel free to adjust the sweetness by adding more or less powdered sugar to the filling.
- Decorate with additional pistachios or whipped cream for a personalized touch.
Nutrition
- Serving Size: 1 slice
- Calories: 380
- Sugar: 18g
- Sodium: 260mg
- Fat: 28g
- Saturated Fat: 16g
- Unsaturated Fat: 9g
- Trans Fat: 0g
- Carbohydrates: 30g
- Fiber: 1g
- Protein: 6g
- Cholesterol: 90mg

