
If you’ve been hunting for a cozy dessert that’s fuss-free, festive, and downright dreamy, I’ve got you covered with my No-Bake Gingerbread Icebox Cake Recipe. This little gem is perfect for those moments when you want something special but don’t feel like firing up the oven. Trust me, once you try it, you’ll be hooked on how those crisp gingersnaps soak up that luscious, spiced cream filling to create layers of pure holiday magic. Keep reading, because I’m sharing everything you need to nail this recipe exactly—and why it might just become your new favorite winter treat.
Why You’ll Love This Recipe
- No Oven Needed: It’s literally magic layering cookies and cream—crazy, delicious, and perfect for busy days or warm kitchens.
- Festive Flavors: Gingerbread spice and caramel swirl together for that holiday nostalgia, but subtle enough to enjoy year-round.
- Impress Without Stress: Looks fancy but is straightforward to build—your guests will never guess how easy it was.
- Customizable Fun: You can swap flavors, adjust layers, or dress it up with unique garnishes as you like.
Ingredients You’ll Need
The ingredients for this No-Bake Gingerbread Icebox Cake Recipe come together in a way that balances spice, sweetness, and creamy texture beautifully. I recommend grabbing good-quality cream cheese and fresh heavy cream—it really makes a difference here since the filling is star of the show.
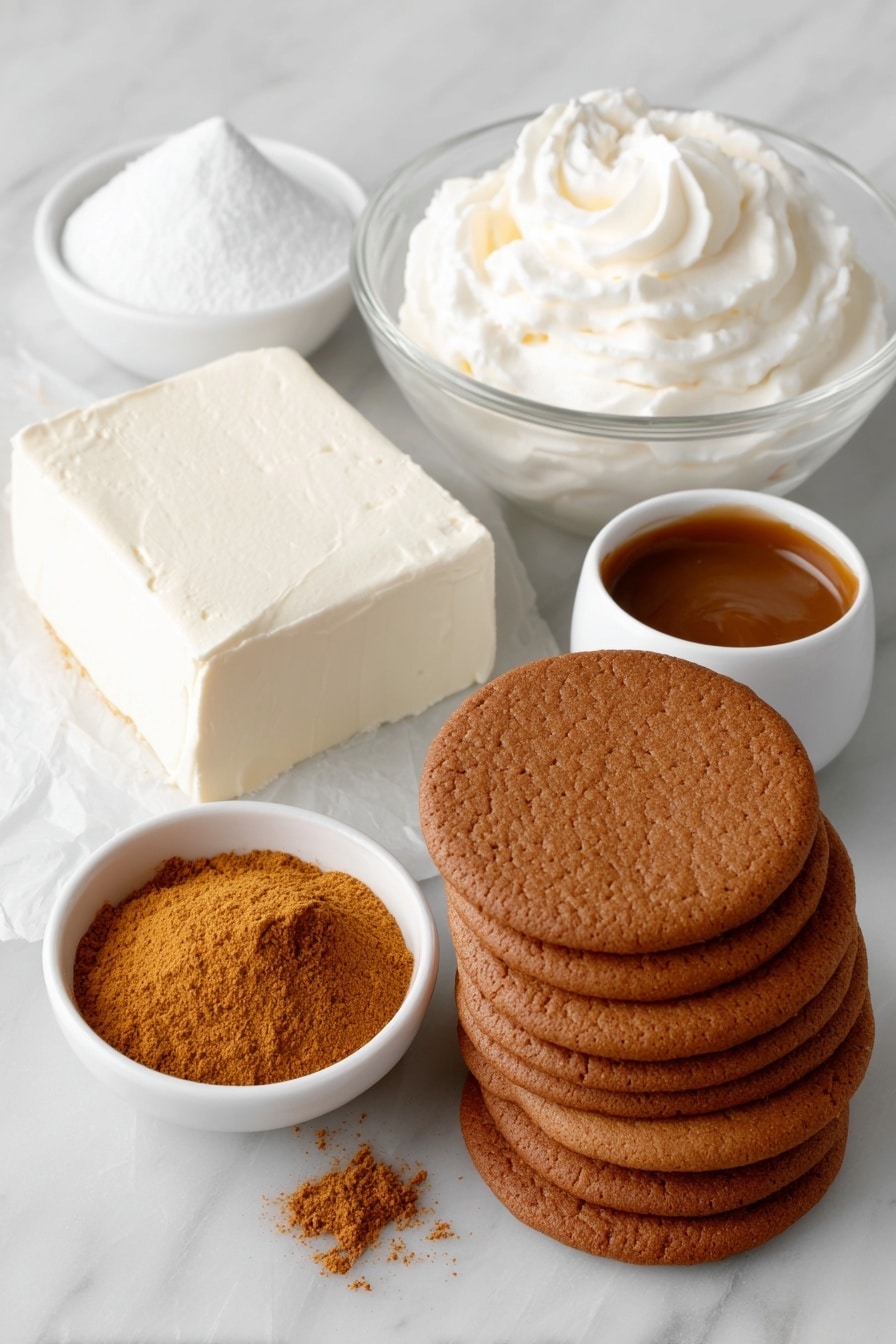
- Cream Cheese: Softened to room temp so it whips up nice and smooth without lumps.
- Confectioners’ Sugar: I love this over regular granulated sugar because it dissolves seamlessly into the cream.
- Caramel or Dulce de Leche: Adds that rich, buttery sweetness that pairs so well with gingerbread—don’t skimp!
- Pumpkin Pie or Gingerbread Spice Blend: This is the magic that warms everything up with cinnamon, ginger, cloves, and hints of nutmeg.
- Heavy Whipping Cream: Make sure it’s cold for that perfect medium peak texture in the filling.
- Thin Gingersnap Cookies: These hold their shape beautifully, and you want thin ones for that tender layering effect.
- Large Piping Bag & Star Tip: While not edible, this helps you get those pretty piped swirls and even layers—trust me, presentation counts!
Variations
Once you get the hang of this No-Bake Gingerbread Icebox Cake Recipe, feel free to make it your own. I’ve tried a few twists, and honestly, that’s part of the fun—tweaking layers and flavors to suit your vibe or occasion.
- Spice It Up: I sometimes add a pinch of cayenne or black pepper into the cream for a sneaky little warmth—delicious if you like a bit of a kick!
- Chocolate Layer: Adding thin chocolate wafers or even sprinkling cocoa powder between layers really amps up the decadence.
- Dairy-Free Version: Use coconut cream instead of heavy cream and dairy-free cream cheese alternatives—I’ve had great success with that for vegan friends.
- Fruit Infusion: Sometimes I layer in sliced poached pears or thin apple slices for a fresh contrast.
How to Make No-Bake Gingerbread Icebox Cake Recipe
Step 1: Whip Up the Creamy Filling
Start by beating the softened cream cheese, confectioners’ sugar, caramel or dulce de leche, and pumpkin pie spice together until silky smooth—usually about 2 minutes on medium speed. This step is crucial because you want your filling free of lumps so it feels silky on your tongue. Then slowly add in the cold heavy whipping cream and continue to whip at medium speed until you see medium peaks forming—about 3 minutes. With the texture just right, transfer this dreamy cream to a piping bag fitted with a star tip. You’ll find that piping makes the layering so much neater and prettier, especially if you’re serving guests.
Step 2: Assemble Your Mini Gingerbread Icebox Cakes
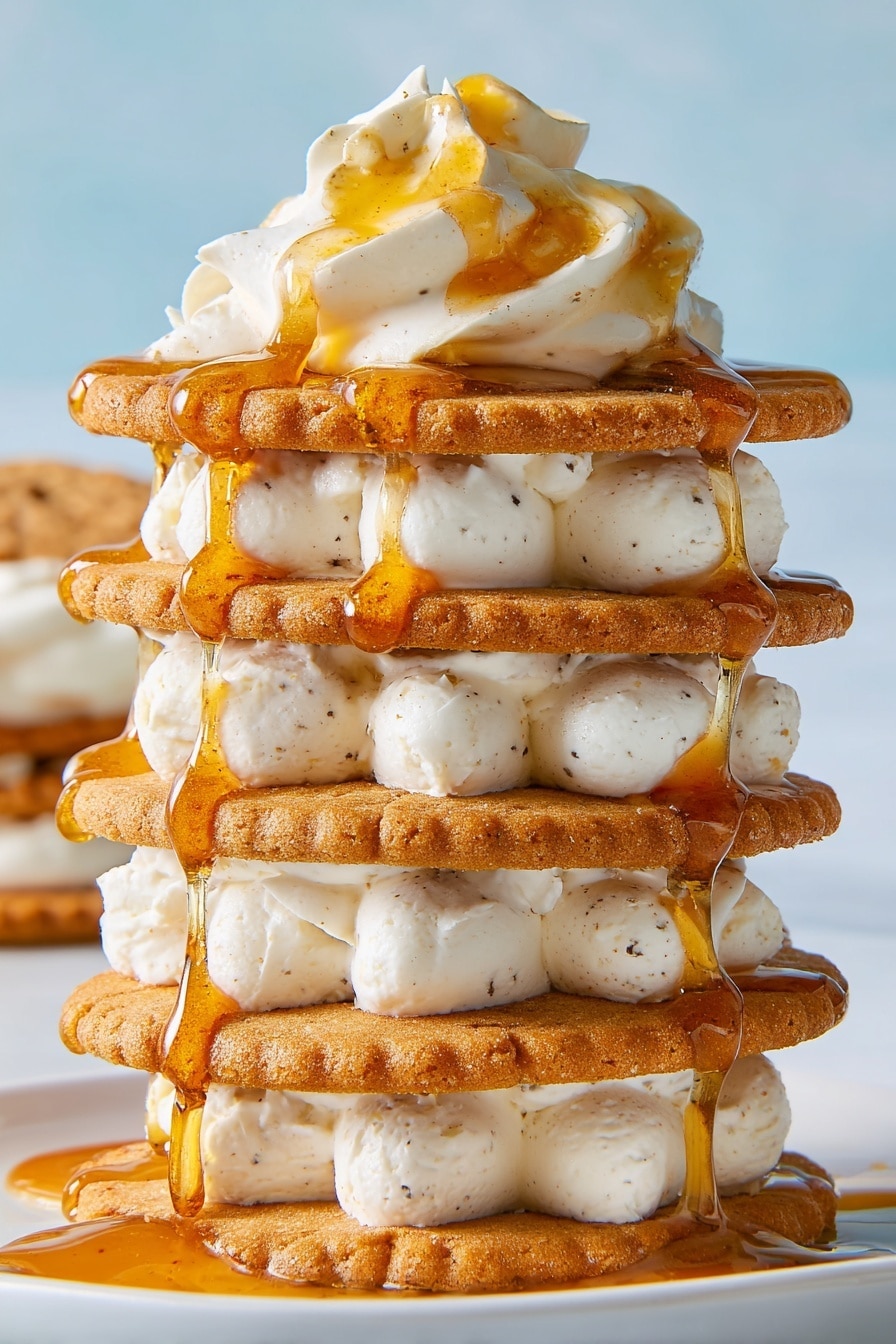
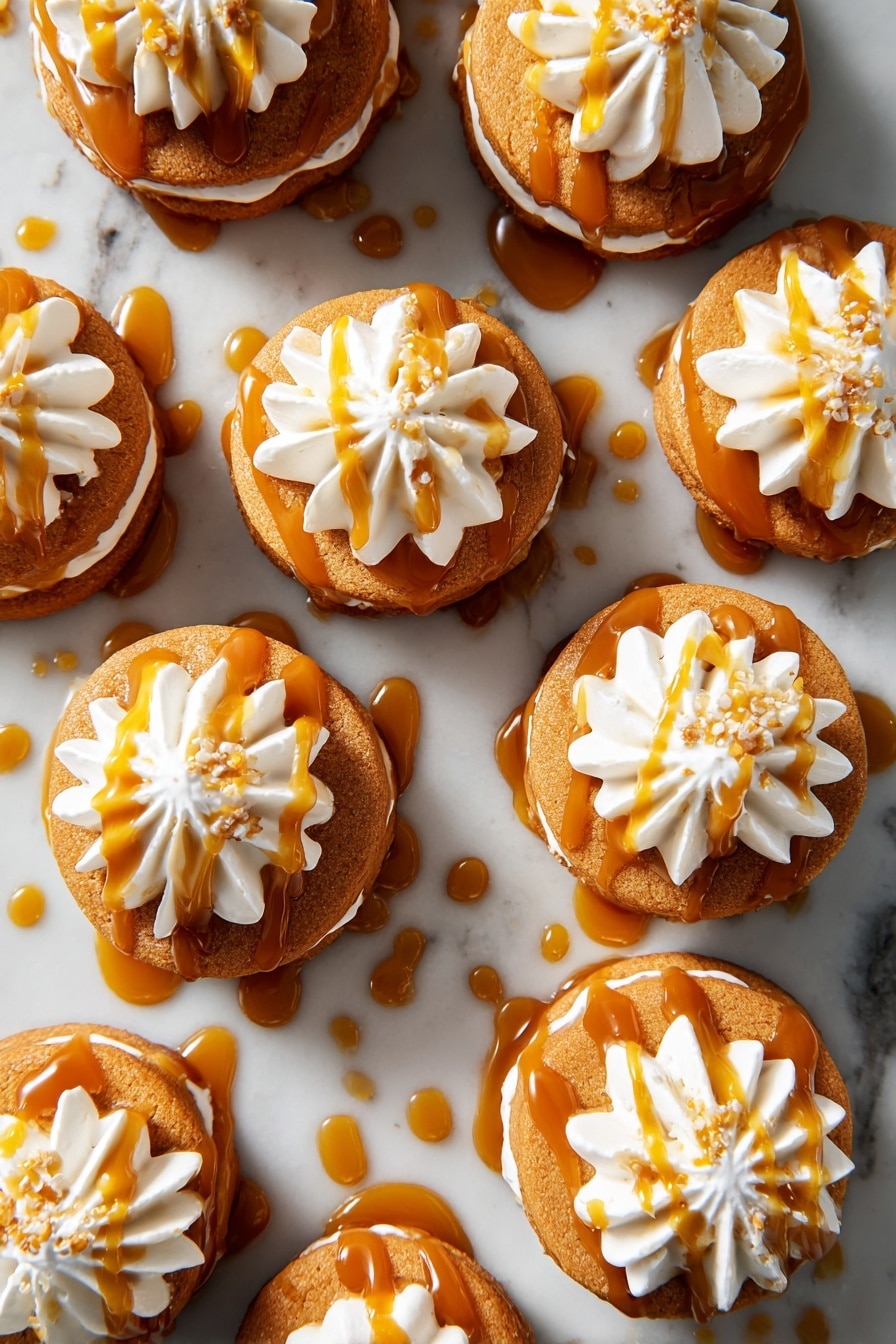
Arrange 12 gingersnap cookies on a large baking sheet. Pipe a zigzag layer of the cream filling over each cookie—zigzag more than just a dollop is key for even coverage without overwhelming the cookie. Top each with a second cookie and gently press down so the layers meld but don’t smash—then pipe more cream, and repeat layering for a total of five cookies per mini cake. I love to finish with a big rosette (or lots of mini rosettes) on top for that extra snazzy look before chilling. This assembly might take a little patience to get the layers even, but trust me, it’s worth it.
Step 3: Chill and Let Those Cookies Soften
Pop the mini cakes into the refrigerator for about 1 hour so the cream sets nicely. After that, loosely cover them with plastic wrap and chill for at least 3 more hours or overnight. This step is what transforms the crunchy cookies into tender, cake-like layers soaked in that creamy goodness. Patience is your best friend here.
Step 4: Drizzle and Serve
Just before serving, drizzle extra caramel or dulce de leche over the top. It adds that final glossy touch and a little extra richness that everyone swoons over. Serve chilled and get ready for the compliments!
Pro Tips for Making No-Bake Gingerbread Icebox Cake Recipe
- Soften Cream Cheese Properly: Leaving cream cheese out for at least 30 minutes helps avoid lumps and gives you the smoothest filling.
- Whip Cream Just Right: Stop whipping once medium peaks form—overwhipping can turn it grainy or too stiff, and ruins the texture.
- Don’t Skip the Chill: Those hours in the fridge turn cookie layer magic happen. I once rushed it and ended with crunchier crumbs instead of melt-in-your-mouth bites!
- Use a Piping Bag: I discovered that piping the cream makes layering neater and presentation way more impressive without extra effort.
How to Serve No-Bake Gingerbread Icebox Cake Recipe
Garnishes
I usually keep garnishes simple: a drizzle of warm caramel sauce and a sprinkle of crushed gingersnaps or a dusting of cinnamon. Sometimes I top with a few fresh cranberries or chopped toasted pecans for color and crunch. That little finishing touch really makes these mini cakes pop on a holiday platter!
Side Dishes
This icebox cake pairs amazingly with a hot cup of spiced tea or a milky chai latte. For something extra festive, I love serving it alongside simple whipped cream or a scoop of cinnamon ice cream. If you want to keep things light, a fresh orange or pear salad with a honey-lime dressing balances the richness perfectly.
Creative Ways to Present
For holiday parties, I sometimes assemble these mini cakes in clear glass jars or individual dessert bowls for a cute single-serve look. Layering additional garnishes like candied ginger or edible gold leaf adds a sophisticated vibe. Using a pretty serving tray with festive napkins makes your dessert table look inviting and polished with minimal effort.
Make Ahead and Storage
Storing Leftovers
These cakes are best eaten within 2-3 days of making, stored in an airtight container in the refrigerator. I learned the hard way that leaving them uncovered dries out the creamy layers and toughens the cookies back up, so always keep them covered or sealed tight.
Freezing
I’ve frozen the assembled mini cakes (wrapped individually in plastic wrap and sealed in a freezer bag) with decent results. When you want to serve, thaw them in the fridge overnight. The texture softens well, though the cream isn’t quite as fluffy after freezing and thawing.
Reheating
Since this is a no-bake icebox cake, you don’t actually reheat it. Instead, just bring leftovers to room temperature for about 15 minutes before serving—it helps soften the cream and makes the flavors sing without losing that perfect chilled texture.
FAQs
-
Can I use regular sugar instead of confectioners’ sugar in this recipe?
You can, but I don’t recommend it. Confectioners’ sugar dissolves into the cream filling much more smoothly, giving a silky texture without any grit. If you only have granulated sugar, try pulsing it in a blender first to make it finer.
-
How long should I chill the cake for the best texture?
For optimum softness, chill the cakes uncovered for at least an hour to set the cream, then loosely cover and refrigerate for an additional 3 hours or overnight. This lets the gingersnaps absorb moisture and become tender, almost like cake layers.
-
Can I make the No-Bake Gingerbread Icebox Cake Recipe ahead of time?
Absolutely! In fact, this dessert improves in flavor and texture the longer it chills. You can assemble it a day ahead and store it in the fridge covered—just add the caramel drizzle right before serving.
-
What if I don’t have a piping bag or star tip?
No worries. You can spread the cream filling with a spoon or offset spatula, though the layers might look a bit less decorative. The flavor and texture will still be delicious!
Final Thoughts
I absolutely love how this No-Bake Gingerbread Icebox Cake Recipe brings such festive joy with minimal effort. The blend of spicy gingersnaps, luscious caramel cream, and that melt-in-your-mouth softness is something I always look forward to during the holidays. More than once, I’ve brought these mini cakes to parties and watched them disappear within minutes—which is always the best kind of praise. Seriously, if you want a delightful showstopper that feels fancy but is easy enough to throw together on a whim, this is your go-to recipe. Give it a try and tell me—what’s your favorite twist you added?
Print
No-Bake Gingerbread Icebox Cake Recipe
- Prep Time: 20 minutes
- Cook Time: 0 minutes
- Total Time: 4 hours 25 minutes
- Yield: 12 servings 1x
- Category: Dessert
- Method: No-Cook
- Cuisine: American
Description
These Mini No-Bake Gingerbread Icebox Cakes are an easy and festive dessert perfect for the holiday season. Layers of gingersnap cookies are filled with a luscious spiced cream cheese and caramel frosting, piped beautifully into rosettes. No baking required—just assemble, chill, and enjoy a soft, creamy treat with warm gingerbread flavors and a drizzle of caramel on top.
Ingredients
Filling
- 4 oz. cream cheese, softened
- 2 tbsp. confectioners’ sugar
- 2 tbsp. jarred caramel or dulce de leche, plus more for drizzling
- 1/4 tsp. pumpkin pie or gingerbread spice blend
- 1 1/2 cups cold heavy whipping cream
Cakes
- 2 (5.25-oz.) boxes thin gingersnap cookies (about 60)
- A large piping bag with an open star or French star tip (3/4″ to 1/2″ diameter)
Instructions
- Prepare the cream filling: In the large bowl of a stand mixer fitted with the whisk attachment, beat the softened cream cheese, confectioners’ sugar, caramel sauce, and pumpkin pie spice on medium speed until smooth, about 2 minutes. Then add the cold heavy whipping cream and continue beating on medium speed until medium peaks form, about 3 minutes. Transfer the filling to a piping bag fitted with a star tip.
- Assemble the cakes: Arrange 12 gingersnap cookies on a baking sheet. Pipe a zigzag layer of the cream filling on each cookie, then top with a second cookie. Gently press down and pipe more cream. Repeat layering with two more cookies, ending with a fifth cookie on top. Pipe a large rosette or multiple mini rosettes on the top cookie.
- Chill to set: Refrigerate the assembled cakes for about 1 hour until the cream has set firmly.
- Soften the cookies: Loosely cover the cakes with plastic wrap and continue to refrigerate for at least 3 hours and up to overnight. This allows the gingersnap cookies to soften and meld with the creamy filling.
- Serve with caramel drizzle: Just before serving, drizzle more caramel over the top of each mini icebox cake for added sweetness and decoration.
Notes
- Use thin gingersnap cookies for optimal softness and layering.
- Ensure the cream cheese is fully softened before mixing to avoid lumps.
- The cakes can be made up to a day in advance for convenience.
- For a dairy-free version, substitute with vegan cream cheese and coconut cream.
- Serve chilled for the best texture and flavor.
Nutrition
- Serving Size: 1 mini cake
- Calories: 210
- Sugar: 18g
- Sodium: 85mg
- Fat: 14g
- Saturated Fat: 8g
- Unsaturated Fat: 5g
- Trans Fat: 0g
- Carbohydrates: 18g
- Fiber: 1g
- Protein: 3g
- Cholesterol: 45mg


