
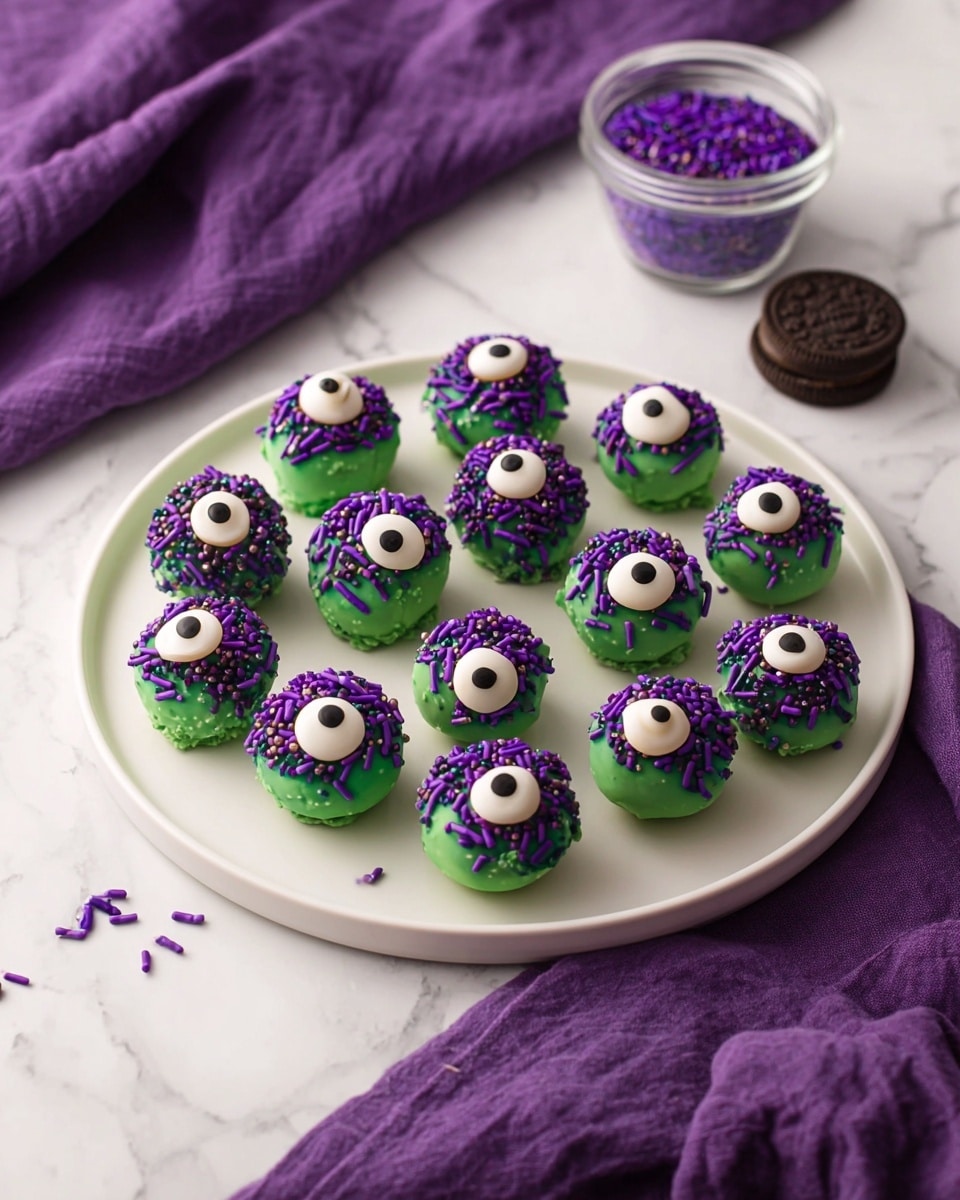
If you’re anything like me and adore a fun, no-fuss dessert that’s bursting with flavor and personality, then you’re going to flip over this Monster Truffles Recipe. It’s like a mini candy party wrapped up in one bite—creamy, crunchy, and oh-so-delicious. I love this recipe because it’s simple to pull together, yet the results are impressively impressive. Keep reading—I’ll share everything you need to make these spooky treats your new go-to for gatherings or just a sweet after-dinner indulgence.
Why You’ll Love This Recipe
- Super Simple: No fancy baking needed—you just mix, chill, dip, and enjoy.
- Crowd-Pleaser: My family goes crazy for these at parties, and they’re perfect for impressing friends.
- Customizable: Easily swap out candies to match your mood or holiday vibe.
- Fun and Festive: Playful decorations make them a hit with kids and adults alike.
Ingredients You’ll Need
These ingredients blend together like a dream. The Oreos give you that classic cookie crunch; cream cheese adds just the right creamy texture to hold everything together, while the chopped Snickers and Reese’s Pieces bring bursts of peanutty, chocolatey goodness. You’ll find that getting fresh candy bars and quality cream cheese really takes these truffles over the top.
- Oreos: Classic cookies that crush down into fine crumbs for the perfect truffle base.
- Cream cheese: Softened to mix easily and bring creamy richness.
- Snickers: Chopped for a chewy, nutty surprise in every bite.
- Reese’s Pieces: Chopped for colorful, crunchy pops of peanut buttery flavor.
- White chocolate chips: Melts nicely for coating with a smooth finish.
- Coconut or vegetable oil: Added to the chocolate melt for silky texture and shine.
- Green gel food coloring: For that perfect spooky monster hue (a few drops go a long way).
- Candy eyeballs: Because every monster needs some personality!
- Purple sprinkles: To add fun texture and extra festive flair.
Variations
I love how flexible this Monster Truffles Recipe is. I often experiment by swapping candies based on what I have at home or the occasion. Whether you’re vegan, prefer less sugar, or want to add an extra zing, you can make these truffles your own.
- Nut-Free Variation: Try swapping out Snickers for chopped dried fruit or crushed pretzels to avoid nuts, and still get an awesome texture.
- Dark Chocolate Twist: Use semi-sweet or dark chocolate chips instead of white chocolate for dipping—gives a rich, sophisticated flavor.
- Holiday Themes: Switch food coloring and sprinkles to suit the holiday—think red and green for Christmas or orange and black for Halloween fun.
- Mini Monster Bites: Make bite-sized versions perfect for party trays or lunchbox treats.
How to Make Monster Truffles Recipe
Step 1: Crush and Combine Your Base
Grab your food processor and pulse those Oreos until they turn into fine crumbs—think coarse sand texture. Tip them into a bowl and mix in the softened cream cheese until it’s evenly blended and sticky—this is the secret that helps your truffles hold shape perfectly. Then, fold in your chopped Snickers and Reese’s Pieces. Trust me, the mixture looks a bit wild here, but that’s exactly how monster-worthy it should be!
Step 2: Form and Chill Your Truffles
Line a baking sheet with parchment paper—it really helps the truffles not stick later. Using a small cookie scoop or teaspoon, form the mixture into small balls (about 1-inch diameter works great). Place these on your sheet and pop them in the freezer for about 30 minutes until they’re just firm to the touch. This step makes dipping so much easier and less messy.
Step 3: Melt and Color Your Chocolate Coating
In a microwave-safe bowl, combine the white chocolate chips and your choice of coconut or vegetable oil. Microwave in 30-second bursts, stirring in between, until everything’s melted and silky smooth. Add green gel food coloring a few drops at a time, stirring well to reach that perfect monster green hue. I discovered that gel colors blend more vibrantly than liquid, so it really pops on these truffles.
Step 4: Dip, Decorate, and Chill
Dip each frozen truffle ball into your green chocolate coating—using a fork helps the excess drip off beautifully. Set them back on the parchment-lined tray. Now for the fun part: gently press a candy eyeball onto the top of each truffle and sprinkle with purple sprinkles for that extra monster charm. You’ll find it’s easier to add decorations while the chocolate is still wet, so keep your workspace ready!
Step 5: Final Freeze
Pop the whole tray back in the freezer for about 15 minutes to let the coating harden completely. Once they’re firm, your Monster Truffles are ready to impress. I usually store them in the fridge after that and find they keep their texture perfectly.
Pro Tips for Making Monster Truffles Recipe
- Chill, Chill, Chill: Don’t rush freezing; well-chilled truffles hold their shape better and dip more easily.
- Use Gel Food Coloring: It gives that vivid green without thinning the chocolate coating like liquid color would.
- Avoid Overheating Chocolate: Heat in short blasts and stir often to prevent burning and grainy texture.
- Work Fast With Decorations: Add candy eyes and sprinkles right after dipping so they stick perfectly as the chocolate sets.
How to Serve Monster Truffles Recipe

Garnishes
I like to serve these truffles with a variety of fun, spooky garnishes. Candy eyeballs are my absolute favorite—they give these treats character and make guests smile. Sometimes I add a sprinkle of edible glitter or crushed freeze-dried raspberries for a little color contrast and extra flair.
Side Dishes
Pair your Monster Truffles with a simple cup of coffee or a cold glass of milk—the richness of the truffles balances perfectly with either. For a party, I sometimes add fresh fruit or a light fruit salad to offset the sweetness and keep things balanced.
Creative Ways to Present
For Halloween or themed parties, I love arranging these little monsters on a black platter lined with faux cobwebs or green-tinted parchment paper. You can even pop them into mini cupcake liners or party favor boxes with ribbon for a festive touch. Presentation definitely ups the wow factor.
Make Ahead and Storage
Storing Leftovers
I keep leftover Monster Truffles in an airtight container in the fridge. They generally stay fresh and moist for up to one week. If you let them sit out too long, they might get a little soft, so I always recommend chilling right before serving.
Freezing
These truffles freeze beautifully! I wrap them individually in parchment or wax paper, and then place them in a freezer-safe container or bag. When I’m ready to serve, I thaw them in the fridge overnight. They keep their texture and flavor really well.
Reheating
Since these are no-bake truffles, they don’t need reheating, but if you want to soften them a bit, letting them sit at room temperature for 15–20 minutes does the trick perfectly. Avoid microwaving, which can melt the coating unevenly.
FAQs
-
Can I make Monster Truffles Recipe without a food processor?
Absolutely! You can crush the Oreos by placing them in a sealed plastic bag and smashing them gently with a rolling pin or the back of a heavy pan. It might take a little more elbow grease, but it works just fine. Just make sure the crumbs are fine, so the texture stays smooth.
-
What’s the best way to soften cream cheese for this recipe?
Take the cream cheese out of the fridge about 30 minutes before you start so it softens at room temperature. If you’re short on time, you can microwave it for 10–15 seconds, but be careful not to melt it.
-
Can I use different candy bars instead of Snickers and Reese’s Pieces?
Yes! Part of the fun with this recipe is switching up candies. Try chopped Twix, Kit-Kat, or even dried fruit and nuts for different textures and flavors. Just make sure the candies are chopped small so they blend nicely into the truffles.
-
How do I prevent the white chocolate from seizing while melting?
White chocolate can be tricky! Use a low heat or microwave in short bursts, stirring frequently. The addition of coconut or vegetable oil, as in this recipe, helps keep the chocolate smooth and glossy.
-
What if I don’t have candy eyeballs for decoration?
No worries! You can use mini chocolate chips, colored icing dots, or even just a sprinkle of edible glitter to give your monster truffles plenty of personality and flair.
Final Thoughts
This Monster Truffles Recipe has been one of my favorites to whip up when I want something that’s easy but shows effort—and always gets compliments. It’s perfect for parties, last-minute treats, or anytime you crave a fun dessert with a little bit of mischievous character. I hope you enjoy making these as much as my family and I do—there’s just something so satisfying about biting into one of these cute, creamy monsters that you made yourself. Give it a try and watch your friends’ faces light up!
Print
Monster Truffles Recipe
- Prep Time: 20 mins
- Cook Time: 45 mins
- Total Time: 1 hr 5 mins
- Yield: 2 dozen (24 truffles) 1x
- Category: Dessert
- Method: No-Cook
- Cuisine: American
Description
Delightfully spooky and fun, Monster Truffles are a sweet treat perfect for Halloween or any festive occasion. Made from crushed Oreos mixed with cream cheese, Snickers, and Reese’s Pieces, these truffles are coated in vibrant green white chocolate and decorated with candy eyeballs and purple sprinkles to create a monster-like appearance. Easy to make and impressively delicious, they’re sure to be a crowd-pleaser.
Ingredients
Truffle Base
- 1 (14-oz.) package Oreos
- 1 (8-oz.) block cream cheese, softened
- 1 cup finely chopped Snickers
- 1/2 cup Reese’s Pieces, chopped
Coating and Decoration
- 1 1/4 cups white chocolate chips
- 2 Tbsp. coconut or vegetable oil
- Green gel food coloring
- Candy eyeballs
- Purple sprinkles
Instructions
- Prepare the Oreo crumbs and mix: In a food processor, pulse Oreos until fine crumbs form. Transfer the crumbs to a medium bowl and stir in the softened cream cheese until the mixture is well combined. Fold in the finely chopped Snickers and chopped Reese’s Pieces until evenly distributed.
- Form and freeze the truffle balls: Line a baking sheet with parchment paper. Using a small cookie scoop or spoon, form the mixture into small, evenly sized balls. Place the truffle balls on the prepared baking sheet and freeze for about 30 minutes until they are slightly hardened and easy to coat.
- Melt and color the white chocolate: In a medium microwave-safe bowl, combine the white chocolate chips and coconut or vegetable oil. Microwave in short bursts until just melted, then stir until smooth, about 2 minutes total. Add about 10 drops of green gel food coloring to the melted chocolate and mix well, adding more drops until you achieve the desired vibrant green color.
- Coat the truffles and decorate: Dip each frozen ball into the melted green chocolate, using a fork to remove it and letting the excess chocolate drip back into the bowl. Place the coated truffle on a parchment-lined baking sheet, then gently press a candy eyeball onto the top of each. Finish by sprinkling purple sprinkles over the truffles while the coating is still wet.
- Set the truffles: Repeat the coating and decorating process for all truffle balls. Once finished, place the sheet with coated truffles in the freezer for about 15 minutes or until the chocolate coating hardens. Serve chilled for a festive and delicious treat.
Notes
- Use room temperature cream cheese for easier mixing and smoother texture.
- Make sure the truffles are well chilled before dipping to prevent melting of the coating.
- Adjust the amount of green gel food coloring to achieve your preferred shade.
- Store leftover truffles in an airtight container in the refrigerator or freezer.
- For a nut-free version, omit the Snickers and substitute with additional chopped Reese’s Pieces or other candies.
Nutrition
- Serving Size: 1 truffle
- Calories: 150
- Sugar: 15g
- Sodium: 90mg
- Fat: 9g
- Saturated Fat: 5g
- Unsaturated Fat: 3g
- Trans Fat: 0g
- Carbohydrates: 17g
- Fiber: 1g
- Protein: 2g
- Cholesterol: 10mg


