
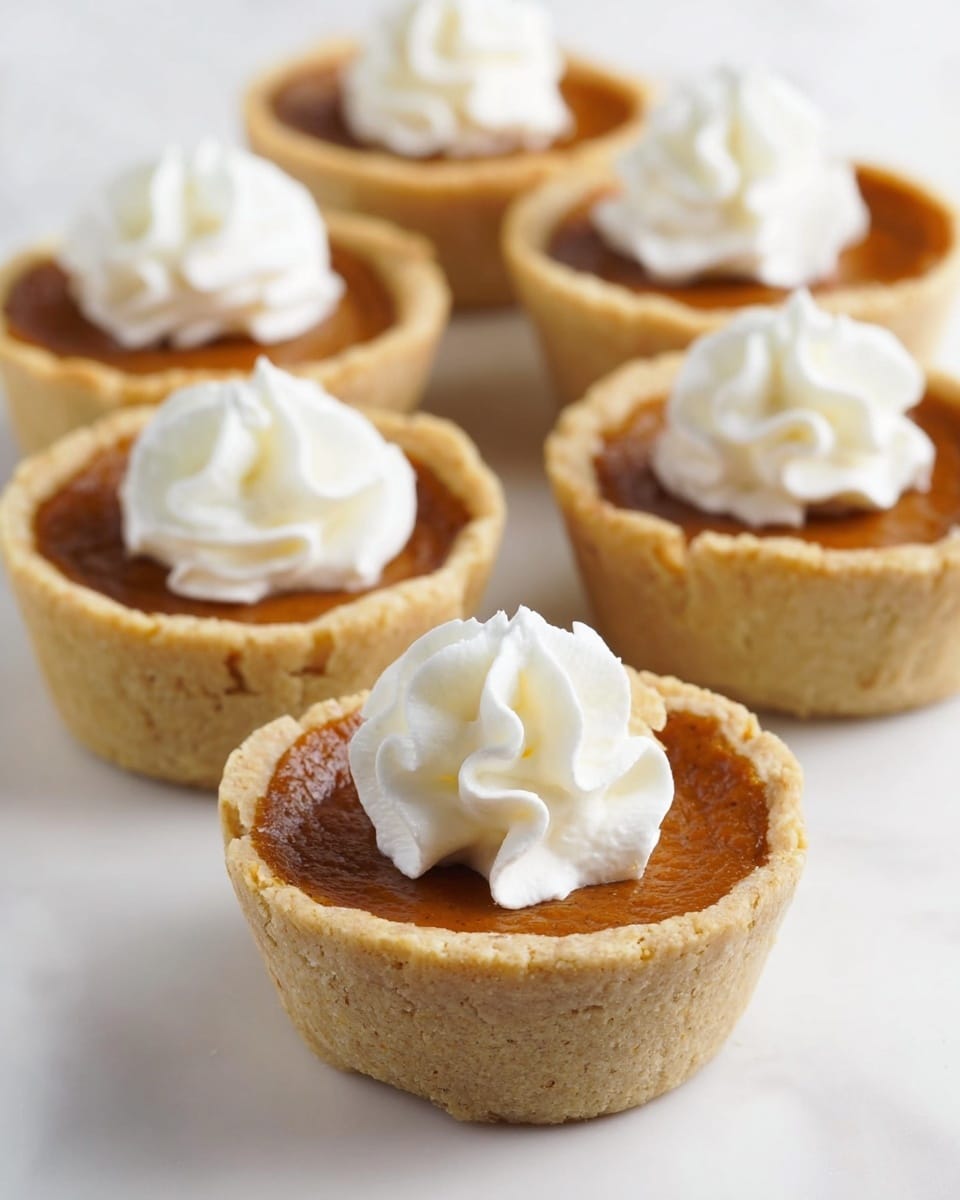
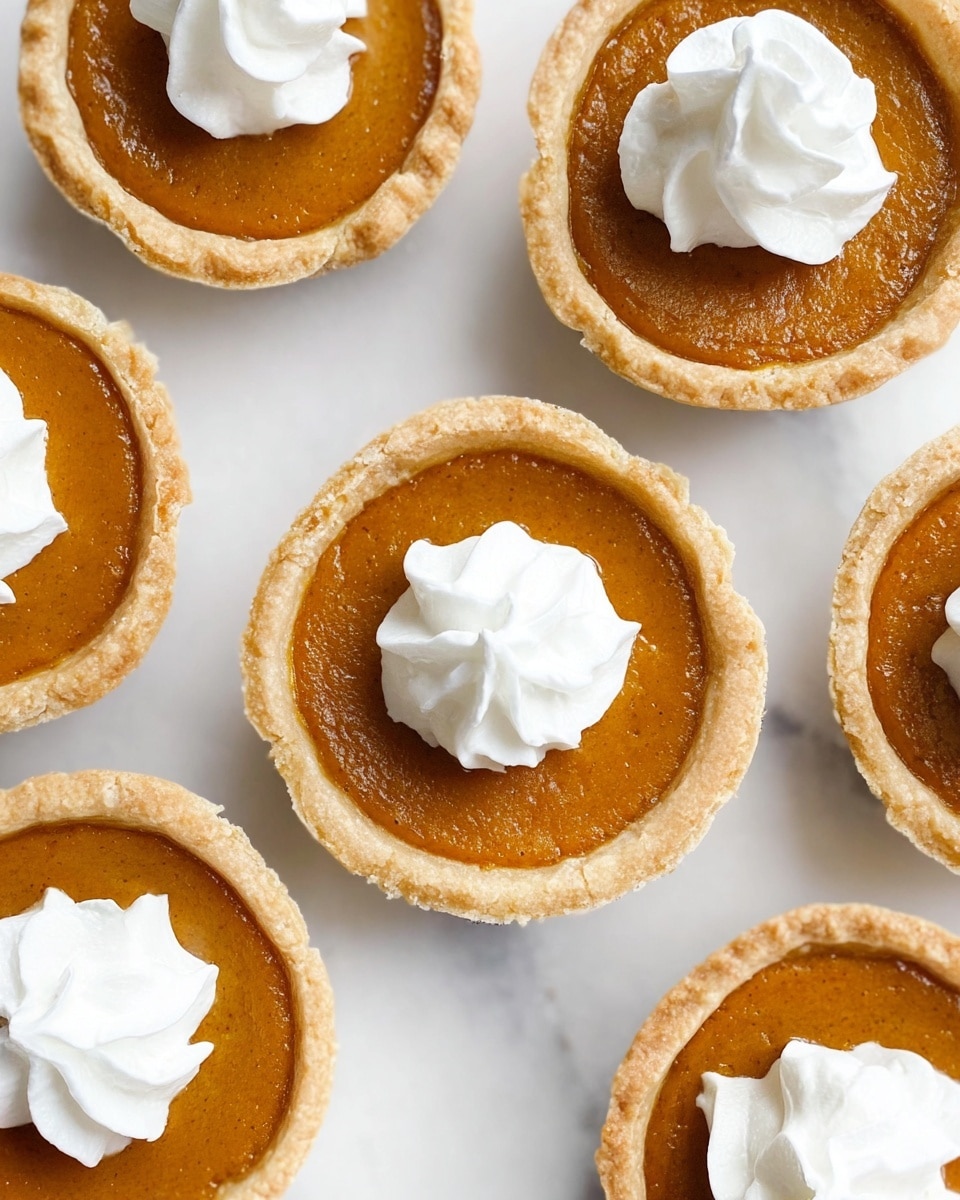
I’m so excited to share this Mini Maple Pumpkin Pies Recipe with you! These little pies are such a delightful twist on traditional pumpkin pie — perfect little bites that pack all the cozy fall flavors into a perfectly portioned treat. I absolutely love how they come out beautifully with a tender crust and a smooth, maple-kissed filling that makes every bite feel like a warm hug.
Whether you’re planning a Thanksgiving dessert, a festive brunch, or just want a quick way to satisfy your pumpkin cravings, this Mini Maple Pumpkin Pies Recipe hits the spot. They’re surprisingly simple to make, and the maple extract adds a special depth that makes these pies truly memorable. Trust me, your family and guests will be asking for these again and again!
Why You’ll Love This Recipe
- Perfect Portion Control: These mini pies make it so easy to serve guests without the fuss of slicing a big pie.
- Maple Magic: The maple extract adds such a unique and cozy depth of flavor that amps up classic pumpkin pie.
- Simple Prep: Using store-bought crusts means you can whip these up quickly — no dough rolling stress.
- Family Favorite: My family goes crazy for these every fall, and I know you’ll hear the compliments too!
Ingredients You’ll Need
Getting the balance right between the pumpkin, sugar, and spice is the key here, and each ingredient plays its part to create that classic autumnal flavor you crave.
- Pie crusts: I usually grab store-bought crusts to save time, and they work wonderfully for these mini pies.
- Pumpkin puree: Use canned pumpkin puree — it’s smooth, consistent, and gives the best texture for the filling.
- Light brown sugar: Adds a lovely molasses note that complements the pumpkin perfectly.
- Granulated sugar: Balances out sweetness without overpowering the spices.
- Pumpkin pie spice: Essential for that warm blend of cinnamon, nutmeg, and cloves — freshly ground if you can!
- Maple extract: Here’s the magic ingredient for maple warmth without overpowering the pumpkin flavor.
- Egg: Helps set the filling so it’s rich and custardy.
- Evaporated milk: Gives the filling a creamy texture and slightly caramelized flavor.
- Whipped cream: To dollop on top—adds a light, fluffy finish.
Variations
I like to switch things up sometimes depending on the occasion or dietary needs — the beauty of this Mini Maple Pumpkin Pies Recipe is how adaptable it is! Feel free to tweak it to your taste or what you have on hand.
- Dairy-Free Variation: Swap the evaporated milk for canned coconut milk for a creamy, dairy-free filling that still tastes amazing.
- Spice Twist: Add a pinch of ground ginger or replace pumpkin pie spice with chai spice for a different flavor profile.
- Sweetener Swap: Use maple syrup in place of part of the sugars for even more maple flavor and a natural sweetener boost.
- Nut Topping: Toasted pecans sprinkled on top before baking add a perfect crunch that my family adores.
How to Make Mini Maple Pumpkin Pies Recipe
Step 1: Prep Your Crusts and Pan
Start by preheating your oven to 350°F (175°C). Lightly flour your countertop and roll out your pie dough if needed — I find rolling out store-bought dough carefully prevents tearing. Using a 4-inch cutter, cut out 12 rounds. Spray a cupcake pan with non-stick spray, then gently press each dough round into the cupcake cavities, smoothing out ripples and trimming excess dough. This step is super important because a neat shell makes your mini pies look professional.
Step 2: Whisk Your Pumpkin Filling
In a large bowl, combine the pumpkin puree, light brown sugar, granulated sugar, and pumpkin pie spice. Stir well until it’s nice and smooth. Then add in the egg and the maple extract, mixing those in fully. Finally, pour in the evaporated milk and stir gently to combine everything evenly. This filling is super rich and creamy — it’s exactly what makes these minis so irresistible.
Step 3: Fill and Bake Your Mini Pies
Divide the pumpkin filling evenly among the 12 crusts, filling each just to the top but leaving a bit of crust visible around the edges (it helps them bake evenly). Bake your mini pies in the oven for about 25 to 30 minutes until the centers no longer jiggle when gently shaken and the crusts turn a lovely golden color. I like to turn the oven off and leave the pies inside with the door slightly open to cool completely — this prevents cracks on top of the filling.
Step 4: Garnish and Chill
Once cooled, pipe or dollop whipped cream on top using a 1M piping tip or a spoon for easy elegance. This final touch adds such a wonderful lightness to the creamy pies. Pop them in the fridge until you’re ready to serve, or enjoy right away if you can’t wait — I totally understand!
Pro Tips for Making Mini Maple Pumpkin Pies Recipe
- Use a sharp cutter for perfect rounds: I discovered this trick when my first rounds were uneven; a sharp cutter makes clean edges that fit cupcake pans beautifully.
- Don’t overfill the crusts: Leaving a small margin around the edges prevents the filling from spilling over during baking.
- Test for doneness with a jiggle check: Slightly jiggle the pies halfway through baking time to avoid underbaking or overbaking.
- Cool pies slowly: Avoid cracks by turning the oven off and cooling with the door ajar instead of moving them right away.
How to Serve Mini Maple Pumpkin Pies Recipe
Garnishes
I love to garnish these mini pies with a dollop of freshly whipped cream — it helps balance the richness and adds a pretty finishing touch. Sometimes I sprinkle a little cinnamon or a few toasted pecans on top for extra texture and flavor. It’s those small details that make these pies feel super special.
Side Dishes
These mini pies shine on their own, but if you’re serving them as part of a bigger spread, they pair beautifully with hot apple cider or a spiced chai latte. At gatherings, I like putting out a cheese board alongside for a savory balance. They’re also great with a cozy scoop of vanilla ice cream if you want to be extra indulgent!
Creative Ways to Present
For holiday parties, I’ve presented these mini pies on tiered cake stands for a charming display. Another favorite: nestling them in edible autumn leaves or mini decorative pumpkins for a festive tablescape. You can even dust them lightly with powdered sugar or edible gold dust to impress guests — it makes these simple pies feel fancy.
Make Ahead and Storage
Storing Leftovers
Leftover mini pies keep beautifully in an airtight container in the fridge for up to 4 days. I’ve found covering them gently with plastic wrap before sealing the container helps keep the whipped cream fresh longer without smooshing it.
Freezing
If you want to make these in advance, you can freeze the baked pies without whipped cream for up to 2 months. I usually flash freeze them on a tray first, then transfer to a sealed freezer-safe bag. When ready to eat, thaw overnight in the fridge and then add fresh whipped cream before serving.
Reheating
Reheat leftovers in a low oven (around 300°F) for 10 minutes to warm the filling while keeping the crust crisp. Avoid microwaving because it can make the crust soggy. After warming, top with whipped cream again to refresh that lovely contrast.
FAQs
-
Can I make mini pumpkin pies without maple extract?
Absolutely! While the maple extract adds a special depth to these pies, you can omit it or substitute with a little vanilla extract if you prefer. The pies will still be deliciously spiced and creamy.
-
Can I use gluten-free pie crust for this Mini Maple Pumpkin Pies Recipe?
Yes, gluten-free pie crust works just fine. Just make sure it’s a sturdy crust that holds up well in a cupcake pan. You might want to prebake the crust for a few minutes before filling to prevent sogginess.
-
How do I know when the mini pumpkin pies are done baking?
The best sign is when the filling no longer jiggles noticeably when you gently shake the pan. The crust should also be lightly golden along the edges. Cooling in the warm oven with the door open helps set the filling without cracking.
-
Can I prepare these mini pies ahead for a party?
Definitely! You can bake the pies a day ahead, keep them refrigerated, and add the whipped cream topping just before serving to keep them fresh and beautiful.
Final Thoughts
This Mini Maple Pumpkin Pies Recipe holds such a warm spot in my heart — it’s the one I turn to whenever I want a simple dessert with a twist that feels surprisingly special. The mix of comforting spices with that subtle maple sweetness is pure magic. I truly hope you give these a try soon; I bet you’ll love sharing these mini treats as much as I do. Happy baking, friend!
Print
Mini Maple Pumpkin Pies Recipe
- Prep Time: 15 minutes
- Cook Time: 25 minutes
- Total Time: 40 minutes
- Yield: 12 mini pies 1x
- Category: Dessert
- Method: Baking
- Cuisine: American
Description
These Mini Maple Pumpkin Pies are a delightful twist on the traditional pumpkin pie, featuring a rich pumpkin and maple-flavored filling baked in individual mini pie crusts. Perfectly portioned for gatherings or as a festive fall dessert, they’re topped with a dollop of whipped cream for added indulgence.
Ingredients
Pie Crust
- 2 store-bought pie crusts or homemade
Filling
- 15 oz. can pumpkin puree
- 1/4 cup light brown sugar, packed
- 1/2 cup granulated sugar
- 2 teaspoons pumpkin pie spice
- 1/2 teaspoon maple extract
- 1 egg
- 1 cup evaporated milk
Topping
- 1/4 cup whipped cream
Instructions
- Preheat Oven: Preheat your oven to 350 degrees Fahrenheit to ensure it’s ready for baking the pies.
- Prepare Pie Dough: Lightly flour your countertop and roll out the pie dough. Using a 4-inch round cutter, cut 12 rounds from the dough.
- Line Cupcake Pan: Spray the cupcake pan with non-stick cooking spray. Press each dough round into the cupcake cavities, smoothing out any ripples and trimming excess dough that hangs over the edges.
- Mix Filling: In a large mixing bowl, combine pumpkin puree, light brown sugar, granulated sugar, and pumpkin pie spice. Stir until well mixed.
- Add Flavor and Egg: Stir in the egg and maple extract thoroughly to incorporate fully into the pumpkin mixture.
- Add Milk: Pour in evaporated milk and stir until the filling is smooth and evenly blended.
- Fill Crusts: Spoon the filling into each prepared pie crust, filling to the top but ensuring the crust edge remains visible around the filling.
- Bake Pies: Bake the mini pies in the oven for 25 to 30 minutes, until the filling is set and no longer jiggles, and the crust turns slightly golden brown.
- Cool Pies: Turn off the oven and open the door to allow the pies to cool completely inside the oven, preventing cracking and ensuring they set properly.
- Add Topping and Store: Once cooled, pipe whipped cream on top of each pie using an 1M piping tip. Store the pies in the refrigerator until ready to serve.
Notes
- Use a light hand when rolling out dough to prevent it from becoming too thin and tearing.
- If you prefer a stronger maple flavor, you can increase the maple extract up to 1 teaspoon.
- Make sure the pies are fully cooled before adding whipped cream to prevent melting and sliding.
- These mini pies can be stored in the refrigerator for up to 3 days.
- For an added crunchy texture, sprinkle chopped pecans on top before baking or on the whipped cream topping.
Nutrition
- Serving Size: 1 mini pie (approx. 85g)
- Calories: 180
- Sugar: 15g
- Sodium: 150mg
- Fat: 7g
- Saturated Fat: 3g
- Unsaturated Fat: 3g
- Trans Fat: 0g
- Carbohydrates: 26g
- Fiber: 2g
- Protein: 3g
- Cholesterol: 40mg

