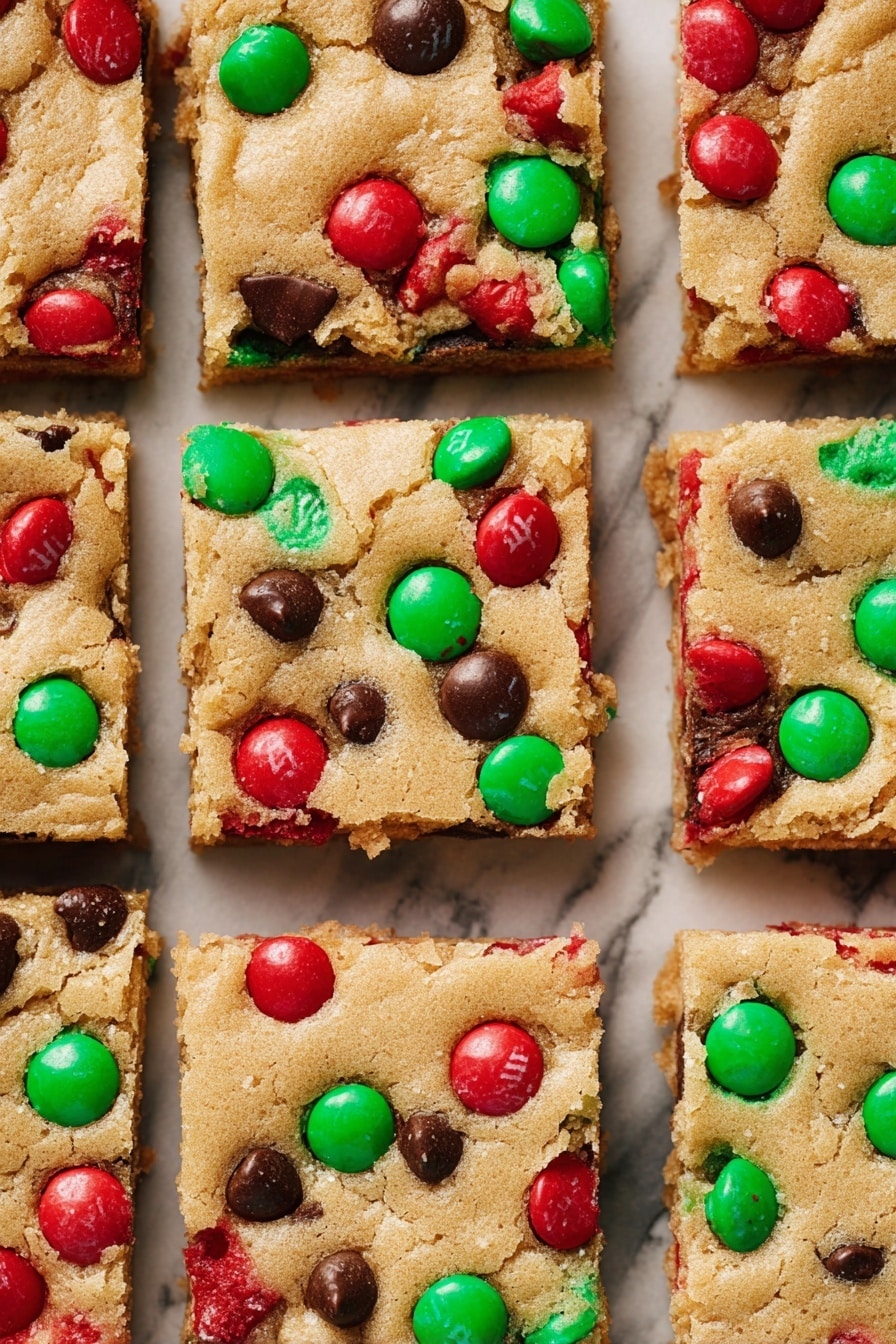
If you’ve been hunting for a festive treat that brings all the holiday cheer in one bite, you’re about to hit the jackpot with this Loaded Christmas Cookie Bars Recipe. I absolutely love these bars because they combine everything we crave during the holidays—peanut butter, melty chocolate, and colorful M&Ms—all baked up into one irresistible, chewy cookie bar that’s perfect for any Christmas gathering. Stick with me and I’ll walk you through all my little tips to get that perfect holiday cookie bar every time.
Why You’ll Love This Recipe
- Overflowing with flavor: Between the peanut butter, chocolate chips, and holiday M&Ms, every bite bursts with festive sweetness.
- Simple to make: With straightforward steps and pantry-friendly ingredients, you’ll have these bars ready before you know it.
- Perfect for sharing: Whether it’s a holiday party or gifting, these bars travel well and impress everyone.
- Customizable fun: You can swap mix-ins or sprinkle on flaky sea salt for that extra wow factor.

Ingredients You’ll Need
These ingredients blend perfectly to create that soft, chewy, and loaded cookie bar texture you want, with a little holiday sparkle thrown in. I always recommend measuring your flour by weight for consistent results—you’ll thank me later!

- All-purpose flour: Use a light hand when measuring—too much flour can dry out your bars.
- Baking powder: Helps give the bars a nice lift without making them cakey.
- Baking soda: Just a pinch to balance the leavening and add tenderness.
- Fine sea salt: Essential for balancing sweetness and enhancing flavor.
- Unsalted butter: Make sure it’s at a cool room temperature, not melted, for the best texture.
- Creamy peanut butter: I use classic creamy for that smooth peanut butter richness.
- Light brown sugar: Adds moisture and a deep caramel flavor.
- Granulated sugar: Balances the sugars for the right chew and sweetness.
- Large eggs: At room temperature to help everything bind evenly.
- Vanilla extract: Gives a warm, sweet undertone that brings all the flavors together.
- Milk: Just a splash to loosen the batter slightly.
- Peanut butter chips: These amp up the peanut butter flavor throughout.
- Holiday Peanut Butter M&Ms plus extra: I love these because they add festive color and a candy crunch.
- Semisweet chocolate chips plus extra: The melty chocolate patches are what dreams are made of.
- Flaky sea salt (optional): I sprinkle this on top just before serving—trust me, it takes these bars to another level.
Variations
I love making the Loaded Christmas Cookie Bars Recipe my own by swapping mix-ins or adding seasonal twists—it’s so easy and fun. You’ll enjoy experimenting with these variations too!
- Nut-Free Variation: Replace the peanut butter and peanut butter chips with sunflower seed butter and skip the peanut M&Ms to make it safe and still delicious for nut allergies—my friend tried this and couldn’t believe how good it was!
- White Chocolate & Cranberry: Swap out the semisweet chocolate chips and peanut butter chips for white chocolate chips and dried cranberries for a tart-sweet festive touch.
- Extra Chewy: For a gooier bar, slightly underbake by a minute or two and let them cool completely before slicing—my family always requests this!
- Spiced Up: Add a teaspoon of cinnamon and a pinch of nutmeg into your flour mix for a cozy warmth in every bite.
How to Make Loaded Christmas Cookie Bars Recipe
Step 1: Prep Your Pan and Oven
Preheat your oven to 350°F (175°C). Line a 9×13-inch metal baking pan with aluminum foil—I find binding it with metal clips keeps the foil snug and makes cleanup a breeze. Don’t forget to spray the foil generously with cooking spray so the bars don’t stick. This setup is the secret weapon for getting perfect lifts out of the pan afterward.
Step 2: Mix Dry Ingredients
Grab a medium bowl and whisk together your flour, baking powder, baking soda, and salt. This ensures your leavening is evenly distributed and avoids unpleasant pockets of baking soda later. Set the dry mix aside—you’ll be adding it soon.
Step 3: Cream Butter, Peanut Butter, and Sugars
In a large mixing bowl fitted with a paddle attachment, beat the butter, creamy peanut butter, light brown sugar, and granulated sugar on medium-high speed for about 2 minutes. I love this part because the mixture turns light, fluffy, and smells like the holidays already! Don’t rush—this step makes a huge difference in texture.
Step 4: Add the Eggs, Vanilla, and Milk
Scrape down the sides of your bowl with a spatula, then add the eggs one at a time, mixing well after each. Stir in the vanilla extract and the milk. Mixing these in gradually helps keep the batter smooth and prevents curdling, which I learned after a few too runny batches myself!
Step 5: Incorporate the Dry Ingredients
Lower your mixer speed to low and slowly add the flour mixture. Beat just until combined—the dough will be thick and a bit sticky, which is exactly what you want. Overmixing here can toughen the bars, so I recommend stopping as soon as you don’t see streaks of flour.
Step 6: Fold in Chips and M&Ms
Add the peanut butter chips, holiday peanut butter M&Ms, and semisweet chocolate chips. You might need to switch to folding these in by hand with a spatula if your mixer isn’t powerful enough—the mix-ins can get quite heavy! This part is so fun because the dough just bursts with color and texture.
Step 7: Spread and Decorate
Transfer the thick dough into your prepared pan, pressing it into an even layer with your spatula or hands (I lightly oil my fingers to avoid sticking). Then sprinkle the reserved M&Ms and chocolate chips on top—which makes these cookie bars feel extra special and festive.
Step 8: Bake and Cool
Bake for about 30 minutes, or until the center is golden brown and just slightly jiggly. I usually start checking around 28 minutes because ovens vary—don’t overbake or the bars will lose that chewy magic. Once out of the oven, sprinkle flaky sea salt over the top. Let the bars cool completely on a wire rack before slicing—this step ensures they hold together and slice cleanly, which can be tricky otherwise.
Pro Tips for Making Loaded Christmas Cookie Bars Recipe
- Use a Metal Pan: Metal pans conduct heat better than glass, giving the bars a perfectly browned edge and chewy center.
- Don’t Skip the Flaky Sea Salt: It balances the sweetness beautifully and adds a gourmet touch that guests will notice.
- Room Temperature Ingredients: Makes mixing smoother and helps with better emulsion in your batter.
- Hold Back Some Mix-Ins: Reserving some M&Ms and chocolate chips for topping creates a festive look and extra melty pockets on top.
How to Serve Loaded Christmas Cookie Bars Recipe

Garnishes
I like to finish these bars with a sprinkle of flaky sea salt just before serving—it’s a small touch that really elevates the flavor. For parties, a dusting of powdered sugar or even a drizzle of melted white chocolate adds extra holiday flair. Sometimes I even toss a few extra holiday M&Ms right on top for color pop and crunch.
Side Dishes
These bars are pretty much the star of the dessert table, but they pair wonderfully with a cup of hot cocoa, spiced eggnog, or even a simple glass of cold milk. I’ve brought these bars to cookie exchanges and loved how they complemented savory finger foods like mini quiches or roasted nuts.
Creative Ways to Present
For gift-giving, I like to stack these bars in festive boxes lined with wax paper and tied with a ribbon. At parties, cutting them into bite-size squares on a decorative platter with scattered extra M&Ms around the edges really makes for a fun presentation. Once, I even used mini paper cupcake liners to serve individual bites—super cute and great for portion control!
Make Ahead and Storage
Storing Leftovers
I store leftover bars in an airtight container at room temperature, and they stay chewy and delicious for up to 5 days. If I know they won’t be eaten that fast, I add a piece of bread to the container—it keeps the bars moist by absorbing excess air.
Freezing
These cookie bars freeze beautifully! I wrap a fully cooled pan tightly with plastic wrap, then aluminum foil, and freeze for up to 3 months. When I want a treat, I thaw them overnight in the fridge and let them come to room temperature before serving. It’s so convenient during busy holidays.
Reheating
If you like your cookie bars a little warm, pop a square in the microwave for about 10 seconds. It revives that gooey, melty texture without changing the flavor. Just be careful not to overheat since they can dry out fast!
FAQs
-
Can I make these Loaded Christmas Cookie Bars Recipe gluten-free?
Absolutely! Swap the all-purpose flour with a 1-to-1 gluten-free baking flour blend. Just be sure it contains xanthan gum for structure, or add a little separately. The texture might be slightly different but still super tasty and festive.
-
Why do my cookie bars turn out dry?
Dry cookie bars are usually caused by too much flour or baking too long. Make sure you’re measuring flour accurately by weight or spooning it lightly, and watch your bake time closely—taking them out when the center is just set but still slightly jiggly works best.
-
Can I use chunky peanut butter instead of creamy?
You can, but keep in mind chunky peanut butter will add extra texture and may change the consistency of your dough slightly. It might be delicious if you love peanut chunks throughout!
-
Is it okay to substitute other candies instead of holiday Peanut Butter M&Ms?
Definitely! Feel free to swap in regular M&Ms, Reese’s Pieces, or even chopped candy canes for a peppermint twist. Just pick something that melts well and complements peanut butter and chocolate flavors.
Final Thoughts
This Loaded Christmas Cookie Bars Recipe has truly become my holiday go-to, and I’m so excited for you to try it. I remember the first time I made these; the way the kitchen filled with that peanut butter and chocolate aroma gave me all the holiday feels. Everyone raved about them, and honestly, they’re easy enough to make that they’ll become a staple in your repertoire too. So grab your mixer and festive spirit—and make some magic happen in your kitchen!
Print
Loaded Christmas Cookie Bars Recipe
- Prep Time: 25 minutes
- Cook Time: 30 minutes
- Total Time: 55 minutes
- Yield: 24 bars 1x
- Category: Dessert
- Method: Baking
- Cuisine: American
Description
Delight in these Loaded Christmas Cookie Bars, a festive treat packed with creamy peanut butter, holiday-themed M&Ms, and chocolate chips. These bars combine a soft, chewy texture with the perfect balance of sweet and salty, topped with a sprinkle of flaky sea salt for an extra touch of indulgence. Ideal for holiday gatherings or cozy winter snacking.
Ingredients
Dry Ingredients
- 2 ½ cups (286 grams) all-purpose flour, measured correctly
- 1 teaspoon baking powder
- ¼ teaspoon baking soda
- ¾ teaspoon fine sea salt
Wet Ingredients
- 1 stick (113 grams) unsalted butter, at cool room temperature
- 1 cup (270 grams) creamy peanut butter
- 1 cup (200 grams) packed light brown sugar
- ¾ cup (150 grams) granulated sugar
- 2 large eggs, at room temperature
- 1 ½ tablespoons vanilla extract
- 1 tablespoon milk
Mix-ins and Toppings
- 1 cup (170 grams) peanut butter chips
- 1 cup (185 grams) holiday Peanut Butter M&Ms + ⅓ cup (70 grams) extra for decorating
- 1 cup (170 grams) semisweet chocolate chips + ⅛ cup (21 grams) extra for decorating
- Flaky sea salt, for topping (optional)
Instructions
- Preheat Oven: Set your oven temperature to 350°F (175°C) to prepare for baking.
- Prepare Baking Pan: Line a 9×13 inch metal baking pan with aluminum foil and secure it with metal binder clips. Spray the foil-lined pan generously with cooking spray to prevent sticking.
- Mix Dry Ingredients: In a medium bowl, whisk together the all-purpose flour, baking powder, baking soda, and fine sea salt. Set aside.
- Cream Butter and Sugars: Using an electric mixer fitted with the paddle attachment, beat the unsalted butter, creamy peanut butter, light brown sugar, and granulated sugar on medium-high speed for about 2 minutes until the mixture is very well combined and creamy.
- Add Eggs and Flavorings: Scrape down the bowl sides, then add the eggs, vanilla extract, and milk. Beat on medium speed until fully combined.
- Incorporate Dry Ingredients: Reduce mixer speed to low and gradually add the flour mixture. Mix just until incorporated; the dough will be thick and slightly sticky.
- Add Chips and Candies: Gently fold in the peanut butter chips, holiday Peanut Butter M&Ms, and semisweet chocolate chips with a spatula if necessary to avoid overworking the dough.
- Press Dough into Pan: Transfer the dough evenly into the prepared pan, pressing it down to spread uniformly.
- Decorate the Top: Sprinkle the reserved Peanut Butter M&Ms and semisweet chocolate chips evenly on top of the dough.
- Bake: Place the pan in the oven and bake for approximately 30 minutes, or until the center is golden brown and only slightly jiggly when shaken.
- Finish with Sea Salt: Immediately after baking, sprinkle flaky sea salt over the top to enhance the flavor.
- Cool and Serve: Set the pan on a wire rack and allow the bars to cool completely before cutting into squares. Store leftovers in an airtight container at room temperature for up to 5 days.
Notes
- To halve the recipe, reduce all ingredient quantities by half and use an 8×8-inch light-colored metal baking pan. Bake for a slightly reduced time, checking for doneness a few minutes earlier.
- Ensure butter is at cool room temperature for easier creaming with sugars.
- Using metal binder clips to secure foil helps keep the lining tight, making it easier to remove the bars after baking.
- Flaky sea salt topping is optional but highly recommended to balance sweetness.
Nutrition
- Serving Size: 1 bar
- Calories: 290
- Sugar: 20g
- Sodium: 140mg
- Fat: 16g
- Saturated Fat: 6g
- Unsaturated Fat: 8g
- Trans Fat: 0g
- Carbohydrates: 30g
- Fiber: 2g
- Protein: 5g
- Cholesterol: 40mg