
If you’re looking for a bright, tangy treat that’s actually good for you, you’ve got to try this Healthy Lemon Bars Recipe. I absolutely love how these lemon bars strike the perfect balance between refreshing citrus and just the right amount of sweetness, all while keeping it paleo and gluten-free. When I first made these, I was amazed at how the coconut flour crust paired so beautifully with the silky lemon filling—this recipe quickly became a family favorite and a go-to when I want a guilt-free dessert. Stick around, and I’ll walk you through everything so you nail it every time!
Why You’ll Love This Recipe
- Clean ingredients: No refined sugars or flours here—just wholesome, natural goodies that taste amazing.
- Our secret crust: The unique coconut and tapioca flour combo creates a tender, flavorful base that holds up beautifully.
- Simple and quick: With minimal preptime and easy steps, you’ll have these on the table in no time.
- Versatile and adaptable: Swap lemons for limes or dress them up with your favorite toppings for any occasion.

Ingredients You’ll Need
This recipe relies on thoughtful ingredients that balance flavor and health without sacrificing texture. The key is fresh lemon juice and zest alongside good-quality ghee and natural sweetener to keep it moist and flavorful. Here’s a quick tip: use fresh lemons for the brightest zing—jarred juice just doesn’t compare.

- Maple syrup: I love using real maple syrup because it melts smoothly and adds a rich, subtle sweetness without overpowering the lemon.
- Ghee: This gives a buttery flavor with less grease than coconut oil — a total game changer for the crust.
- Eggs: Absolutely essential here to provide structure and that classic lemon bar richness.
- Coconut flour: This absorbs moisture wonderfully, giving the crust a tender crumb without being too dry.
- Tapioca flour: Acts as the perfect binder alongside eggs, ensuring the crust and filling set nicely.
- Lemon zest and juice: Obviously the star of the show—I like zesting just before baking to capture the freshest citrus aroma.
- Vanilla extract: Enhances overall flavor, balancing the tartness subtly.
Variations
I’m all about making recipes your own, so I encourage you to tweak things to suit your taste or what you have on hand. You’ll find that this Healthy Lemon Bars Recipe is a fantastic base for different citrus flavors or dietary tweaks (within reason!).
- Key lime bars: Substitute fresh lime juice and zest for a zesty twist—my family absolutely went crazy when I made this for the first time.
- Butter swap: If you’re not paleo, grass-fed butter or regular butter works fine instead of ghee—they add their own lovely richness.
- Sweetener experiment: I haven’t tested honey yet, but I’m curious! Maple syrup has always been my go-to because it blends smoothly.
- Pan size: Tried it in both glass and metal pans; metal conducts heat faster, so watch closely for slight cracking if baked too long—it’s nothing to worry about flavor-wise.
How to Make Healthy Lemon Bars Recipe
Step 1: Prep Your Crust Mixture
Begin by preheating your oven to 350°F (175°C). In a large bowl, mix together the maple syrup, melted and cooled ghee, vanilla extract, and one large egg. Cooling the ghee is crucial here—if it’s too hot, it can scramble your egg. Then, in another bowl, combine the coconut flour, tapioca flour, and lemon zest. Slowly add your wet mixture into the dry ingredients, stirring with a fork. At first, it might seem too wet, but coconut flour loves soaking up moisture, so keep mixing until it comes together into a dough-like consistency.
Step 2: Bake the Crust
Press the dough evenly into an 8×8-inch pan lined with parchment or sprayed lightly with cooking spray. Don’t be shy about pressing firmly; this helps create a sturdy, crumbly base. Give the crust a few gentle pricks with a fork—just enough to allow steam to escape, but don’t pierce all the way through. Pop this into the oven for 8-10 minutes. You’re looking for it to set and maybe brown just slightly on the edges. If it puffs up a bit, I like to gently deflate it with a fork—it keeps the texture even.
Step 3: Whisk Together the Filling
While your crust is baking, whisk together 4 large eggs, fresh lemon juice, lemon zest, maple syrup, and tapioca flour until your mixture is silky smooth. This filling is the heart of these lemon bars, so take a moment to make sure it’s lump-free. The tapioca flour helps it thicken without any graininess, which is a trick I discovered after a few trial runs!
Step 4: Bake the Bars
As soon as the crust comes out of the oven, pour the filling right over it while still warm—don’t let it cool down first, or the filling won’t set properly. Immediately reduce the oven temperature to 325°F (163°C) and bake for another 14-16 minutes. Watch closely and pull them out once the filling is just set—you want a slight wobble in the center but not liquidy. Overbaking can dry out the bars and cause cracking.
Step 5: Chill and Serve
Let your lemon bars cool completely at room temperature first, then refrigerate for at least 90 minutes to fully set and develop flavor. When you’re ready to enjoy, cut them into squares and serve as is or topped with a light whipped coconut cream or a sprinkle of powdered sugar for that classic touch (though that’s not paleo). I love how the chill intensifies the lemony zing—be sure to try it cold!
Pro Tips for Making Healthy Lemon Bars Recipe
- Cool ghee carefully: Make sure your ghee is warm, not hot, so eggs don’t scramble in the mixture.
- Watch baking times: Ovens vary, so start checking lemon bars a few minutes early to avoid dryness or cracks.
- Don’t skip chilling: The fridge time is key to firm up the filling and sharpen the flavors—it really makes a difference.
- Use fresh lemons only: I tried this with bottled lemon juice once and it lacked that fresh brightness—always go fresh!
How to Serve Healthy Lemon Bars Recipe

Garnishes
I usually keep garnishes pretty simple because the lemon bars have such a vibrant flavor on their own. A light dusting of powdered sugar pairs beautifully if you’re not worried about strict paleo, or a dollop of homemade whipped coconut cream adds a smooth contrast that melts in your mouth. Fresh mint leaves on top also add a lovely pop of color and an extra layer of freshness that I can’t resist.
Side Dishes
These lemon bars shine perfectly after a meal paired with a simple cup of herbal tea or your favorite coffee. For a special brunch, I like serving them alongside fresh berries or a light fruit salad to amplify the citrus vibe. They’re also wonderful paired with a scoop of vanilla coconut ice cream for cooler evenings.
Creative Ways to Present
For parties or gifts, I’ve wrapped individual lemon bars in parchment and tied them with a pretty ribbon—instantly charming. You can also cut the bars into bite-sized squares and serve them on a tiered dessert tray with assorted garnishes for an elegant touch. Another favorite? Drizzle a thin line of dark chocolate over the top for a fancy finish that’s still healthy!
Make Ahead and Storage
Storing Leftovers
Once cooled and cut, I keep leftover healthy lemon bars stored in an airtight container in the fridge. They stay fresh and firm for up to 4 days, which makes them perfect for meal prep snacks or quick afternoon pick-me-ups. I like to layer parchment paper between bars to keep them from sticking together.
Freezing
I haven’t frozen these bars often, but when I have, I slice them first and wrap each piece tightly in plastic wrap, then place in a freezer bag. They freeze beautifully for up to 2 months. When you’re ready to eat, just thaw them overnight in the fridge. This trick is perfect for making ahead for events or just having a stash on hand.
Reheating
Since these lemon bars are best enjoyed chilled, I usually eat them cold straight from the fridge. But if you want to warm them slightly, a quick 10-15 second zap in the microwave softens them up without melting the filling. Just don’t overdo it, or you’ll lose that lovely set texture.
FAQs
-
Can I substitute almond flour for coconut flour in this recipe?
Almond flour won’t give you the right texture or structure for these Healthy Lemon Bars. Coconut flour is unique because it absorbs moisture differently and works with tapioca flour plus eggs to create the perfect crust. I recommend sticking to the original flours for best results.
-
Is it okay to use bottled lemon juice instead of fresh?
Fresh lemon juice is a must here. It offers vibrant flavor and acidity that bottling and processing tend to dull. To get that signature tangy brightness, fresh lemons are the way to go.
-
Can I make these bars vegan or egg-free?
This particular recipe relies heavily on eggs for texture and binding, so I don’t recommend trying to swap them out here. However, if you need an egg-free version, you might want to look for a specifically vegan lemon bar recipe designed with suitable alternatives.
-
How long do these lemon bars last?
Stored properly in an airtight container in the refrigerator, they stay fresh for up to 4 days. If you want to keep them longer, freezing is a great option.
-
Can I double this recipe?
I haven’t personally doubled this Healthy Lemon Bars Recipe yet, but logically you can do so in a 9×13 pan—just keep a close eye on the baking times, as it will likely take longer. Start checking early to avoid overbaking.
Final Thoughts
This Healthy Lemon Bars Recipe holds a special place in my kitchen because it combines refreshing flavor with wholesome goodness—something I used to struggle finding in desserts. Knowing you can whip these up quickly with clean ingredients and serve them to family or friends feels so satisfying. I really hope you’ll give it a try because once you taste that tender crust and zesty filling, you’ll be hooked just like I am. Don’t be afraid to make it your own and have fun with it in the kitchen—it’s truly one of those recipes that just brings joy every time!
Print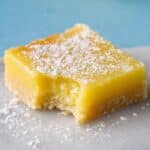
Healthy Lemon Bars Recipe
- Prep Time: 5 minutes
- Cook Time: 25 minutes
- Total Time: 2 hours
- Yield: 9 servings 1x
- Category: Dessert
- Method: Baking
- Cuisine: American
- Diet: Gluten Free
Description
A healthy, gluten-free, paleo-friendly lemon bar recipe featuring a coconut and tapioca flour crust sweetened with maple syrup and a tangy lemon filling. Perfectly balanced to offer a delicious dessert without refined sugars or grains, these lemon bars are baked to a tender set with a vibrant lemon flavor, ideal for a wholesome treat.
Ingredients
Crust
- 1/4 cup maple syrup
- 1/3 cup ghee, melted and cooled
- 1 large egg
- 2/3 cup Bob’s Red Mill Coconut Flour
- 1/4 cup Bob’s Red Mill Tapioca Flour
- ½ teaspoon lemon zest (zest of about 1/2 lemon)
- 2 teaspoons vanilla extract
Filling
- 1/2 cup lemon juice, freshly squeezed (about 4–5 lemons depending on size)
- 1 1/2 tablespoons lemon zest (about zest of 2 lemons)
- 1/3 cup maple syrup
- 4 large eggs
- 2 tablespoons tapioca flour
Instructions
- Preheat Oven: Set your oven to 350 degrees Fahrenheit to prepare for baking the crust.
- Mix Wet Ingredients for Crust: In a large mixing bowl, combine the maple syrup, cooled melted ghee, vanilla extract, and one large egg. Ensure the ghee is not hot to prevent scrambling the egg.
- Add Dry Ingredients for Crust: In a separate bowl, combine the coconut flour, tapioca flour, and lemon zest. Gradually add the wet mixture to the dry ingredients, stirring with a fork. The mix will seem wet initially, but continue mixing until it forms a dough-like consistency as the coconut flour absorbs liquid.
- Form the Crust: Press the dough evenly into an 8×8-inch baking pan lined with parchment or sprayed with cooking spray. Prick the top of the dough lightly with a fork a few times without piercing through.
- Bake the Crust: Bake the crust for 8-10 minutes at 350 degrees until just set and slightly golden at the edges. If the dough puffs up, gently deflate by pricking with a fork.
- Prepare the Filling: While the crust bakes, whisk together the eggs, lemon zest, maple syrup, fresh lemon juice, and tapioca flour in a bowl until the mixture is completely smooth.
- Add Filling to Crust: Remove the crust from the oven and immediately pour the lemon filling evenly over it without allowing the crust to cool.
- Reduce Oven Temperature and Bake Bars: Lower the oven temperature to 325 degrees Fahrenheit and bake the filled pan for 14-16 minutes. Watch closely so the bars just set; avoid overbaking to prevent cracking.
- Cool and Chill: Remove the lemon bars from the oven and let them cool completely at room temperature. Then refrigerate for at least 90 minutes to set fully before slicing.
- Serve: Cut into 9 squares and serve chilled, optionally topped with whipped topping or a dusting of powdered sugar for a classic finish.
Notes
- Substitutions are limited to preserve flavor and texture; this recipe is tested specifically with coconut and tapioca flours, ghee, and maple syrup.
- Use fresh lemon juice rather than jarred for best flavor; lime juice can be used as a substitute for a key lime version.
- Avoid substituting coconut oil for ghee as it alters flavor and texture negatively; butter is an acceptable substitute if not adhering to paleo guidelines.
- Cooking in metal pans may result in quicker baking times compared to glass pans and possible surface cracking without flavor impact.
- Eggs are essential for structure and cannot be substituted; for egg-free options, seek vegan lemon bar recipes.
- Maple syrup might be substituted with honey, but this is untested.
- Doubling the recipe is likely feasible in a 9×13 pan, though not tested.
- Coconut sugar is not recommended as it does not dissolve properly and affects taste adversely.
Nutrition
- Serving Size: 1 bar (approx. 1/9th of recipe)
- Calories: 180
- Sugar: 12g
- Sodium: 30mg
- Fat: 11g
- Saturated Fat: 7g
- Unsaturated Fat: 3g
- Trans Fat: 0g
- Carbohydrates: 17g
- Fiber: 3g
- Protein: 4g
- Cholesterol: 85mg

