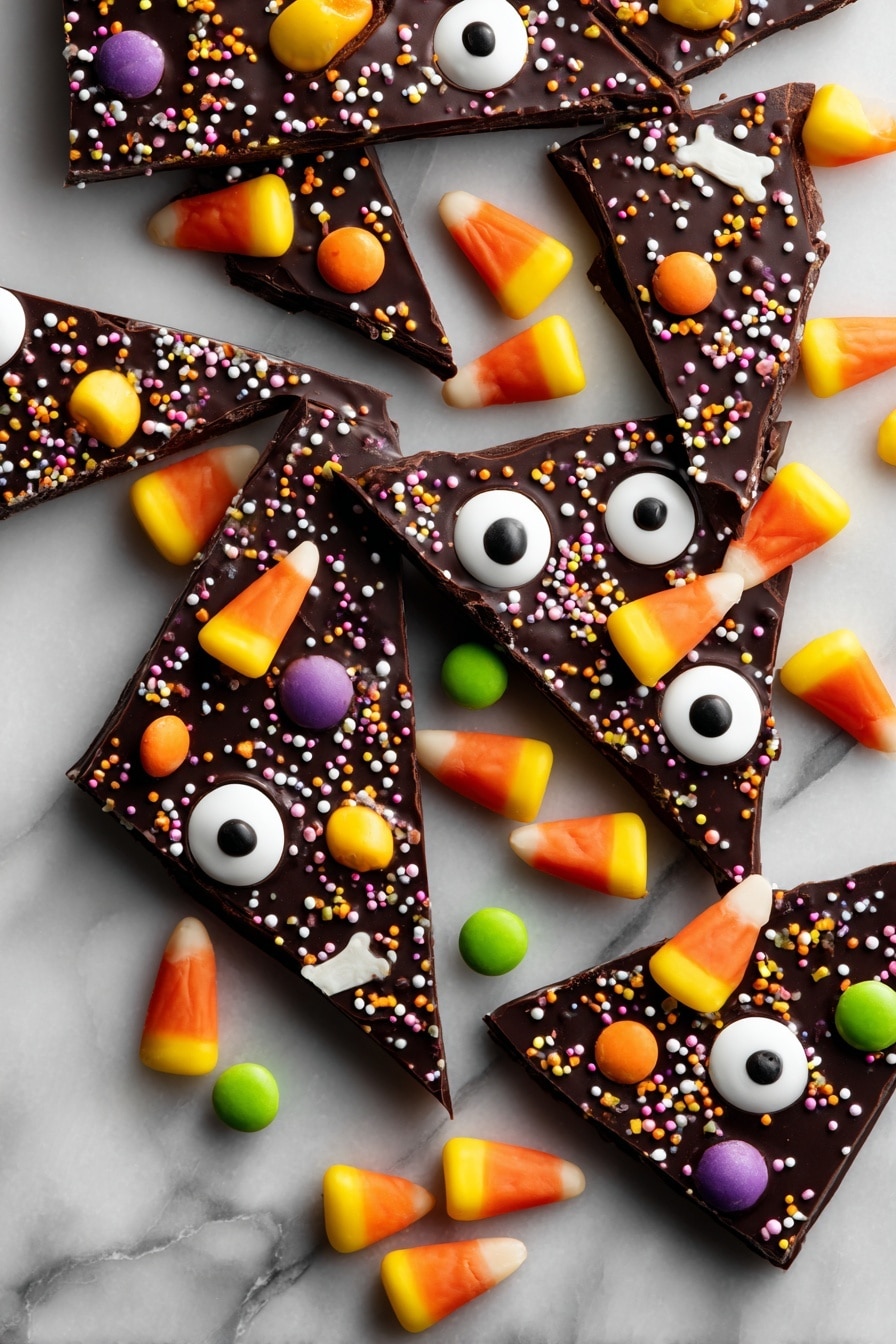
If you’re on the hunt for a festive treat that’s as fun to make as it is to eat, you’ve got to try this Halloween Chocolate Bark Recipe. I absolutely love how this simple, customizable bark transforms plain chocolate into a spooky, colorful masterpiece. Whether you’re throwing a Halloween party or just want an easy Halloween snack to impress the fam, this recipe has your back — and it couldn’t be easier or more delicious.
Why You’ll Love This Recipe
- Super Easy & Quick: You’ll have this Halloween chocolate bark ready in under 30 minutes with almost no cleanup.
- Customizable Toppings: Swap in your kid’s favorite candies or whatever’s leftover from Halloween night.
- Perfect for Parties or Gifts: Break it into fun shards and share the spooky joy with friends and neighbors.
- All Skill Levels Welcome: Whether you’re a first-time chocolate melter or a bark pro, this recipe guides you all the way.

Ingredients You’ll Need
The magic of this Halloween Chocolate Bark Recipe lies in its simplicity and variety. The smooth melted chocolate acts as the perfect canvas, while the spooky, colorful toppings give it that festive punch — and you can get creative with what you choose!
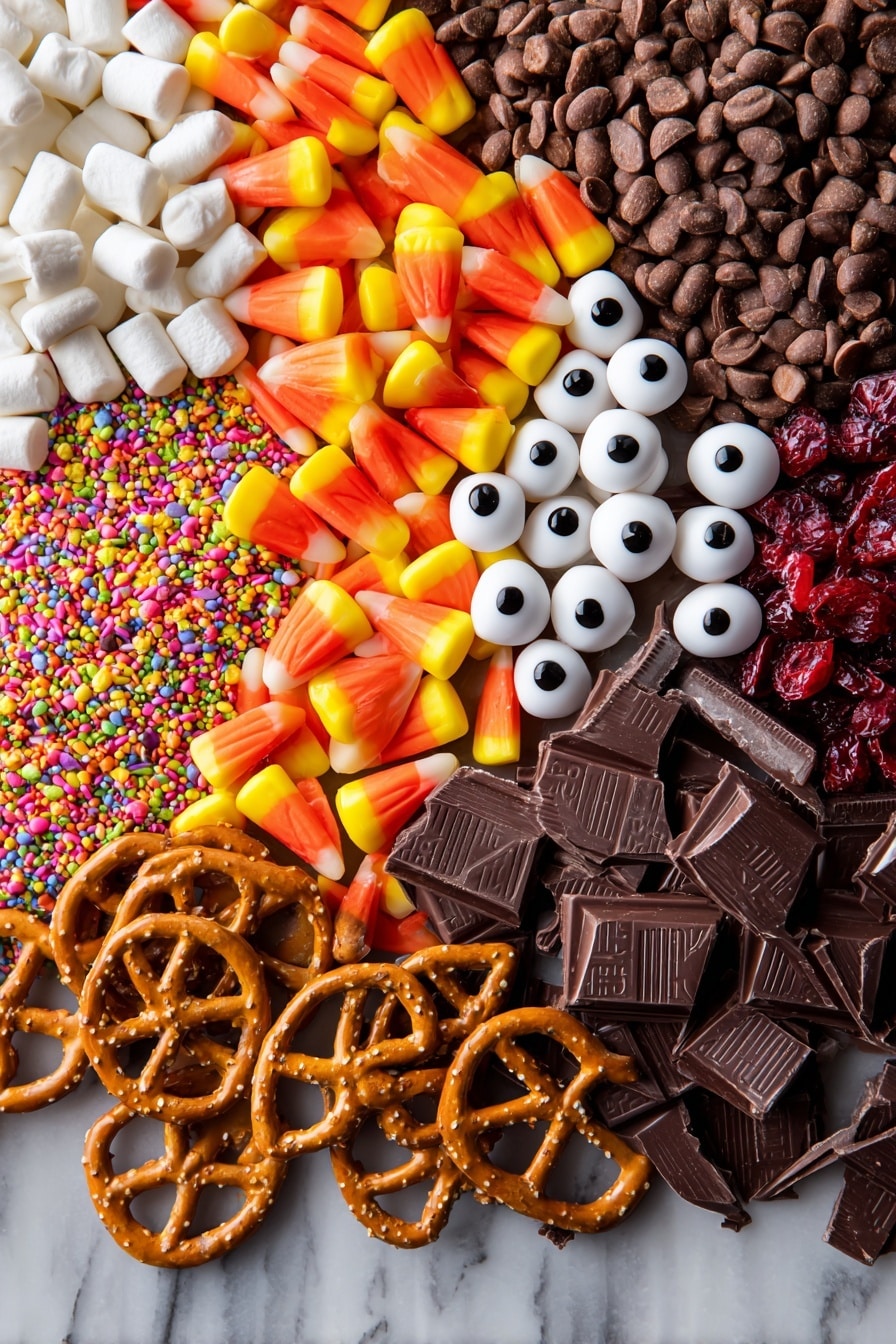
- Semisweet or bittersweet chocolate chips or bars: I find bittersweet adds richness without overwhelming sweetness, but semisweet works beautifully too.
- Candy corn: A Halloween staple that adds a fun pop of color and chewy texture.
- Halloween sprinkles and candy eyeballs: These take the spooky vibe up a notch; I especially love the googly candy eyes!
- Pretzels: Great for a salty crunch, balancing the sweetness perfectly.
- Leftover Halloween candy (like M&Ms, Reese’s Pieces): Chop them up and sprinkle on for plenty of variety.
- Nuts (almonds, peanuts, pistachios): Adds texture and a bit of protein — plus, makes the bark that much more satisfying.
- Dried fruit (cranberries, apricots): I like the tartness they add — a nice twist!
- Broken potato chips: Don’t underestimate this salty crunch; it’s surprisingly delicious.
- Oreo cookies: Especially the Halloween-themed ones, for a fun twist on cookies and cream.
- Flaky sea salt: Just a sprinkle lifts all the flavors and complements the chocolate so well.
- Mini marshmallows: Soft, sweet, and perfect for kids to spot.
- Gummy worms: A classic creepy crawlies garnish that always brings smiles.
- Granola: Adds a wholesome crunch, especially if you like textures in your bark.
- Broken graham crackers: Another fun crunch and a bit of mild sweetness.
- Flaked or shredded coconut: Gives tropical flavor and a pretty snow-like look against the dark chocolate.
- Roasted pumpkin seeds (pepitas): A seasonal twist that amps up texture and nuttiness.
Variations
The beauty of this Halloween Chocolate Bark Recipe is how easy it is to make your own. I often switch up toppings depending on what candy my kids bring home or what flavor combos I’m craving that year. Feel free to experiment — it’s all about making it yours.
- White Chocolate Base: I tried using white chocolate once, and wow, it gave the bark a ghostly, snowy vibe that was perfect for Halloween.
- Peanut Butter Swirls: Adding a swirl of peanut butter before the chocolate sets makes the bark creamy and crazy addictive.
- Vegan/Dairy-Free Option: Use dairy-free chocolate chips and skip marshmallows to keep it vegan-friendly.
- Extra Crunch: Toast some nuts or pumpkin seeds before adding for that extra toasty flavor boost.
How to Make Halloween Chocolate Bark Recipe
Step 1: Prep Your Space and Ingredients
First things first, line a rimmed baking pan with parchment paper. This is your chocolate canvas, and the parchment will make it super easy to pop the bark off later without any stuck bits. While you’re at it, sort out your toppings so they’re within reach. Having everything prepped makes the process smooth, especially if you’re working with kids or multitasking between Halloween festivities.
Step 2: Melt That Chocolate
Use a double boiler to gently melt your chocolate chips or chopped bars. I usually fill a saucepan with a couple inches of water, heat it almost to a simmer, then rest a heatproof bowl on top — making sure the bowl doesn’t touch the water. Stir frequently until the chocolate is silky smooth and glossy. If you’re in a hurry, the microwave works too — heat in short 20-30 second bursts, stirring in between to avoid burning.
Step 3: Spread the Chocolate with Love
Pour the melted chocolate onto your parchment-lined pan. Grab a knife or an offset spatula and gently spread the chocolate evenly until it’s about 1/4 to 1/2 inch thick. This thickness gives you a solid bark that’s not too fragile but still easy to bite into. I learned the hard way that too thin a layer can break into crumbly bits, so don’t be shy with spreading!
Step 4: Add Your Halloween Toppings
Now for the fun part — sprinkle your candy corn, sprinkles, candy eyeballs, and any other goodies you’re using evenly over the top. Press them down just a little so they stick to the chocolate, but not too much that they sink in. This step is where you get to bring your spooky style to life — I love mixing bright orange, black, and white bits for a seriously festive feel.
Step 5: Let It Harden
Leave your bark to harden at room temperature for at least two hours, or pop it in the fridge for about 30 minutes if you want to speed things along. The goal is a firm, snap-worthy bark that breaks apart easily. Just remember: avoid the temptation to break it too soon or it might crumble on you — patience here really pays off.
Pro Tips for Making Halloween Chocolate Bark Recipe
- Don’t Overheat Chocolate: I’ve scorched chocolate before; keep the heat low and stir constantly for silky results.
- Use Parchment Paper: It’s a total game changer for easy cleanup and flawless bark removal.
- Press Toppings Lightly: Just a gentle press helps your toppings stick without sinking in or losing their shape.
- Don’t Skip the Chill: If you rush chilling, the chocolate might crack unevenly or break too fragilely — patience is key!
How to Serve Halloween Chocolate Bark Recipe
Garnishes
I love adding a few extra candy eyeballs or some festive chocolate spiders on top just before serving for that “wow” factor. Sometimes, I dust a tiny sprinkle of edible glitter or lightly dust confectioner’s sugar to mimic a ghostly effect — it’s subtle but adds a fun flair that guests always ask about.
Side Dishes
This Halloween Chocolate Bark pairs perfectly with a cup of steaming hot cocoa, especially when the nights turn chilly. For parties, I often serve it alongside bowlfuls of spiced popcorn or caramel apples to keep the treats diverse and exciting.
Creative Ways to Present
Looking for cool ways to serve? I like breaking the bark into chunks and arranging them in a glass jar with festive ribbons, or stacking the pieces on a Halloween-themed tray lined with black lace doilies for dramatic effect. For classroom parties, I bag individual pieces in clear cellophane bags tied with mini orange and black bows — instant hit!
Make Ahead and Storage
Storing Leftovers
If you have leftovers (and trust me, that’s likely), store your bark in an airtight container at room temperature or in a cool, dry spot. I’ve found that it stays fresh for up to two weeks. Just keep it away from heat sources or direct sunlight to prevent melting.
Freezing
I’ve frozen leftover bark wrapped tightly in parchment and foil inside a freezer-safe bag. When you want to enjoy it again, just thaw at room temperature — it keeps the texture nice without condensation messing up the toppings.
Reheating
This bark is best enjoyed as-is, but if it gets a bit cold and too hard, just let it sit at room temperature for a few minutes before digging in. Unlike baked goods, reheating isn’t necessary, and skipping it preserves that perfect crunch and texture.
FAQs
-
Can I use white or milk chocolate instead of semisweet in this Halloween Chocolate Bark Recipe?
Absolutely! White chocolate gives a sweet, creamy flavor that’s great if you want a ghostly or snowy look. Milk chocolate is sweeter and pairs well with salty or tart toppings. Just watch your melting temperature closely, especially with white chocolate, since it’s more sensitive to heat.
-
How do I prevent my chocolate from seizing while melting?
Chocolate seizes when even a little moisture gets into it. Be sure all your equipment is completely dry before you start melting. Use low heat, stir frequently, and avoid steam or water dripping into the chocolate. If you use the microwave, short bursts with stirring between help as well.
-
Can I make this Halloween Chocolate Bark Recipe without candy toppings?
Yes, you can keep it simple with just the chocolate and maybe a sprinkle of flaky sea salt or nuts for texture. But adding colorful candy toppings really makes it festive and fun, especially for Halloween.
-
How long does Halloween Chocolate Bark last?
Stored properly in a cool, dry place inside an airtight container, the bark can last up to two weeks without losing texture or flavor. Just keep it away from heat to avoid melting.
Final Thoughts
This Halloween Chocolate Bark Recipe has become a favorite in my family because it’s so easy, flexible, and festive all at once. Every year, I look forward to pulling it out for fall gatherings and seeing the smiles it brings — especially from the kids. If you want a quick project that leads to jaw-dropping Halloween treats, I genuinely recommend giving this a try. You’ll feel proud whipping up a batch, and trust me, your friends and family will be asking for the recipe next year!
Print
Halloween Chocolate Bark Recipe
- Prep Time: 10 minutes
- Cook Time: 10 minutes
- Total Time: 20 minutes
- Yield: 12 servings 1x
- Category: Dessert
- Method: Stovetop
- Cuisine: American
Description
This Halloween Chocolate Bark recipe is a festive and easy-to-make treat perfect for the spooky season. Rich semisweet chocolate is melted and spread thin, then topped with colorful candy corn, sprinkles, candy eyeballs, and your choice of fun Halloween-themed toppings. It sets quickly and can be customized with nuts, pretzels, dried fruit, or leftover candy for a deliciously sweet and crunchy treat to share at parties or give as gifts.
Ingredients
Chocolate Base
- 1 pound semisweet or bittersweet chocolate chips (or chopped chocolate bars)
Toppings
- 1/3 cup candy corn
- 1/4 cup Halloween sprinkles and/or candy eyeballs
Optional Topping Ideas
- Pretzels
- Leftover Halloween candy (M&Ms, Reese’s Pieces, candy bars), chopped into bite-sized pieces if needed
- Nuts like almonds, peanuts, or shelled pistachios
- Dried fruit such as cranberries or chopped dried apricots
- Broken potato chips
- Oreo cookies (especially Halloween-colored), chopped
- Flaky sea salt
- Mini marshmallows
- Gummy worms
- Granola
- Broken graham crackers
- Flaked or shredded coconut
- Roasted pumpkin seeds (pepitas)
Instructions
- Prepare pan: Line a rimmed baking pan with parchment paper to ensure easy removal and cleanup.
- Melt chocolate: Using a double boiler, gently heat the chocolate chips or chopped chocolate, stirring frequently until the chocolate is fully melted and smooth. Alternatively, you can melt the chocolate in the microwave in short bursts, stirring often to prevent burning.
- Spread chocolate: Pour the melted chocolate onto the prepared baking pan. Using a knife or offset spatula, spread it evenly until about 1/4- to 1/2-inch thick.
- Add toppings: While the chocolate is still warm and soft, evenly sprinkle candy corn, Halloween sprinkles, candy eyeballs, and any other chosen toppings over the surface.
- Let it set: Allow the chocolate bark to harden at room temperature for at least 2 hours until firm. Alternatively, place it in the refrigerator for about 30 minutes until it is set enough to break into pieces.
- Serve and store: Once firm, break the bark into pieces. Serve immediately or store in an airtight container in a cool place to keep fresh.
Notes
- To melt chocolate in the microwave, heat in 20- to 30-second intervals, stirring well between each burst to avoid overheating and burning.
- You can customize the bark with any favorite candies, nuts, or other mix-ins based on your preferences or what you have on hand.
- Storing in a cool place prevents the chocolate from melting or blooming.
Nutrition
- Serving Size: 1 piece (approx. 1 oz)
- Calories: 150
- Sugar: 18g
- Sodium: 15mg
- Fat: 9g
- Saturated Fat: 5g
- Unsaturated Fat: 3g
- Trans Fat: 0g
- Carbohydrates: 20g
- Fiber: 2g
- Protein: 2g
- Cholesterol: 5mg