
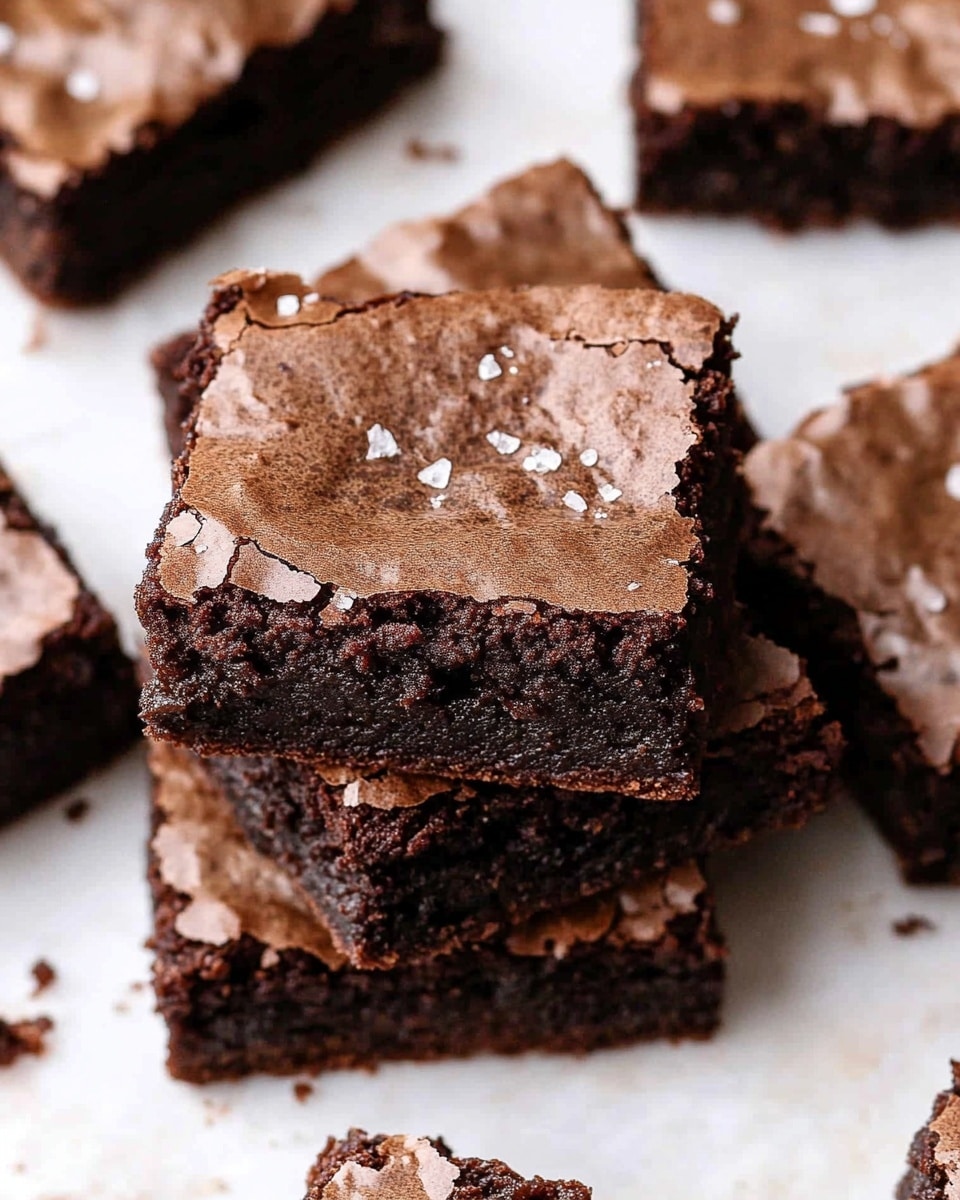
If you re a fan of rich, fudgy brownies with a twist, you re going to adore this Espresso Brownies Recipe. The deep chocolate flavor is enhanced beautifully by just the right amount of espresso powder, giving these brownies a subtle coffee kick without overpowering their classic taste. I love this recipe because it balances the bitterness of dark cocoa and espresso with the sweetness of sugar and a nutty browned butter base-it s a flavor combo that hits all the right notes.
Whether you re baking for a casual weekend treat, a special occasion, or simply craving something cozy to enjoy with your afternoon coffee, these espresso brownies will never disappoint. You ll find that the texture is perfectly fudgy but still has a slight cakey crumb, making them easy to slice and share. Trust me, once you try this Espresso Brownies Recipe, it ll quickly become a go-to in your dessert lineup.
Why You’ll Love This Recipe
- Bold Flavor Boost: Espresso powder intensifies the chocolate flavor for a rich, sophisticated taste.
- Fudgy Texture: Browned butter and the right bake time create a chewy, moist brownie you ll go back to again and again.
- Simple Ingredients: Using pantry staples with a few special touches means you can whip these up anytime.
- Perfect for Sharing: The espresso flavor pairs wonderfully with coffee or milk, making it a crowd-pleaser at gatherings.
Ingredients You’ll Need
Each ingredient in this Espresso Brownies Recipe plays an important role – the quality of your chocolate, for example, really makes a difference, and the espresso powder is what brings it all together in a subtle but wonderful way.
- Unsalted Butter: I always use cold butter so I can brown it slowly for that amazing nutty flavor.
- Semi-Sweet Chocolate Chips: Melting these with the butter creates a silky base; pick good-quality chips for best results.
- All-Purpose Flour: Helps give structure without making the brownies cakey.
- Dark Cocoa Powder: Adds intense chocolate flavor and works hand-in-hand with the espresso.
- Espresso Powder: This is the secret ingredient that amplifies the chocolate flavor – don t skip it!
- Salt: Enhances all the other flavors, especially the bittersweet elements.
- Granulated Sugar: Provides sweetness and helps with the brownie s chewy texture.
- Large Eggs: Binds everything together and adds richness.
- Vanilla Extract: A small splash rounds out the flavors beautifully.
Variations
One of the things I like most about this Espresso Brownies Recipe is how easy it is to make it your own. Whether you want to amp up the coffee flavor or add some texture, there are some fun ways to switch things up.
- Add Nuts: I often toss in chopped walnuts or pecans for a crunchy contrast – my family goes crazy for this addition.
- Mocha Lovers: Drizzle warmed melted chocolate mixed with a little espresso on top for a mocha glaze that s a total showstopper.
- Gluten-Free: Swap all-purpose flour for a 1:1 gluten-free blend and bake a bit longer; this still works wonderfully.
- Spicy Twist: A pinch of cayenne or cinnamon stirred into the dry ingredients gives a subtle warming kick that I adore in colder months.
How to Make Espresso Brownies Recipe
Step 1: Brown the Butter with Love
This is the first and most important step to nailing an incredible flavor. Start by melting the cold unsalted butter on medium heat; it will foam, pop, and crackle – don t turn away, and stir occasionally! When you see golden brown bits on the bottom and smell a nutty aroma, remove the pan from heat immediately and scrape all the browned butter into a bowl. This browning step adds an irresistible depth I never skip.
Step 2: Melt Chocolate with Butter
Next, add your semi-sweet chocolate chips to the warm browned butter and stir gently until fully melted and smooth. This creates a rich chocolate base that s silky and smooth – if you have any unmelted chunks, give it a few more seconds; patience here pays off in the final texture.
Step 3: Mix Dry Ingredients
In a separate bowl, whisk together the all-purpose flour, dark cocoa powder, espresso powder, and salt. Combining these before mixing helps evenly distribute the espresso flavor and cocoa intensity throughout your batter. Keep this bowl nearby as you prepare the wet ingredients.
Step 4: Whisk Eggs and Sugar
In your mixing bowl, beat the eggs, sugar, and vanilla extract together on medium speed for about 1-2 minutes until the mixture is light and fluffy. This step incorporates air, meaning your brownies won t be too dense – a little lift goes a long way!
Step 5: Combine Wet and Dry
While the mixer is running low, slowly drizzle the melted butter and chocolate mixture into your egg-sugar batter. Then, gently fold the flour mixture in using a spatula – use gentle strokes, just until blended to avoid overmixing, which can toughen your brownies.
Step 6: Bake to Perfection
Pour the batter into a parchment-lined 8×8 metal baking pan. Pop it into a preheated 350°F (180°C) oven and bake for 30-40 minutes, but here s what I ve learned: your oven and pan type matter a lot. If you re using a glass or silicone pan, or one with rounded edges, expect it to take closer to 45-50 minutes. Check for doneness by inserting a toothpick – it should come out with moist crumbs, not wet batter.
Step 7: Cool and Slice
Once baked, let the brownies cool completely in the pan on a wire rack. Cutting warm brownies can get messy and gummy, so I always wait. When cool, use a hot sharp knife – I dip mine in hot water and wipe clean between cuts – to slice into 16 perfect squares.
Pro Tips for Making Espresso Brownies Recipe
- Brown Butter Slowly: Browning butter takes time and attention – don t rush it, or you ll miss that nutty flavor that sets these brownies apart.
- Use Metal Pan if You Can: I found that metal pans bake more evenly and quicker; glass or silicone pans need longer baking adjustments.
- Don t Overmix Batter: Folding the dry ingredients gently keeps the brownies tender rather than tough and dry.
- Sharp Knife for Slicing: Heating and cleaning your knife between cuts gives you clean brownies without crumbling or sticking.
How to Serve Espresso Brownies Recipe

Garnishes
I like to keep garnishes simple so the espresso and chocolate shine. A dusting of powdered sugar or a light sprinkle of cocoa powder works perfectly. Sometimes I add a few espresso beans on top for a pretty, thematic touch that s fun to nibble on. For a special occasion, a drizzle of caramel sauce or a dollop of whipped cream turns these brownies into a dessert everyone raves about.
Side Dishes
Espresso brownies pair wonderfully with a scoop of good-quality vanilla ice cream or a dollop of mascarpone cheese for a creamy contrast. I ve also served them alongside fresh berries or a simple espresso latte for an all-out coffee-themed treat. If you re feeling fancy, a glass of red wine or a rich dessert stout elevates the experience beautifully.
Creative Ways to Present
For parties, I like to cut these brownies into smaller bite-sized pieces and arrange them on a decorative platter with espresso bean clusters. Sometimes I make layered espresso brownie parfaits by crumbling the brownies and layering them with whipped cream and chocolate shavings in clear glasses. For gifting, wrapping squares in parchment and tying with a cute ribbon always makes them feel extra special.
Make Ahead and Storage
Storing Leftovers
I store leftover espresso brownies in an airtight container at room temperature for up to 3 days – they stay fudgy and moist. If your kitchen is warm, I recommend refrigerating them but bring the brownies to room temp before serving to enjoy the full flavor and texture.
Freezing
Freezing is a fantastic way to keep these brownies fresh longer. I wrap individual squares tightly in plastic wrap, then place them in a freezer-safe container or bag. When you re ready to indulge, thaw at room temperature or warm slightly in the microwave – they taste almost as good as fresh!
Reheating
To reheat, I pop a brownie in the microwave for about 10-15 seconds – just enough to bring back that soft, melty center without drying it out. If you re feeling fancy, a quick warm-up in a toaster oven wrapped in foil works wonders too.
FAQs
-
Can I use instant coffee instead of espresso powder in this recipe?
Yes! Instant coffee can work as a substitute if you don’t have espresso powder on hand, although espresso powder is specially made to dissolve better and provide a purer coffee flavor. Use the same amount as espresso powder, but be cautious-instant coffee can be a bit more bitter, so you might want to adjust the amount slightly to taste.
-
Why do I brown butter for these brownies?
Browned butter adds a rich, nutty depth of flavor that plain melted butter can’t achieve. It enhances the chocolate and espresso notes beautifully, giving your brownies a complex, irresistible taste. Skipping this step will still produce brownies but without that extra flavor boost.
-
How do I know when my espresso brownies are done baking?
Insert a toothpick into the center; it should come out with moist crumbs but no wet batter. Because ovens vary and pans differ, start checking at 30 minutes. If your pan is glass or has rounded edges, the brownies may need more time-up to 45-50 minutes. Avoid overbaking to keep them fudgy.
-
Can I add mix-ins like nuts or chocolate chunks to this recipe?
Absolutely! Nuts like walnuts, pecans, or almonds add a lovely crunch, and extra chocolate chunks provide gooey pockets of melted chocolate. Just fold them in gently with the dry ingredients to avoid overmixing the batter.
-
Is it okay to use a non-stick baking pan instead of lining with parchment paper?
You can use a non-stick pan, but I highly recommend lining with parchment to ensure your brownies release cleanly. Using parchment also helps with cleanup and prevents the edges from overbaking or sticking.
Final Thoughts
This Espresso Brownies Recipe has become one of my absolute favorites because of its deep, sophisticated flavor and fudgy texture that melts in your mouth. Making it feels like a special little ritual, especially browning the butter – it smells divine and sets a cozy tone for baking. I encourage you to try it out for your next bake day; your kitchen will smell amazing, and you ll have a batch of brownies that you ll be proud to share (or keep all to yourself!). Trust me, these espresso brownies are a sweet little pick-me-up you ll reach for again and again.
Print
Espresso Brownies Recipe
- Prep Time: 20 minutes
- Cook Time: 28 minutes
- Total Time: 48 minutes
- Yield: 16 brownies 1x
- Category: Dessert
- Method: Baking
- Cuisine: American
Description
These rich and fudgy Espresso Brownies combine the deep flavors of dark cocoa and espresso powder with melted chocolate and browned butter for an indulgent treat. Perfectly balanced with a hint of espresso bitterness, these brownies have a moist, dense texture and a luscious chocolatey finish. Easy to prepare and baked in a single pan, they’re an ideal dessert or coffee-time snack.
Ingredients
Wet Ingredients
- 1 cup unsalted butter, cold
- 1 cup + 2 tbsp semi-sweet chocolate chips
- 3 large eggs
- 1/2 tbsp vanilla extract
Dry Ingredients
- 1 cup all-purpose flour
- 3 tbsp dark cocoa powder
- 2 tbsp espresso powder
- 1/2 tsp salt
- 1 1/4 cups granulated sugar
Instructions
- Preheat and Prepare Pan: Preheat your oven to 350°F (180°C). Line an 8×8 inch square baking pan with parchment paper, allowing some overhang for easy removal later, and set aside.
- Brown the Butter: In a stainless steel pan over medium heat, melt the cold butter. Allow it to cook, foaming and crackling for 10-12 minutes, stirring occasionally. When it turns a nutty brown color and you see brown bits forming at the bottom, remove from heat and scrape all contents into a heatproof bowl.
- Melt Chocolate: Add the semi-sweet chocolate chips to the warm browned butter and stir gently until the chocolate is completely melted and combined. Set aside to cool slightly.
- Combine Dry Ingredients: In a separate bowl, whisk together the all-purpose flour, dark cocoa powder, espresso powder, and salt until evenly mixed. Set aside.
- Mix Eggs and Sugar: In a mixing bowl, whisk the eggs, granulated sugar, and vanilla extract at medium speed for 1-2 minutes until the mixture is fluffy and slightly thickened.
- Incorporate Butter-Chocolate Mixture: With the mixer running on low speed, slowly stream the melted browned butter and chocolate mixture into the egg and sugar batter. Mix just until incorporated.
- Fold in Dry Ingredients: Using a rubber spatula, gently fold the dry ingredient mixture into the wet batter until just combined. Be careful not to overmix to maintain brownie tenderness.
- Bake the Brownies: Pour the batter evenly into the prepared baking pan. Bake in the preheated oven for 30-40 minutes, or until a toothpick inserted into the center comes out with moist crumbs sticking to it. Baking time may extend to 45-50 minutes if your pan is non-metal or has rounded edges.
- Cool and Serve: Remove the brownies from the oven and allow them to cool completely on a wire rack. Once cooled, use a hot sharp knife (wiped clean between cuts) to slice into 16 equal squares. Serve and enjoy!
Notes
- Use a metal 8×8 inch square baking pan for even baking and to achieve the recommended bake time.
- Browned butter adds a nutty depth and richness but requires careful attention to avoid burning.
- The espresso powder intensifies the chocolate flavor without making the brownies taste like coffee.
- Use a hot knife to cut brownies cleanly and prevent crumbling.
- Store brownies in an airtight container at room temperature for up to 4 days or refrigerate for longer freshness.
Nutrition
- Serving Size: 1 brownie
- Calories: 240
- Sugar: 25g
- Sodium: 90mg
- Fat: 14g
- Saturated Fat: 8g
- Unsaturated Fat: 5g
- Trans Fat: 0g
- Carbohydrates: 28g
- Fiber: 3g
- Protein: 3g
- Cholesterol: 65mg


