
These Easy Gluten Free Oat Waffles are morning magic for busy people who crave something wholesome—and crave it fast. The batter stirs together in a flash, and you’ll have golden, crisp waffles on your plate in about 25 minutes. Made with nourishing oat flour, these waffles are gluten-free by nature, lightly sweetened with maple syrup, and finished with a dreamy crispness that holds up under any topping you love. Whether it’s a relaxed weekend or a hectic weekday, this recipe brings all the cozy breakfast vibes with none of the fuss.
Why You’ll Love This Recipe
- Speedy and Effortless: These waffles come together with minimal prep and no fancy equipment—just two bowls, your waffle iron, and a whisk.
- Naturally Gluten-Free: Crafted with oat flour, they’re perfect for anyone avoiding gluten (just make sure to grab certified gluten-free oats).
- Stunning Texture: Expect a crisp outside and a soft, fluffy interior that won’t fall apart—no cardboard texture here!
- Customizable: The flavors are mild, ready to dress up with your favorite toppings or creative mix-ins.
- Hearty and Satisfying: Oat flour delivers natural fiber and energy for a breakfast that truly fills you up.
Ingredients You’ll Need
- Oat Flour: The star ingredient for tender, gluten-free waffles; choose certified gluten-free if needed.
Tip: You can blend rolled oats at home for DIY oat flour! - Baking Powder: Plumps up the batter for airy, light waffles every time.
- Salt: Don’t skip it—it’s key for highlighting the waffle’s flavors.
- Cinnamon (Optional): Adds a hint of warmth; completely up to your preference.
- Milk of Choice: Any kind works; light coconut, almond, or regular dairy milk all yield great results.
- Melted Coconut Oil or Butter: For rich flavor and just the right crispness; pick coconut oil for dairy-free or stick with butter for that classic taste.
- Eggs: The essential binder for structure and fluffiness.
- Maple Syrup: A natural sweetener that complements the nutty oats.
- Vanilla Extract: Rounds out the flavor with a subtle aromatic note.
Note: If your coconut oil firms up when mixed with cold milk, simply warm the wet mixture gently until smooth again.
Note: You’ll find the complete list of ingredients, along with their exact measurements, in the printable recipe card at the bottom of this post.
Variations
- Dairy-Free Swap: Use plant-based milk (such as almond, oat, or soy) and melted coconut oil to keep these waffles 100% dairy-free.
- Egg-Free Version: Use two flax eggs (2 tablespoons ground flaxseed + 5 tablespoons water) for a vegan-friendly batch.
Note: Flax eggs will make the waffles slightly more tender and less crisp but still delicious! - Add-Ins: Fold in fresh blueberries, sliced bananas, mini chocolate chips, or chopped nuts for extra bursts of flavor and texture.
- Spices: Amp up the flavor by adding a pinch of nutmeg or cardamom alongside the cinnamon.
- Savory Approach: Omit the maple syrup and vanilla, and add a handful of shredded cheese and some herbs for a brunch-ready savory waffle.
How to Make Easy Gluten Free Oat Waffles
Step 1: Mix the Dry Ingredients
Grab a mixing bowl and whisk together your oat flour, baking powder, salt, and a pinch of cinnamon if you’re using it. This ensures the leavening agent and spice are evenly distributed.
Step 2: Combine Wet Ingredients
In another bowl, whisk your milk of choice, melted coconut oil or butter, eggs, maple syrup, and vanilla extract until well combined. If you notice your coconut oil solidifying, don’t worry—just microwave the mixture in short bursts until everything is liquid again.
Step 3: Bring It All Together
Pour the wet mixture into the bowl with your dry ingredients. Stir gently with a large spoon until just combined; it’s perfectly fine if the batter is a little lumpy! Avoid overmixing for fluffier waffles.
Step 4: Rest the Batter
Let the mixed batter sit for 10 minutes. This brief rest lets the oat flour soak up the moisture, ensuring beautifully thick waffles.
Step 5: Preheat the Waffle Iron
Plug in your waffle maker and set it to medium-high if it has adjustable settings. While it heats, give your batter a quick swirl to recombine.
Step 6: Cook the Waffles
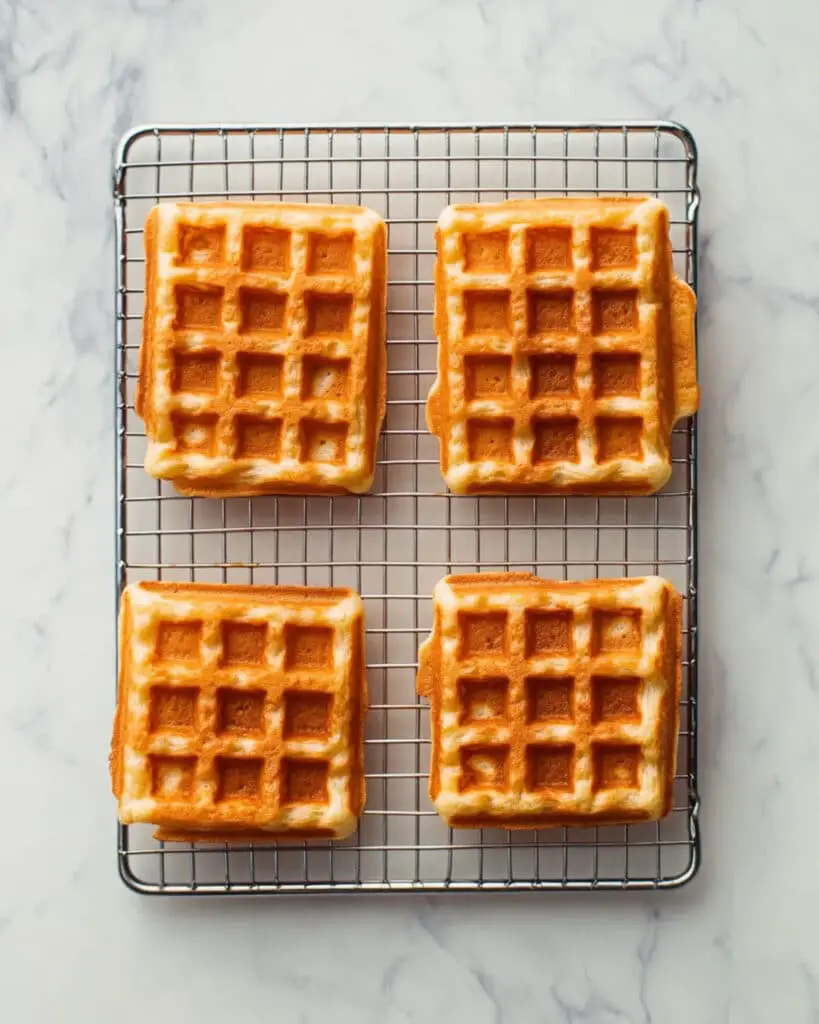
Spoon the batter onto the center of your hot waffle iron, covering most of the surface. Close the lid and cook until your waffle is a gorgeous golden brown and the edges are enticingly crisp. Move the finished waffles to a cooling rack (not a stack!) to preserve their crisp magic.
Step 7: Serve and Enjoy
Repeat with the rest of your batter. Serve these beauties hot, topped with maple syrup, a pat of butter, your favorite nut butter, or fresh fruit.
Pro Tips for Making the Recipe
- Let Batter Rest: The 10-minute rest makes a huge difference in the final texture—don’t rush it.
- Don’t Stack Waffles: Place cooked waffles on a rack or baking sheet instead of stacking, so each one stays perfectly crisp.
- Oven Hold: If making a big batch, keep waffles warm and crispy in a 200°F oven until ready to serve.
- Grease the Iron: If your waffle maker isn’t nonstick, lightly brush with extra oil or butter to prevent sticking.
How to Serve
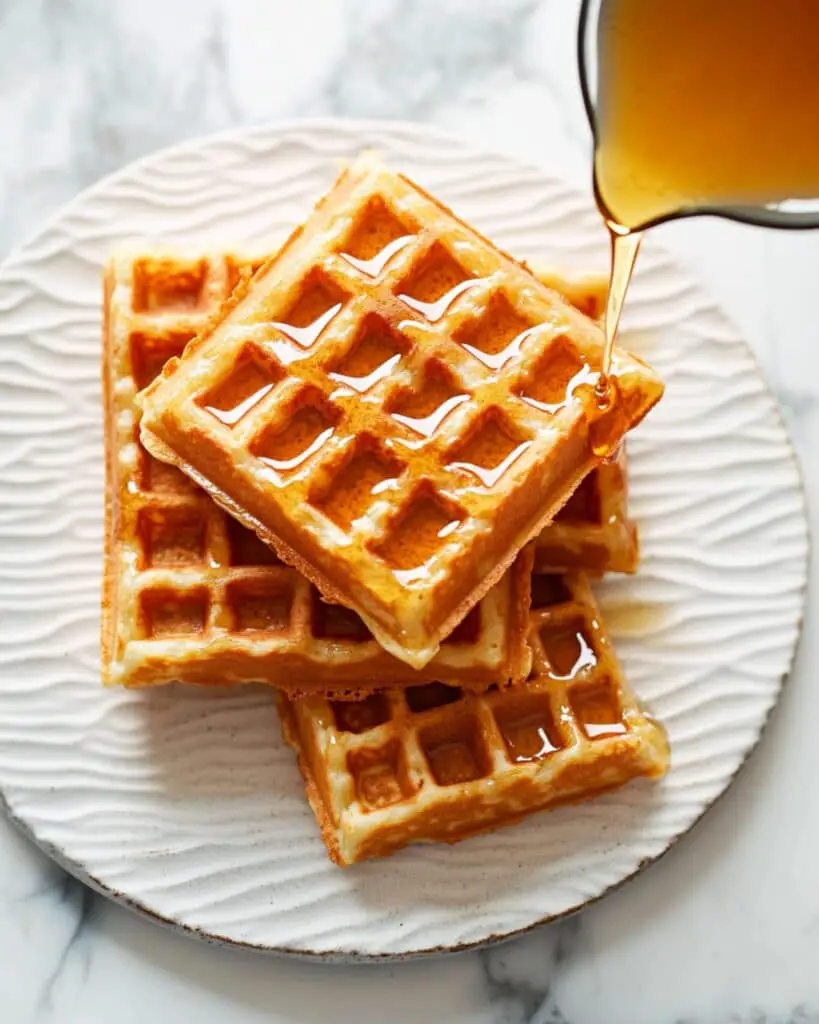
These oat waffles are a dream with classic toppings like pure maple syrup and a pat of butter, but don’t stop there! Try topping with fresh berries, sliced bananas, or a dollop of Greek yogurt for freshness. Craving extra crunch? Sprinkle on toasted nuts or add a swirl of almond or peanut butter. For a special twist, stack up waffles with a layer of whipped cream or fruit compote for a breakfast “cake.” Pair with hot coffee or tea for a truly satisfying start to your day.
Make Ahead and Storage
Storing Leftovers
- Let any leftover waffles cool completely, then store them in an airtight container or zip-top bag. Refrigerate for up to 3 days for the best texture.
Freezing
- These waffles freeze beautifully! Place them in a single layer on a baking sheet to freeze, then transfer to a freezer bag. Waffles will keep for up to 3 months.
Reheating
- Reheat straight from the fridge or freezer in a toaster or toaster oven (ideal for restoring crispness). Alternatively, warm in a 350°F oven until hot and crisp.
FAQs
-
Can I make oat flour at home if I don’t have any?
Absolutely! Just blend rolled oats in a high-speed blender or food processor until you get a fine, flour-like consistency. Use certified gluten-free oats if you need to keep the recipe gluten-free.
-
What if I don’t have coconut oil or butter?
No problem—use any mild oil you have on hand, such as avocado oil or a light olive oil. The flavor will be slightly different, but the waffles will still cook and crisp nicely.
-
My waffles aren’t crisp, what went wrong?
Stacking hot waffles traps steam, which can make them soggy. Always cool waffles in a single layer on a rack, and if needed, pop them back in a toaster for a quick crisp refresh!
-
Can I make these waffles egg-free?
Yes! Swap the eggs for two flax eggs (mix 2 tablespoons flaxseed meal with 5 tablespoons water and let sit for 5 minutes). The result will be a bit more tender, but still holds together well and tastes great.
Final Thoughts
If you want a breakfast that feels special but takes almost no time, these Easy Gluten Free Oat Waffles are a must-try. They bring the best crispy, fluffy waffle experience—without the gluten, the guesswork, or the long prep. Play with your favorite toppings and make them your own. Once you try these, you’ll wonder why you ever waited for the weekend to have waffles. Enjoy experimenting and happy cooking!
Print
Easy Gluten Free Oat Waffles Recipe
- Prep Time: 15 mins
- Cook Time: 10 mins
- Total Time: 25 minutes
- Yield: 6 Belgian-style waffles 1x
- Category: Breakfast
- Method: Stovetop
- Cuisine: American
- Diet: Gluten Free
Description
These easy gluten-free oat waffles are light, crisp, and delicious, made with wholesome oat flour. Perfect for a nutritious breakfast, they are naturally gluten-free and customizable with your favorite choice of milk and toppings. Quick to make and ideal for anyone seeking a healthier, hearty twist on classic waffles.
Ingredients
Dry Ingredients
- 1 1/2 cups (128 grams) oat flour, certified gluten-free if necessary
- 2 teaspoons baking powder
- 1/2 teaspoon salt
- Pinch of cinnamon (optional)
Wet Ingredients
- 3/4 cup room temperature milk of choice (light coconut milk, nut milk, or cow’s milk)
- 1/4 cup + 1 tablespoon melted coconut oil, or 5 tablespoons unsalted butter, melted
- 2 large eggs
- 2 tablespoons maple syrup
- 1 teaspoon vanilla extract
Instructions
- Mix Dry Ingredients: In a large mixing bowl, whisk together the oat flour, baking powder, salt, and cinnamon if using. Ensure the ingredients are well blended for even distribution.
- Combine Wet Ingredients: In a separate bowl, whisk the milk, melted coconut oil or butter, eggs, maple syrup, and vanilla extract until completely combined. If the coconut oil solidifies, gently warm the wet mixture in short microwave intervals until smooth.
- Combine Wet and Dry Mixtures: Pour the wet ingredients into the bowl with the dry ingredients. Stir gently with a large spoon until the mixture is just combined—it’s okay if the batter is slightly lumpy. Allow the batter to rest for 10 minutes so the oat flour can absorb the liquid.
- Preheat Waffle Iron: While the batter rests, plug in your waffle iron to preheat. For best results, set the temperature or browning dial to medium-high if your waffle maker provides this option.
- Cook Waffles: After 10 minutes, stir the batter again briefly. Pour enough batter onto the heated waffle iron to cover the center and much of the surface, then close the lid. Cook until the waffle is deeply golden and crisp.
- Cool and Serve: Transfer finished waffles to a cooling rack or a baking sheet, taking care not to stack them so they remain crisp. To keep waffles warm, place them in a 200°F oven until ready to serve. Repeat with the remaining batter. Serve hot with maple syrup, nut butter, or your favorite toppings.
Notes
- Use certified gluten-free oat flour if you need these to be strictly gluten-free.
- If your coconut oil solidifies in the wet ingredients, gently heat to re-liquefy.
- Don’t stack waffles on top of each other to preserve crispiness.
- You can substitute butter for coconut oil if desired.
- The batter may remain slightly lumpy; do not overmix.
Nutrition
- Serving Size: 1 waffle (of 6)
- Calories: 210
- Sugar: 4g
- Sodium: 340mg
- Fat: 10g
- Saturated Fat: 6g
- Unsaturated Fat: 3.5g
- Trans Fat: 0g
- Carbohydrates: 24g
- Fiber: 2g
- Protein: 4g
- Cholesterol: 55mg


