
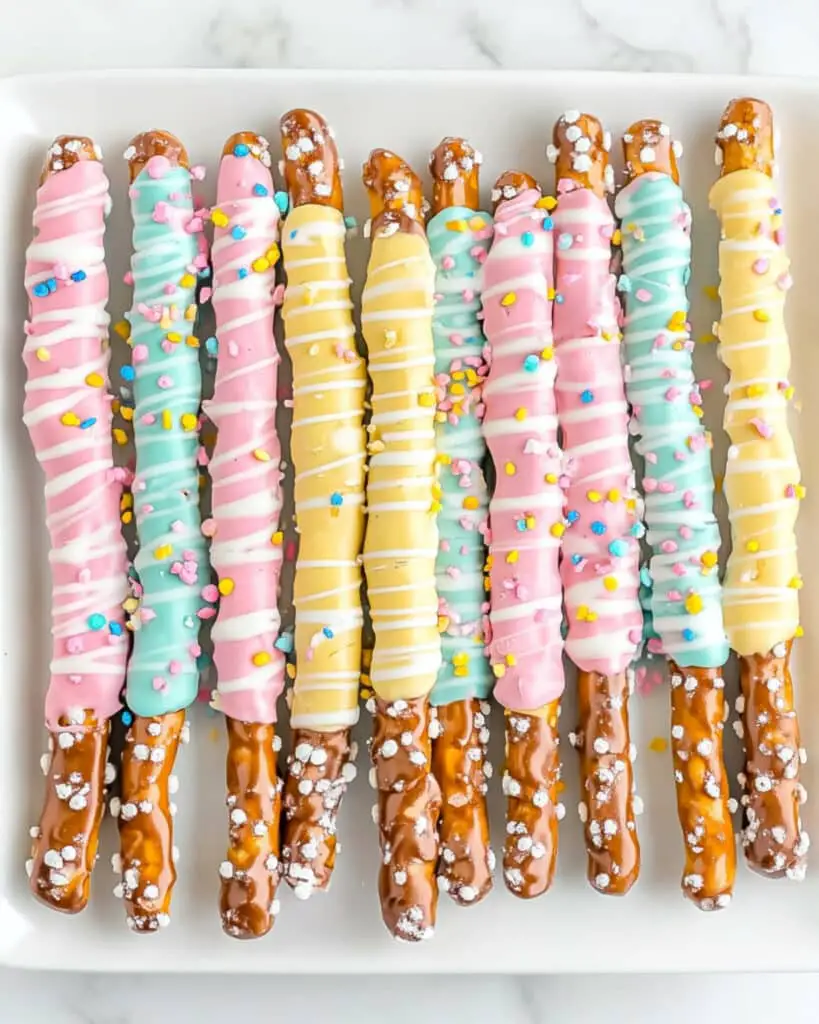
These Easter Pretzel Rods are the perfect sweet-and-salty treat for your holiday festivities! With their festive pastel colors and delightful contrast of crunchy pretzel and smooth chocolate, they’re irresistible to both kids and adults. The best part? They take just minutes to prepare but look like you spent hours creating them – your secret is safe with me!
Why You’ll Love This Recipe
- No Baking Required: Who needs a hot oven when you can create these beautiful treats with just a microwave?
- Kid-Friendly Project: Little hands will love helping with the dipping and decorating – it’s a perfect family activity during Easter break!
- Impressive Presentation: These pretzel rods look absolutely stunning on your Easter table or packaged as gifts, yet they’re surprisingly simple to make.
- Customizable: Change up the colors and toppings to match any holiday or celebration throughout the year.

Ingredients You’ll Need
- Pretzel Rods: The sturdy base that provides that perfect salty crunch to balance the sweetness. Make sure they’re not broken before you start!
- White Chocolate Chips: These create the creamy, sweet coating that serves as the “canvas” for your decorations. Use good quality chips for the smoothest melt.
- Candy Melts: These add those beautiful pastel accents that make the pretzel rods look festive and spring-like. They come in various colors, so choose what matches your Easter theme.
- Pastel M&Ms: The star decoration that brings texture, color, and an extra chocolate hit. Crushing them creates a beautiful confetti-like effect!
Note: You’ll find the complete list of ingredients, along with their exact measurements, in the printable recipe card at the bottom of this post.
Variations
Color Themes
Try different color combinations depending on the holiday – red and green for Christmas, orange and black for Halloween, or team colors for a sports celebration!
Topping Options
- Sprinkles: Rainbow jimmies, nonpareils, or shaped sprinkles add fun texture
- Chopped Nuts: Add a nutty crunch with almonds, pecans, or peanuts
- Cookie Crumbs: Crushed Oreos or graham crackers provide a delicious texture contrast
- Mini Chocolate Chips: For an extra chocolate boost
Flavor Twists
- Use milk or dark chocolate instead of white chocolate
- Add a drop of peppermint or orange extract to the melted chocolate
- Drizzle with peanut butter chips for a nutty variation
How to Make Easter Pretzel Rods
Step 1: Prepare Your Workspace
Line a cookie sheet with parchment paper or foil. Have all your decorations ready to go, as you’ll need to work quickly once the chocolate is melted.
Step 2: Melt the White Chocolate
Pour white chocolate chips into a tall glass (this makes dipping easier). Microwave in 30-second intervals, stirring thoroughly between each interval until completely smooth. Be careful not to overheat!
Step 3: Dip the Pretzels
Hold each pretzel rod by one end and dip into the melted white chocolate, covering about 2/3 of the rod. Gently tap against the side of the glass to remove excess chocolate, then place on your prepared cookie sheet.
Step 4: Add M&M Topping
While the chocolate is still wet, sprinkle your crushed M&Ms over the coated pretzels. Work with 5-6 pretzels at a time so the chocolate doesn’t set before you can add toppings.
Step 5: Prepare the Drizzle
Melt your candy melts in a microwave-safe bowl, following the same 30-second interval method until smooth. Transfer to a small zip-top bag and snip a tiny corner for easy drizzling.
Step 6: Add Decorative Drizzle
Drizzle the melted candy over the pretzel rods in a zigzag pattern, creating a festive finish.
Step 7: Set and Enjoy
Allow the pretzels to cool completely until the chocolate is fully set, about 1 hour at room temperature (or 15-20 minutes in the refrigerator).
Pro Tips for Making the Recipe
- Temperature Matters: If your kitchen is warm, place your baking sheet in the refrigerator for a few minutes before starting so the chocolate sets faster.
- Smooth Chocolate: Add a teaspoon of coconut oil or shortening to your melting chocolate for a smoother consistency that’s easier to dip.
- Work in Batches: Only dip 5-6 pretzels at a time so you can add the toppings before the chocolate hardens.
- Prevent Breakage: Handle the pretzel rods gently during dipping to avoid breaking them in the thick chocolate.
- Dipping Technique: A tall, narrow glass works better than a wide bowl for dipping pretzel rods.
How to Serve
Easter Celebrations
Place these colorful pretzel rods in a tall clear glass or mason jar for a beautiful edible centerpiece that doubles as a dessert.
Gift Packaging
Wrap groups of 2-3 pretzel rods in clear cellophane bags tied with pastel ribbons for adorable Easter basket stuffers or party favors.
Dessert Table
Arrange your pretzel rods alongside other Easter treats like cupcakes and cookies for a stunning dessert spread.
Make Ahead and Storage
Storing Leftovers
Store completely cooled pretzel rods in an airtight container at room temperature, with parchment paper between layers to prevent sticking. They’ll stay fresh for up to 2 weeks.
Make Ahead Tips
These can be made 3-5 days in advance of your event. The pretzel may lose some crunchiness over time, but they’ll still taste delicious!
Freezing
For longer storage, place fully set pretzel rods in a freezer-safe container with parchment between layers. Freeze for up to 2 months. Thaw at room temperature for about 30 minutes before serving.
FAQs
-
Can I use milk chocolate instead of white chocolate?
Absolutely! Milk or dark chocolate works beautifully with these pretzel rods. Just follow the same melting instructions and watch carefully to avoid burning the chocolate.
-
My chocolate seized up and became grainy. What happened?
This usually happens when moisture gets into your melting chocolate or if it’s overheated. Make sure your glass and spoon are completely dry, and always melt chocolate slowly at 50% power in your microwave.
-
How far in advance can I make these for a party?
These pretzel rods stay fresh for about 2 weeks when stored properly in an airtight container at room temperature. The pretzels might lose some crunchiness after the first week, but they’ll still taste great!
-
Can I use regular M&Ms instead of pastel ones?
Definitely! While pastel M&Ms give these a spring feel, you can use any color M&Ms to match your event theme. Regular, holiday, or specialty M&Ms all work wonderfully.
Final Thoughts
These Easter Pretzel Rods are one of those magical recipes that deliver maximum impact with minimal effort. The combination of crunchy pretzel, smooth white chocolate, and colorful candy creates a treat that’s as delightful to look at as it is to eat. Whether you’re making them with kids, as homemade gifts, or as a last-minute addition to your Easter spread, they’re guaranteed to bring smiles all around. Give them a try – you might just find yourself making them for every holiday!
Print
Easter Pretzel Rods Recipe
- Prep Time: 15 minutes
- Cook Time: 1 hour
- Total Time: 1 hour 15 minutes
- Yield: 24 servings 1x
- Category: Desserts
- Method: No-cook
- Cuisine: American
Description
These Easter Pretzel Rods are a delightful and festive treat, perfect for celebrating the holiday or any special occasion! Crunchy pretzel rods are coated in creamy white chocolate, topped with crushed pastel M&Ms, and beautifully drizzled with colorful candy melts. They’re simple to make, fun to decorate, and perfect for both kids and adults to enjoy.
Ingredients
- 24 Pretzel Rods
- 1 bag of 15 oz white chocolate chips
- 1/4 bag of 12 oz candy melts
- 1/2 cup of pastel M&M candies (crushed)
Instructions
- Melt the White Chocolate
In a tall microwave-safe glass, melt the white chocolate chips in the microwave. Heat them in 30-second increments, stirring well between each interval, until fully melted and smooth. This method ensures a creamy and even texture for dipping. - Dip the Pretzel Rods
Dip each pretzel rod into the melted white chocolate, coating it evenly. Place the dipped rods on a baking sheet lined with parchment paper, aluminum foil, or a wire rack. Ensure proper spacing to prevent sticking. - Add Crushed M&Ms
Crush the pastel M&Ms into small pieces. While the white chocolate coating is still wet, sprinkle the crushed M&Ms generously over the pretzel rods. This step adds both color and delicious texture. - Prepare and Melt the Candy Melts
Pour the candy melts into a microwave-safe dish and melt them in the microwave. Use 30-second intervals, stirring in between until smooth. These candy melts will be used to add a decorative drizzle. - Drizzle the Candy Melts
Using a spoon or piping tool, drizzle the melted candy melts over the pretzel rods already coated with white chocolate and M&Ms. Go back and forth in a zig-zag motion for a festive appearance. - Cool and Finish
Allow the pretzel rods to cool completely. You can let them chill at room temperature or place them in the fridge for faster cooling. Once hardened, they’re ready to serve and enjoy!
Notes
- To crush the M&Ms easily, place them in a zip-top bag and gently hit them with a rolling pin or the back of a spoon.
- For a smoother white chocolate melting process, add a teaspoon of coconut oil or shortening to the chocolate chips.
- Make these treats ahead of time and store them in an airtight container for up to a week.
- Experiment with different candy melt colors to match other holidays or events.
Nutrition
- Serving Size: 1 pretzel rod
- Calories: 120kcal
- Sugar: 16g
- Sodium: 81mg
- Fat: 5g
- Saturated Fat: 3g
- Unsaturated Fat: 2g
- Trans Fat: 0g
- Carbohydrates: 18g
- Fiber: 1g
- Protein: 2g
- Cholesterol: 0mg


