If you’re on the lookout for a show-stopping dessert that’s both fun and absolutely delicious, you have to try this Dead Velvet Cake Recipe. Trust me, it’s fan-freaking-tastic and a total crowd-pleaser — perfect for Halloween parties, spooky celebrations, or just when you want to wow your friends with something a little different. The juicy cream cheese frosting paired with the luscious “blood” drizzle makes this cake as striking as it is tasty. Stick with me and I’ll walk you through the steps to get this spooky beauty just right.
Why You’ll Love This Recipe
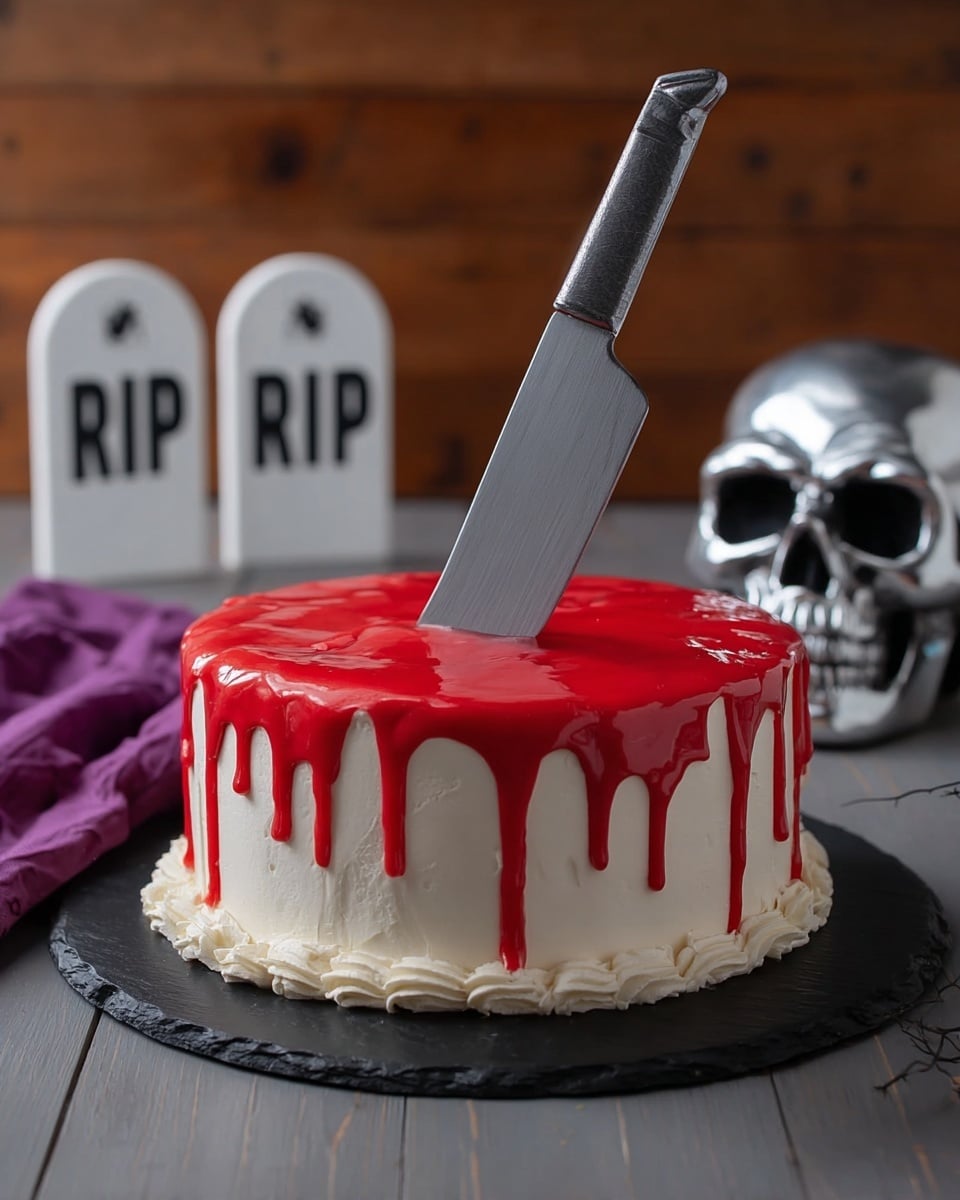
- Visually Stunning: The vibrant red “blood” drip over cream cheese frosting turns any cake into a spooky masterpiece.
- Easy to Make: Using a boxed red velvet mix keeps the process approachable without sacrificing flavor.
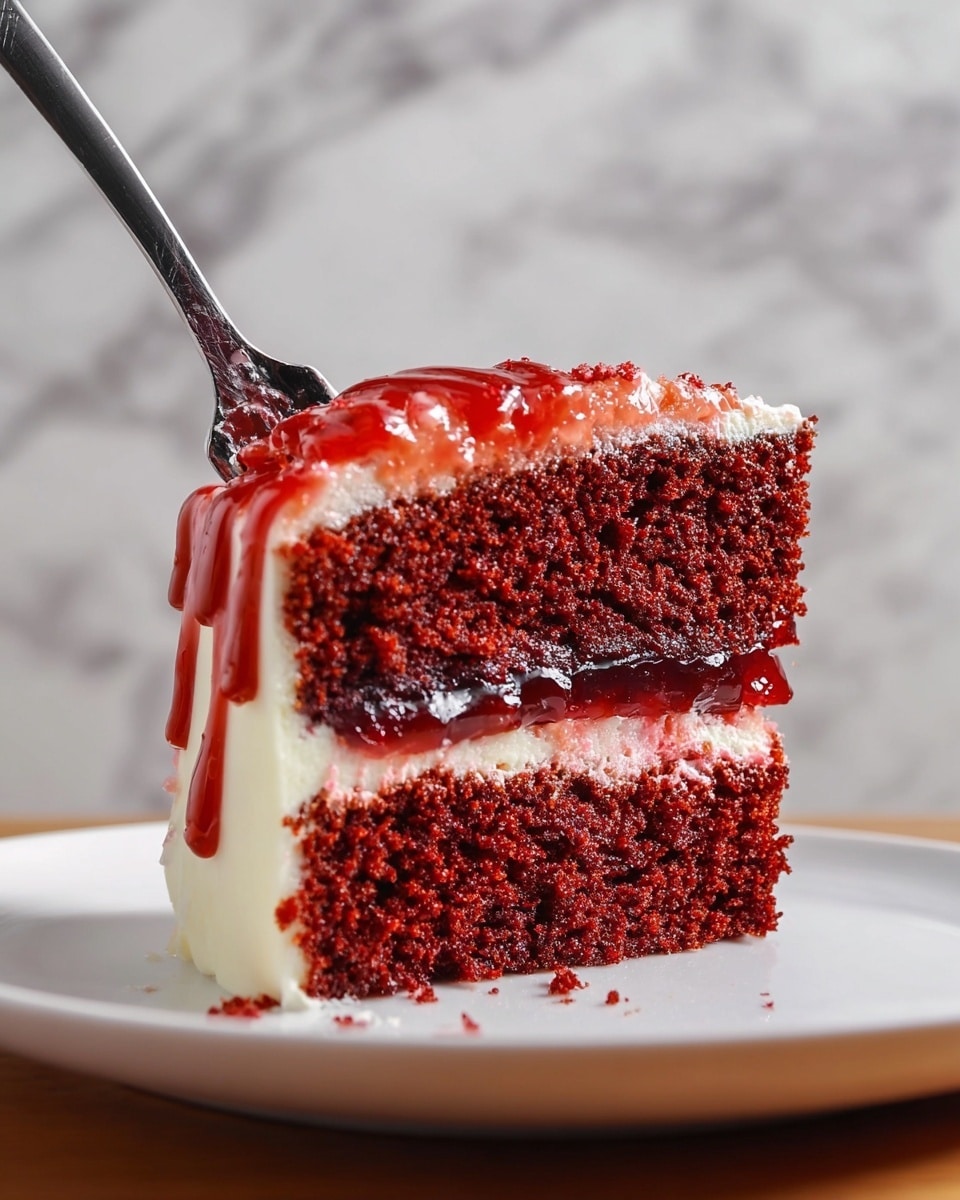
- Delicious Texture: Cream cheese frosting brings that perfect tangy creaminess, balancing the sweet “blood” drizzle.
- Perfect for Occasions: Whether it’s Halloween or a themed party, this cake will get everyone talking and coming back for seconds.
Ingredients You’ll Need
Before we dive into the baking, let’s chat about the ingredients — most of these you might already have on hand! The boxed red velvet cake mix simplifies things, and fresh cream cheese and butter are your secret weapons for a luscious frosting. And the “blood” — that’s a little homemade magic using cornstarch and corn syrup that you’re going to love.
- Red Velvet Cake Mix: Choose a quality brand and follow the box instructions for best results — this keeps it simple and reliable.
- Cream Cheese: Softened cream cheese gives the frosting its creamy tang; bring to room temperature for smooth mixing.
- Butter: Also softened — this helps create a fluffy frosting texture when whipped with the cream cheese.
- Powdered Sugar: Adds sweetness to the frosting without grit; sift if it’s clumpy for silky smoothness.
- Vanilla Extract: Enhances the flavor depth in both frosting and “blood” sauce.
- Cold Water: Used for the cornstarch mixture to thicken the syrup for the “blood.”
- Cornstarch: This thickens the “blood” mix, creating that perfect drip effect.
- Light Corn Syrup: Provides shine and stickiness to the “blood” so it clings beautifully to the cake.
- Red Food Coloring: The key for that rich, scary-red hue you want dripping down your cake.
Variations
Over time, I’ve personalized the Dead Velvet Cake Recipe in fun ways — whether swapping out corn syrup for honey for a different sweetness or mixing in a bit of espresso powder to intensify the red velvet flavor. You can totally put your own spin on this, depending on your taste or what you have in the pantry.
- Chocolate “Blood” Variation: I tried adding a tablespoon of cocoa powder to the “blood” mixture once, and the slightly chocolaty richness really added a unique twist my family adored.
- Dairy-Free Version: Swap cream cheese and butter for vegan alternatives; just make sure they’re soft enough to whip smoothly — it works great!
- Spiced Red Velvet: Adding a pinch of cinnamon and nutmeg to the cake batter gives it a warm seasonal note perfect for fall gatherings.
- Mini Bundt Cakes: For portion control and cute presentation, I’ve baked this recipe in mini bundt pans – the blood “drip” effect looks fantastic on a smaller scale.
How to Make Dead Velvet Cake Recipe
Step 1: Prep and Bake Your Red Velvet Layers
First things first: preheat your oven to 350ºF and butter and flour two 9-inch cake pans. This is the first trick I learned—thorough greasing and flouring prevents any sticking without overpowering the red color of the cake edges. Then prepare your red velvet cake batter according to the box directions; I like to mix by hand with a whisk to avoid over-beating, which can make the cake too dense. Divide the batter evenly between your pans and pop them in the oven. Bake following the box’s timing, but start checking 5 minutes early—every oven is its own beast! Once baked, let them cool completely before moving to the next step.
Step 2: Whip Up the Cream Cheese Frosting
While your cakes cool, it’s frosting time. In a large bowl, beat the softened cream cheese and butter together until light and fluffy — this takes about 3-5 minutes if you’re using a hand mixer or stand mixer. Then gradually add your powdered sugar and vanilla extract. Something I’ve discovered is that adding the powdered sugar slowly gives you a smoother finish without clouds of sugar dust everywhere. Keep beating until the frosting is silky smooth and spreadable but not runny. Trust me, this frosting is what takes this Dead Velvet Cake Recipe from good to unforgettable.
Step 3: Make the “Blood” Drip Sauce
Now for the fun part — the “blood.” In a small saucepan, stir together your cold water and cornstarch until completely smooth. Turn the heat to medium and pour in the light corn syrup. This is where you have to keep a close eye; let it simmer gently while stirring constantly for about 2 minutes. Once it thickens slightly, remove it from heat and quickly stir in vanilla extract and red food coloring until you hit that perfect gory shade. I remember the first time I got this mix just right — it clings so beautifully!
Step 4: Assemble Your Dead Velvet Cake
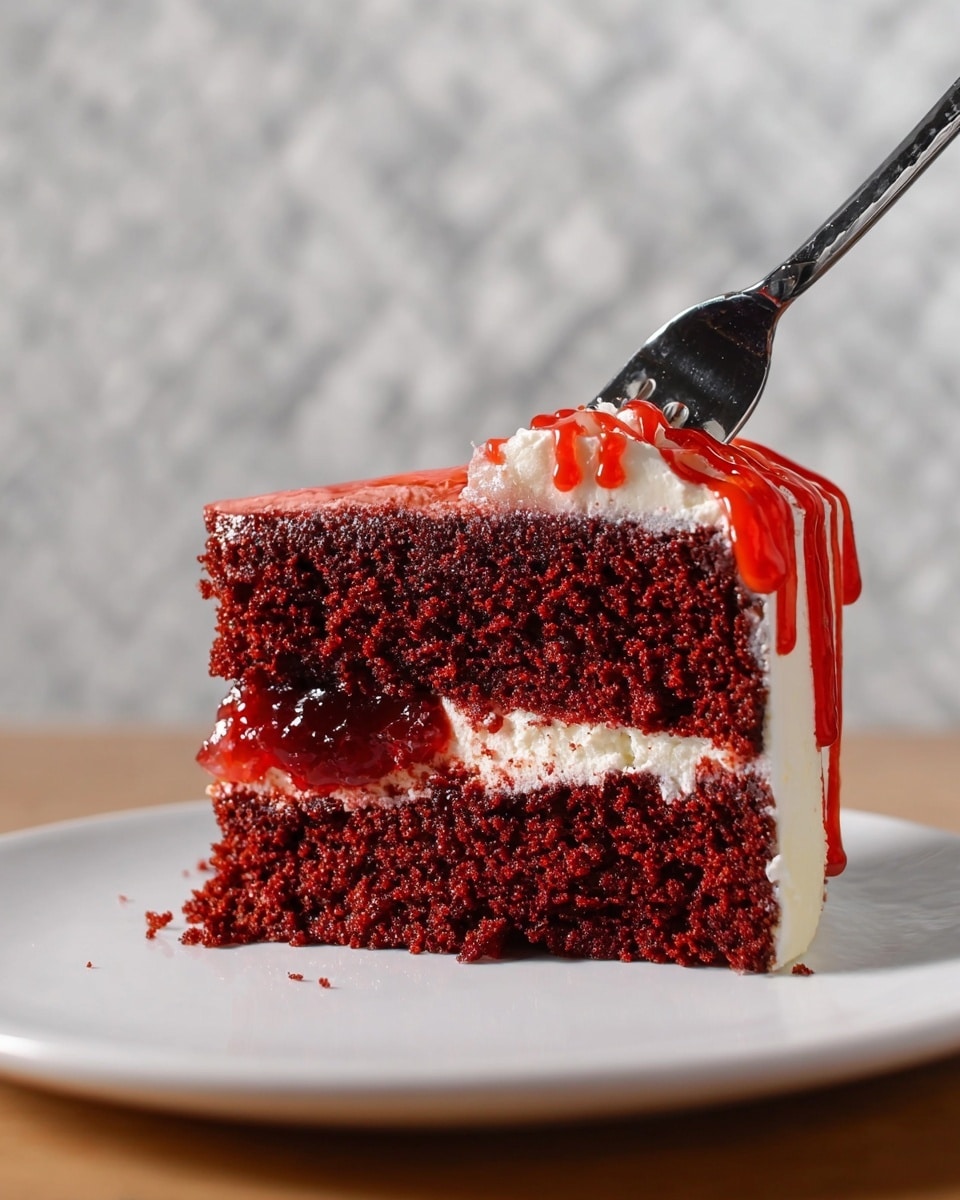
Place one cake layer on your serving plate and trim off the rounded dome to create an even surface. Next, spoon just enough “blood” onto this layer to dampen it — it gives a moist, intense burst of flavor. Then trim the dome off your second cake and place it upside down on top of the first. This layering trick adds height and surprise to the cake’s spooky look.
Step 5: Frost and Drip the Cake
Frost the entire cake generously with your cream cheese frosting. I love to smooth the top extra carefully for a sleek look — use a bench scraper or offset spatula dipped in warm water to get that perfect finish. Finally, pour your “blood” on the top, letting it drip naturally over the edges. This final touch is where your cake really comes alive; the contrast between red syrup and white frosting is just stunning. Chill it for at least 30 minutes so the “blood” sets slightly before serving. You’re ready to impress!
Pro Tips for Making Dead Velvet Cake Recipe
- Softening Ingredients: Always bring cream cheese and butter to room temperature for flawlessly smooth frosting without lumps.
- Even Cake Layers: Trim off domed tops for stacking stability and a professional look.
- Blood Sauce Consistency: Keep stirring the cornstarch mixture gently on the heat to avoid lumps and achieve that glossy, thick drip.
- Chill Before Serving: Letting the cake chill in the fridge helps the “blood” set, making slices neat and photo-ready.
How to Serve Dead Velvet Cake Recipe
Garnishes
I love keeping the garnish simple with this cake — just a few fresh cranberries or raspberries around the plate enhance that bloody vibe and add a fresh tartness. Sometimes I sprinkle a tiny pinch of edible glitter on the frosting for a subtle shimmer that makes the “blood” pop even more under party lights.
Side Dishes
For sides, a scoop of vanilla bean ice cream or a dollop of lightly whipped cream with a splash of cinnamon pairs perfectly with this Dead Velvet Cake Recipe. If you’re serving at a Halloween party, consider some spicy pumpkin soup or a tart cranberry punch to complement the rich flavors.
Creative Ways to Present
Once, I set this cake on a rustic wooden board with a few plastic “spider” decorations scattered around for Halloween — it was such a hit! I’ve also drizzled extra “blood” on the serving plate itself, creating a spooky effect like the cake just oozed red everywhere. For birthday parties, add edible flowers on top (just skip the blood if kids are around) and it’s suddenly elegant and festive.
Make Ahead and Storage
Storing Leftovers
Leftover cake? No problem. I store any uneaten Dead Velvet Cake tightly covered in the fridge — plastic wrap works well over the cake plate or you can pop it in a cake carrier. The cream cheese frosting holds up nicely for up to 3-4 days. Just bring it to room temperature before serving for the best texture and flavor.
Freezing
You can freeze this cake, but I recommend freezing un-frosted layers wrapped tightly in plastic wrap and foil to prevent freezer burn. When you’re ready, thaw fully in the fridge, then frost and assemble as usual. The “blood” sauce is best made fresh when serving for that maximum glossy drip.
Reheating
I don’t usually reheat this cake because it’s best enjoyed chilled or at room temperature. But if you prefer slightly warmed slices, a quick zap of 10 seconds in the microwave does the trick — just don’t overdo it or the frosting gets melty and the “blood” loses its structure.
FAQs
-
Can I make the Dead Velvet Cake Recipe without a boxed mix?
Absolutely! If you have a favorite red velvet cake recipe from scratch, you can use that instead. Just be mindful of the density and sweetness to work well with the cream cheese frosting and “blood” sauce.
-
What’s the best way to get the “blood” sauce thick enough?
Keep stirring the mixture constantly over medium heat and watch for it to thicken slightly before removing it from the heat. If it’s too thin, add a bit more cornstarch dissolved in cold water and cook for another minute.
-
Can I use a different frosting on this cake?
You can, but I highly recommend sticking with cream cheese frosting. Its tang balances the sweet “blood” drizzle perfectly and keeps the cake moist and flavorful.
-
How long can I keep the assembled cake before serving?
This cake is best served within 24 hours for maximum freshness and to keep the “blood” dripping vivid. Store in the fridge uncovered for a short time or lightly covered if longer.
-
Is there a way to make this cake less sweet?
Yes! Consider reducing powdered sugar slightly in the frosting or diluting the “blood” mixture with a bit more water. Adding a hint of lemon zest to frosting also cuts sweetness with fresh acidity.
Final Thoughts
I absolutely love how this Dead Velvet Cake Recipe turns out every single time — it’s fun to make, irresistibly delicious, and perfect for those moments when you want to impress without going overboard. From the tangy cream cheese frosting to that gleaming red “blood” drip, it’s just as tasty as it is eye-catching. I can’t wait for you to try this recipe and hear how your family and friends react — it might just become your new go-to cake for festive occasions (or even just because!). Happy baking and enjoy every spooky bite!
Print
Dead Velvet Cake Recipe
- Prep Time: 30 mins
- Cook Time: 30 mins
- Total Time: 2 hrs
- Yield: 8–10 servings 1x
- Category: Dessert
- Method: Baking
- Cuisine: American
Description
Dead Velvet Cake is a spooky-themed dessert featuring classic red velvet layers with a rich cream cheese frosting and a striking, shiny red “blood” glaze made from corn syrup and red food coloring. Perfect for Halloween or any eerie celebration, this cake combines moist, tender cake layers with a smooth, tangy frosting and a dramatic, glossy finish that drips down the sides for a haunting effect.
Ingredients
Red Velvet Cake
- 1 box Red Velvet cake mix, plus ingredients called for on box (usually eggs, oil, and water)
Cream Cheese Frosting
- 2 8–oz. packages cream cheese, softened
- 1 stick (1/2 cup) butter, softened
- 2 1/4 cups powdered sugar
- 1 tsp. vanilla extract
“Blood” Glaze
- 1/2 cup cold water
- 2 Tbsp. cornstarch
- 1/2 cup light corn syrup
- 1 tsp. vanilla extract
- Red food coloring, to desired intensity
Instructions
- Preheat and Prepare Cake Pans: Preheat your oven to 350ºF (175ºC). Butter and flour two 9-inch cake pans thoroughly to prevent sticking.
- Make and Bake Red Velvet Cake: Prepare the red velvet cake batter according to the box instructions, which typically includes mixing cake mix with eggs, oil, and water. Divide the batter evenly between the two prepared pans. Bake as directed on the box, usually for 25-30 minutes, until a toothpick inserted comes out clean. Let cakes cool.
- Prepare Cream Cheese Frosting: In a large bowl, beat together the softened cream cheese and butter until light and fluffy, about 3-5 minutes. Gradually add the powdered sugar and vanilla extract, mixing until smooth and lump-free. Chill if necessary to firm up.
- Make the “Blood” Glaze: In a small saucepan, whisk together the cold water and cornstarch until fully combined with no lumps. Place over medium heat and add the light corn syrup. Bring to a gentle simmer, stirring frequently, and cook for about 2 minutes until the mixture thickens. Remove from heat and stir in vanilla extract and enough red food coloring to achieve a deep red, blood-like color. Let cool slightly.
- Assemble the Cake: Place the bottom cake layer on a cake plate and trim off the dome to create a flat surface. Pour a small amount of the “blood” glaze onto this bottom layer, just enough to moisten it evenly.
- Add Top Layer: Trim the dome off the second cake layer as well, then carefully invert it and place it upside down on top of the bottom cake layer that has been glazed.
- Frost the Cake: Use the cream cheese frosting to cover the entire outside of the assembled cake, smoothing it out especially on top for a sleek finish.
- Decorate with Blood Drip: Pour the remaining “blood” glaze over the top of the frosted cake, letting it drip naturally down the sides for a dramatic, eerie effect. Serve promptly or refrigerate to keep fresh.
Notes
- For best results, ensure both cake layers are completely cooled before frosting to avoid melting the frosting.
- You can adjust the amount of red food coloring to get the perfect blood-red shade for the glaze.
- If the “blood” glaze thickens too much after cooling, warm it slightly to return to a pourable consistency.
- This cake serves about 8-10 people depending on slice size.
- Store leftover cake covered in the refrigerator for up to 3 days.
Nutrition
- Serving Size: 1 slice (1/10 of cake)
- Calories: 420
- Sugar: 35g
- Sodium: 320mg
- Fat: 22g
- Saturated Fat: 12g
- Unsaturated Fat: 8g
- Trans Fat: 0.5g
- Carbohydrates: 50g
- Fiber: 1g
- Protein: 4g
- Cholesterol: 65mg


