
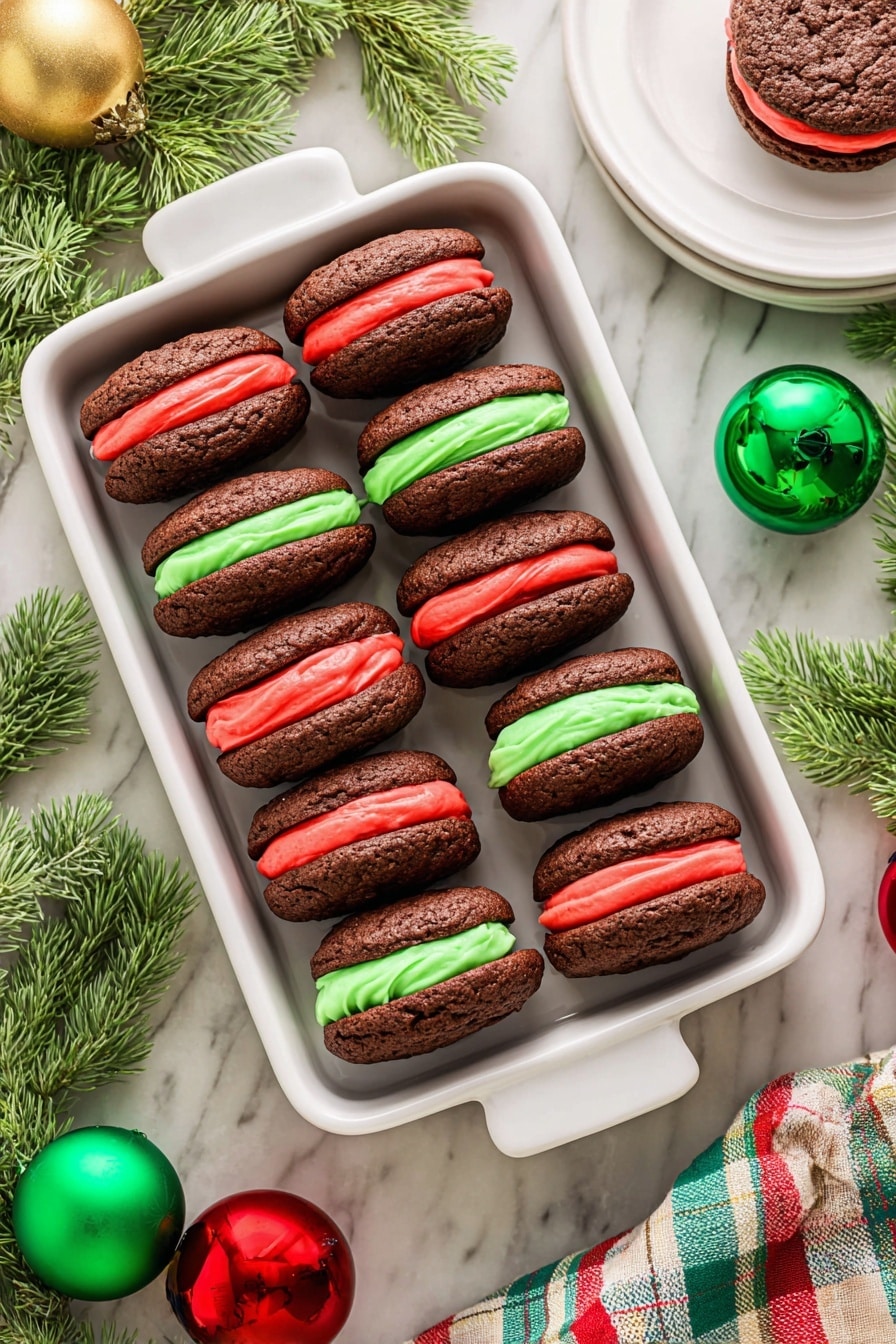
If you’re looking for a festive treat that’s both fun to make and absolutely delicious, I’m thrilled to share this Christmas Whoopie Pies with Marshmallow Filling Recipe with you. These soft, cakey whoopie pies sandwiched with a fluffy, sweet marshmallow filling are a holiday showstopper—plus you’ll find they’re surprisingly easy to whip up, even if you’re juggling a busy kitchen during the season.
Why You’ll Love This Recipe
- Super Easy Prep: Using devil’s food cake mix means no complicated batter mixing but still gets you cake-level softness every time.
- Festive and Fun: The red and green marshmallow filling adds a cheerful holiday pop that’s perfect for Christmas parties or gift giving.
- Kid-Friendly: My kids love helping me color and pipe the filling, making it a fun family activity.
- Make Ahead Friendly: These whoopie pies keep well in the fridge for days, so you can prep early and enjoy stress-free celebrations.
Ingredients You’ll Need
What I love about this Christmas Whoopie Pies with Marshmallow Filling Recipe is how common pantry staples come together to create something so festive and indulgent. Grab the devil’s food cake mix for rich chocolate flavor, and you’ll want cream cheese for that creamy, tangy filling that pairs perfectly with marshmallow fluff.
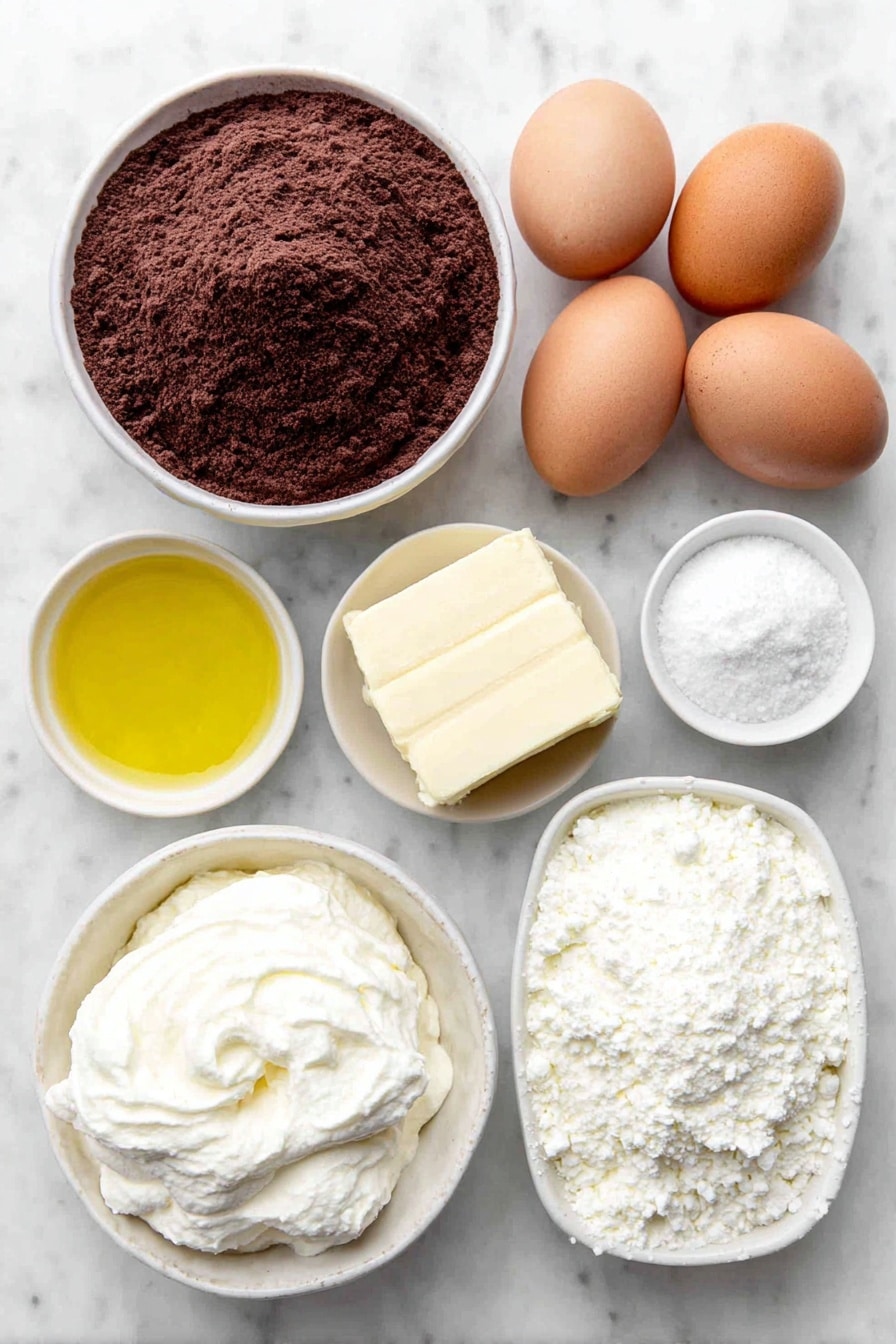
- Devil’s food cake mix: This shortcut gives you a wonderfully moist, chocolatey cookie base without fuss.
- Eggs: Provide structure and help the cookies rise just right.
- Oil: Keeps the cookie tender and soft – I like a neutral oil like vegetable or canola.
- Cream cheese: Room temperature is key here for smooth filling mixing.
- Marshmallow fluff: Gives you that pillowy, sweet filling texture that I adore.
- Vanilla extract: Just a tiny splash to deepen the flavor of the filling.
- Salt: Balances sweetness and enhances all the other flavors.
- Red and green gel food color: For that extra Christmas cheer in your filling—gel colors give you vibrant hues without thinning the consistency.
Variations
One of the best things about this Christmas Whoopie Pies with Marshmallow Filling Recipe is how easy it is to customize. I love switching things up depending on who I’m sharing with, so feel free to get creative!
- Flavor Twist: I’ve swapped the devil’s food cake mix for a red velvet mix once, which made the pies even more festive and paired beautifully with the colored filling.
- Dietary Adaptation: If you need gluten-free, there are excellent gluten-free chocolate cake mixes that work perfectly as a substitute.
- Filling Fun: Try mixing half the marshmallow filling with peanut butter for a nutty surprise—a real hit at holiday gatherings.
- Less Sweet Option: If you prefer, add less marshmallow fluff and increase cream cheese a bit to balance out sweetness.
How to Make Christmas Whoopie Pies with Marshmallow Filling Recipe
Step 1: Prepare Your Cookie Dough
Start by preheating your oven to 350°F and lining two baking sheets with parchment paper. This keeps the cookies from sticking and makes cleanup a breeze. In a large bowl, stir together the devil’s food cake mix, eggs, and oil until you have a thick, uniform batter. It’ll feel dense, which is exactly right—don’t be tempted to overmix or add extra liquid!
Step 2: Shape and Bake the Cookies
Next up, scoop tablespoons of dough and roll them into balls. Place them on your cookie sheets about 1.5 inches apart—these babies will spread a little. I use the bottom of a lightly sprayed glass to gently flatten each ball; it helps them bake evenly. Pop them into the oven for 8-10 minutes, until edges are set but the center still looks soft. Let them cool for 5 minutes on the sheet, then transfer to a wire rack to cool completely before you fill.
Step 3: Whip Up That Fluffy Marshmallow Filling
While the cookies cool, it’s time to prepare the filling. In your mixer bowl, beat together the cream cheese, marshmallow fluff, vanilla, and a pinch of salt until silky smooth. This part is pure magic—when you take a beat with the mixer, it goes from sticky chunks to an effortlessly creamy filling.
Step 4: Divide and Dye Your Filling
For the full Christmas effect, split the filling in half. Add red gel food color to one half and green to the other, mixing each until the color is vibrant and even. I find gel colors are best because you don’t need much, and they don’t make the filling too runny. Pop each colored filling into a piping bag—that control makes sandwiching these whoopie pies so much neater.
Step 5: Pipe the Filling and Assemble
Pipe the red filling onto six cooled cookies, the green filling onto another six, then top each with a plain cookie. Press gently to make sure the filling spreads just right without oozing out. And just like that, you have a batch of joyful Christmas Whoopie Pies with Marshmallow Filling ready to impress.
Pro Tips for Making Christmas Whoopie Pies with Marshmallow Filling Recipe
- Don’t Overbake Your Cookies: Pull them out when edges are set but centers look a little soft, they’ll firm up perfectly while cooling.
- Room Temperature Cream Cheese: This makes filling smoother with no lumps—take it out of the fridge early!
- Use Gel Food Coloring: It gives that rich festive color without watering down your filling.
- Chill Filled Pies Before Serving: I learned this helps the filling set so your whoopie pies hold together better and slice cleanly.
How to Serve Christmas Whoopie Pies with Marshmallow Filling Recipe
Garnishes
I like to sprinkle just a tiny bit of edible glitter or mini red and green sugar pearls on top of each pie for a little sparkle that wows guests. It’s subtle but adds that extra festive touch without overpowering the sweet marshmallow filling.
Side Dishes
These whoopie pies pair wonderfully with a warm cup of spiced hot chocolate or a simple peppermint tea. When hosting, I like to set them alongside an assortment of holiday cookies and fresh fruit to balance out the sweetness.
Creative Ways to Present
For a party, try stacking the whoopie pies on a tiered dessert stand with holly leaves decorating the edges—so pretty! Or wrap each pie individually in cellophane tied with red and green ribbon to make edible holiday gifts for neighbors and coworkers.
Make Ahead and Storage
Storing Leftovers
In my experience, storing these whoopie pies in an airtight container in the fridge keeps them fresh and soft for up to 5 days. I usually layer them with parchment paper to prevent sticking, and they taste just as good the next day.
Freezing
Freezing is a great option! I wrap each pie individually in plastic wrap, then place them all in a freezer bag. When you’re ready, thaw them in the fridge overnight and they’re practically freshly made—super convenient for busy holiday schedules.
Reheating
If you like your whoopie pies just a little warm, I pop them in the microwave for about 10 seconds. That softens the filling slightly without melting it all over. Just be careful not to heat them too long or they’ll get messy.
FAQs
-
Can I make Christmas Whoopie Pies with Marshmallow Filling Recipe dairy-free?
Yes! You can use dairy-free cream cheese alternatives and check that your marshmallow fluff is vegan-friendly. Just make sure to select products that whip up well for a creamy filling texture.
-
Can I use homemade chocolate cake batter instead of cake mix?
Absolutely. If you prefer homemade batter, make sure it’s thick enough to hold the shape of cookies. The cake mix just simplifies the process, but homemade works well too.
-
How do I prevent the filling from oozing out?
The key is to pipe a moderate amount of filling and press the top cookie gently but firmly so it spreads evenly without squeezing out. Chilling the pies after assembly also helps the filling set.
-
Can I prepare the cookies and filling a day ahead?
Yes, you can bake the cookies and keep the filling refrigerated separately. Assemble them a few hours before serving for the best freshness and texture.
Final Thoughts
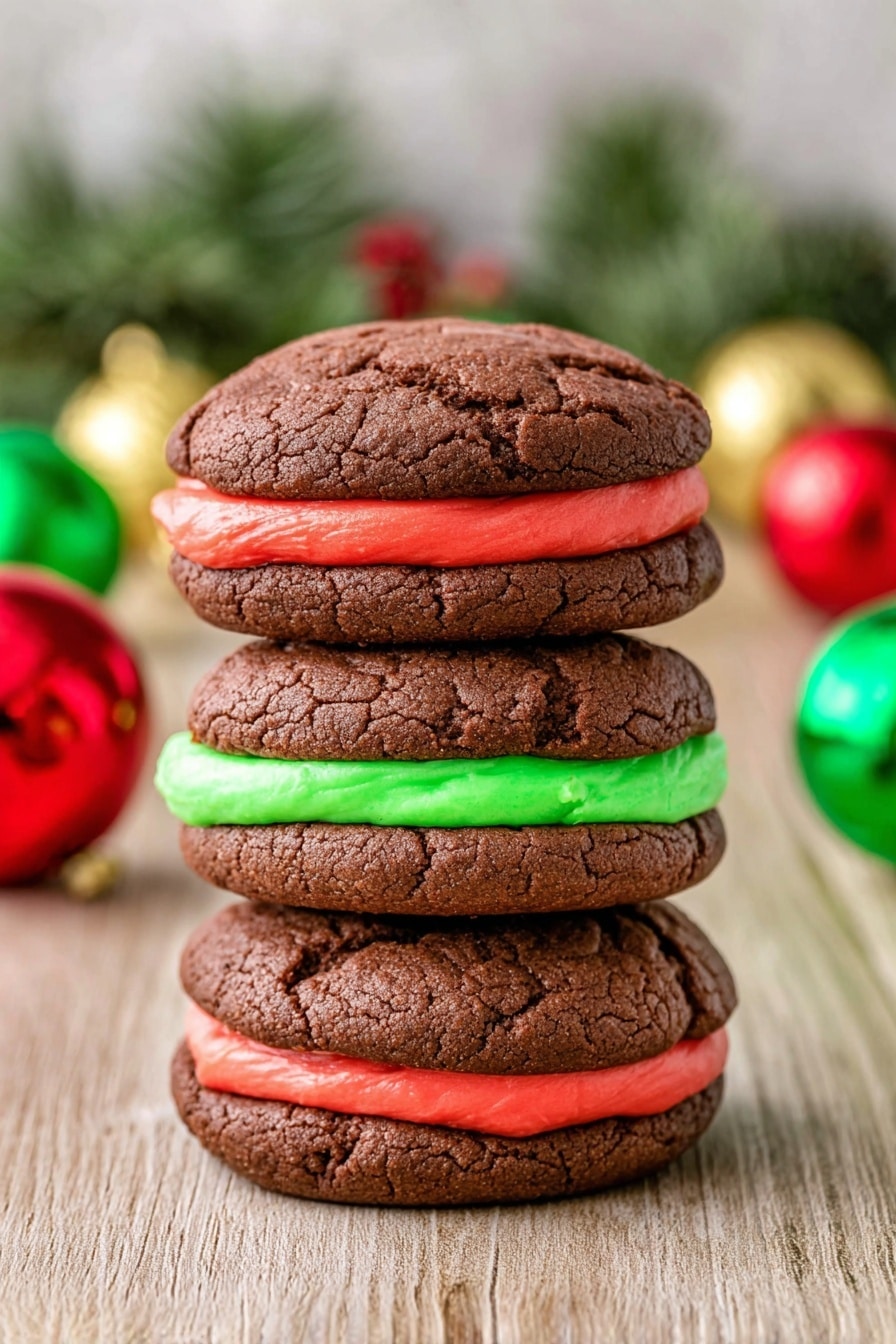
I absolutely love how this Christmas Whoopie Pies with Marshmallow Filling Recipe brings out the embraceable texture of soft cake cookies paired with that sweet, fluffy filling—it just screams holiday joy. When I first tried this recipe, I was blown away by how easy and impressive it was, and now my whole family goes crazy for these treats every year. So if you’re looking for a festive, crowd-pleasing dessert that’s both fun to make and delivers on flavor, I can’t recommend these enough. Go ahead, try them out—you’ll be baking a new Christmas tradition!
Print
Christmas Whoopie Pies with Marshmallow Filling Recipe
- Prep Time: 12 minutes
- Cook Time: 8 minutes
- Total Time: 45 minutes
- Yield: 12 whoopie pies 1x
- Category: Dessert
- Method: Baking
- Cuisine: American
Description
This Easy Christmas Whoopie Pies recipe features soft and moist devil’s food cake cookies sandwiched with a fluffy cream cheese and marshmallow filling tinted with festive red and green colors. Perfect for holiday celebrations, these delightful treats are fun to make and sure to impress family and friends with their vibrant colors and delicious flavor.
Ingredients
Cookies:
- 1 15.25 oz box devil’s food cake mix
- 2 large eggs
- ⅓ cup oil
Marshmallow Filling:
- 8 oz cream cheese, room temperature
- 7 oz marshmallow fluff
- 1 teaspoon vanilla extract
- Pinch of salt
- Red gel food color
- Green gel food color
Instructions
- Preheat Oven: Preheat the oven to 350°F. Line two large cookie sheets with parchment paper and set aside to prepare for baking.
- Mix Cookie Batter: In a large bowl, stir together the devil’s food cake mix, eggs, and oil until the batter is well combined. The batter will be thick, which is normal.
- Form Dough Balls: Scoop 1 tablespoon of cookie dough and roll into a ball. Place the dough balls on the prepared cookie sheets, spacing them about 1.5 inches apart to allow for spreading during baking.
- Flatten Dough: Slightly flatten the dough balls using the palm of your hand or gently press with the bottom of a non-stick sprayed glass to even out the shape.
- Bake Cookies: Bake for 8 to 10 minutes or until the edges are set. Remove from oven and allow the cookies to cool for 5 minutes on the cookie sheet before transferring them to a wire rack to cool completely.
- Prepare Filling: In a stand mixer bowl or using a hand mixer, beat together the cream cheese, marshmallow fluff, vanilla extract, and salt until the mixture is smooth and well combined.
- Color Filling: Divide the filling into two portions. Add 4-5 drops of red gel food coloring to one portion and mix until fully incorporated with no white streaks. Repeat with green food coloring for the other portion.
- Pipe Filling: Place each colored filling into separate piping bags. Pipe the red filling onto the bottom side of six cookies, the green filling onto six more cookies, then sandwich with the remaining 12 cookies.
- Serve and Enjoy: Serve immediately or store in an airtight container in the fridge for up to 5 days.
Notes
- Storage: Store whoopie pies in an airtight container in the refrigerator for up to 5 days to maintain freshness.
- Make Ahead: Cookies and filling can be made a day ahead and assembled just before serving.
- Color Variations: You can customize the filling colors to match any holiday or theme by selecting different gel food colors.
Nutrition
- Serving Size: 1 whoopie pie (1 sandwich)
- Calories: 320 kcal
- Sugar: 26 g
- Sodium: 230 mg
- Fat: 16 g
- Saturated Fat: 6 g
- Unsaturated Fat: 8 g
- Trans Fat: 0 g
- Carbohydrates: 38 g
- Fiber: 1 g
- Protein: 4 g
- Cholesterol: 35 mg


