If you’re looking to make the most delightful holiday treat this season, you’re in the right place! This Christmas Tree Sugar Cookies with Frosting Recipe is absolutely one of my favorites to bake and share with family and friends. From the tender, buttery texture of the cookies to the playful swirl of pink and white frosting, these cookies are both festive and delicious. I promise you’ll find them easy to make and fun to decorate – perfect for getting into the holiday spirit!
Why You’ll Love This Recipe
- Perfect Holiday Vibes: The classic Christmas tree shape and festive pink-and-white frosting instantly bring holiday cheer to any gathering.
- Easy To Make: Even if you’re new to baking sugar cookies, the step-by-step process here makes it manageable and enjoyable.
- Bright Lime Twist: The subtle lime zest and juice in the dough add a lovely freshness that really makes these cookies stand out.
- Fun to Decorate: Whether you’re baking solo or with kids, decorating with royal icing and sprinkles is always a good time.

Ingredients You’ll Need
I’ve found that using fresh, quality ingredients really takes this Christmas Tree Sugar Cookies with Frosting Recipe to the next level. Each component works in harmony – from the flour giving structure to the lime zest brightening up the flavor. I recommend shopping for unsalted butter and fresh eggs to get the best results!
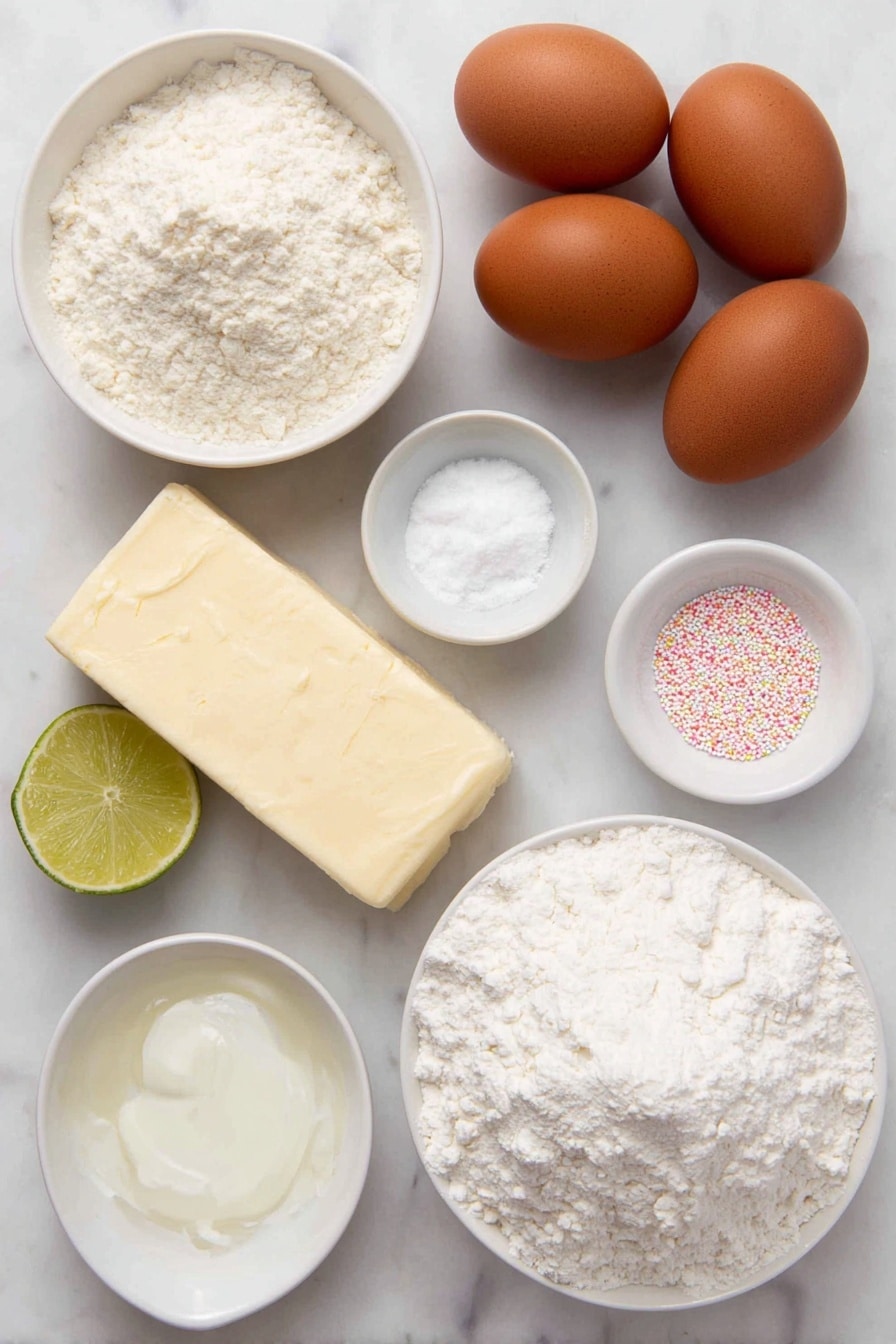
- All-purpose flour: The base of your cookie dough, it gives the right texture and helps with easy cutting and shaping.
- Kosher salt: Just a pinch to balance the sweetness and highlight the buttery flavor.
- Lime (juice and zest): This gives a refreshing citrus note that cuts through the sweetness and keeps everything tasting fresh.
- Unsalted butter: Make sure it’s softened for easy mixing and rich flavor without extra salt.
- Granulated sugar: For sweetness and that classic sugar cookie crumb.
- Large eggs: They bind everything together and add richness.
- Egg whites (for icing): Key for that smooth royal icing that hardens nicely to hold your decorations.
- Powdered sugar (for icing): Creates the perfect, sweet base for the frosting.
- Pink gel food coloring: I love using gel for vibrant color without thinning the icing.
- Sprinkles: Choose your favorite festive decorations to personalize the cookies.
Variations
I’m a big fan of making this recipe your own—sometimes I switch out colors and sprinkles depending on the season, or even add a little almond extract for a different flavor twist. Don’t be afraid to experiment and make the Christmas Tree Sugar Cookies with Frosting Recipe uniquely yours!
- Color Variations: Instead of pink, try classic green or red frosting for a traditional Christmas feel—I’ve had so much fun switching things up each year.
- Flavor Boost: Adding a teaspoon of vanilla or almond extract to the dough changes the flavor profile completely, and it’s a personal favorite of mine!
- Diet-Friendly Option: You can swap regular sugar for coconut sugar or use a butter substitute to make these dairy-free—just keep in mind it might change the texture a bit.
- Different Shapes: Although I adore the Christmas tree cutter for this recipe, stars and snowflakes work wonderfully if you want variety on your cookie platter.
How to Make Christmas Tree Sugar Cookies with Frosting Recipe
Step 1: Mix the Dry Ingredients & Lime Zest
Start by whisking together the flour and kosher salt in a large bowl. Then, add in the lime zest. I love this step because the lime zest infuses the dough with subtle citrus aroma that feels so fresh and festive—it’s the little thing that sets these cookies apart!
Step 2: Cream Butter, Sugar & Lime Juice
In your mixer, beat the softened butter and granulated sugar with the fresh lime juice until the mixture is creamy and fluffy, about 2-3 minutes. Scraping down the bowl helps everything come together smoothly. When I first tried this, I was surprised how zest and juice lighten up the richness—trust me, you don’t want to skip this!
Step 3: Add Eggs, Then Combine Dry Mixture
Beat in the eggs one at a time until they’re fully incorporated. Then gradually add your flour mixture to the wet ingredients. Work in batches so it blends nicely without overworking the dough—you want it just combined so it pulls away cleanly from the bowl.
Step 4: Chill the Dough
Flatten the dough into a disc, wrap it tightly in plastic wrap, and pop it into the fridge for at least an hour. This is a key step! I’ve learned that chilling firm ups the dough making it easier to roll out and cut, plus it helps maintain the shape during baking.
Step 5: Roll, Cut, and Bake
Preheat your oven to 350°F, and line a baking sheet with parchment paper. Roll your chilled dough on a lightly floured surface to about ¼-inch thick. Use a 3-inch Christmas tree cookie cutter to cut shapes and place them on your sheet—make sure to leave a bit of space between them.
Bake for 12-14 minutes; you want the bottoms lightly golden. When baking, keep an eye on the cookies so they don’t overbake—they should look just set, not brown on top. Let them cool on the tray for 5 minutes before transferring to a rack to cool completely.
Step 6: Make the Royal Icing
In a completely clean bowl, beat the egg whites until frothy. Then slowly add powdered sugar and continue whisking until the mixture thickens and can hold stiff peaks. This royal icing is the magic that lets you decorate so beautifully.
Divide the icing into two portions—leave one white and tint the other with pink gel coloring. Remember to keep some thick for outlining and thin the rest slightly with water for flooding. I always use separate piping bags to avoid a mess and to make decorating quicker and more precise.
Step 7: Decorate Your Cookies
First outline each cookie with the thick icing—this creates a barrier so the thinner icing doesn’t spill over the edges. Then ‘flood’ inside the outline with the thinner icing, gently using a toothpick to spread it evenly. While the icing is still wet, sprinkle your sugar pearls and festive sprinkles. You’ll see how fun it is to get creative here—the possibilities are endless!
Once decorated, let the cookies sit until the icing has set and hardened. This usually takes a few hours, but it’s well worth the wait. Then serve them up and watch your guests’ faces light up!
Pro Tips for Making Christmas Tree Sugar Cookies with Frosting Recipe
- Chill Twice for Clean Cuts: If your dough gets warm while rolling, pop it back in the fridge for 10-15 minutes—I’ve found this helps keep those sharp cookie edges crisp.
- Use Room Temperature Eggs & Butter: This ensures your dough blends evenly and creates a smooth texture, a small step that pays off big in results.
- Don’t Overbeat Icing: When mixing your royal icing, watch the peaks forming—mixing too long can dry it out and make it hard to work with.
- Decorate While Icing is Wet: Adding sprinkles quickly on wet icing helps them stick perfectly before drying out—been burned on this waiting too long!
How to Serve Christmas Tree Sugar Cookies with Frosting Recipe

Garnishes
On my decorated cookies, I love using a mix of sugar pearls, tiny star-shaped sprinkles, and even some edible glitter to catch the light. These little accents make the cookies look so festive and professional — plus, they add just a nice bit of crunch and sweetness to each bite.
Side Dishes
These cookies are a sweet centerpiece on their own but pair beautifully with warm drinks like spiced hot cocoa or cinnamon-infused tea. For a party, I like setting them alongside a cheese board and some fresh fruit to balance the sweetness.
Creative Ways to Present
One fun twist I tried was placing the decorated Christmas Tree Sugar Cookies in mini cellophane bags tied with red and green ribbons—instant gifts! You can also arrange them on tiered cake stands or festive platters with fairy lights woven between for holiday gatherings.
Make Ahead and Storage
Storing Leftovers
I’ve stored these cookies in an airtight container layered with parchment paper for up to a week and found they stay fresh and soft. Just keep them in a cool, dry place away from direct sunlight—and definitely don’t stack them before the icing has fully dried!
Freezing
I’ve frozen both the cookie dough and the baked cookies. For dough, wrap it tightly and freeze for up to 2 months—thaw in the fridge overnight before rolling. Baked cookies also freeze well when placed in a single layer in a sealable bag, then thaw at room temperature. Baking ahead this way saves holiday stress!
Reheating
These cookies are best enjoyed at room temperature, so I don’t usually reheat them. If you want to freshen slightly frozen cookies, a few seconds in a microwave (about 5-7 seconds) wrapped in a paper towel helps soften them without melting the icing.
FAQs
-
Can I make these Christmas Tree Sugar Cookies without eggs?
Absolutely! You can substitute eggs with an egg replacer or use mashed bananas/applesauce in some recipes, but for this particular dough, I recommend using an egg replacer powder to maintain proper texture and binding. Keep in mind the flavor may slightly shift.
-
What’s the best way to get perfect royal icing consistency?
Start by beating egg whites until fluffy, then gradually add powdered sugar until thick peaks form. If it’s too thick, add water a few drops at a time until it’s easier to pipe but still holds shape. If too thin, add more powdered sugar. Practice and adjusting by eye helps a lot!
-
Can I skip the lime in the cookie dough?
You can, but the lime zest and juice add a fresh pop that elevates these cookies. Without it, the cookies will still be tasty but lose that subtle zing that makes this recipe unique. If you can’t find lime, lemon zest works too.
-
How far ahead can I make these cookies?
You can bake and decorate these cookies up to a week ahead, storing them in an airtight container to keep them fresh. For even more time, freeze the baked cookies for up to 3 months and thaw when ready to serve.
Final Thoughts
This Christmas Tree Sugar Cookies with Frosting Recipe has become a holiday staple for me because it’s easy enough to whip up on a busy day, but fancy enough to impress when friends and family gather around. Every time I bake these, I get such joy decorating the little trees and sharing stories while we wait for the icing to dry. I hope you’ll try it out and make some sweet memories of your own—it’s the kind of recipe you’ll want to come back to every year!
Print
Christmas Tree Sugar Cookies with Frosting Recipe
- Prep Time: 45 minutes
- Cook Time: 12-14 minutes
- Total Time: 57 minutes
- Yield: 24 cookies 1x
- Category: Dessert
- Method: Baking
- Cuisine: American
- Diet: Vegetarian
Description
Celebrate the holiday season with these delightful Christmas Tree Sugar Cookies, featuring a zesty lime-infused dough and beautifully decorated with royal icing and sprinkles. These festive treats combine the perfect buttery crunch with a smooth, sweet icing that’s perfect for gifting or enjoying with loved ones.
Ingredients
For the Cookies:
- 4 cups all-purpose flour
- ¼ teaspoon kosher salt
- Zest of 1 lime
- Juice of 1 lime
- 1 cup unsalted butter, softened
- 1 cup granulated sugar
- 2 large eggs
For the Icing:
- 3 large egg whites
- 4 ½ cups powdered sugar
- Pink gel food coloring
- Sprinkles (sugar pearls and sugar sprinkles)
Instructions
- Combine Dry Ingredients: In a large bowl, mix together the flour and kosher salt. Add the lime zest, and set the mixture aside for later use.
- Cream Butter and Sugar: Using a stand mixer or hand mixer, beat the softened butter, granulated sugar, and lime juice at medium speed. Scrape down the sides frequently and continue for 2-3 minutes until the mixture is creamy and light.
- Add Eggs: Incorporate the eggs into the butter mixture, beating until well combined.
- Form Dough: Gradually add the flour mixture to the wet ingredients in batches. Mix until the dough comes together and begins to pull away from the sides of the bowl.
- Chill Dough: Flatten the dough into a disc shape and wrap it tightly in plastic wrap. Refrigerate for at least one hour to firm up the dough.
- Prepare for Baking: Preheat the oven to 350°F (175°C). Line a cookie sheet with parchment paper.
- Roll and Cut Cookies: On a lightly floured surface, roll out the chilled dough to a ¼-inch thickness. Use a 3-inch Christmas tree cookie cutter to cut out shapes.
- Bake Cookies: Place the cut-out cookies on the prepared cookie sheet and bake for 12-14 minutes or until edges are lightly golden.
- Cool: Allow cookies to rest on the cookie sheet for 5 minutes before transferring to a wire rack to cool completely.
- Prepare Royal Icing: In a clean, dry stand mixer bowl fitted with a whisk attachment, beat egg whites on high until foamy.
- Add Powdered Sugar: Reduce mixer speed and add powdered sugar in batches, beating until the icing thickens and holds stiff peaks.
- Color and Thin Icing: Divide icing into two portions: keep one white, tint the other pink using gel food coloring. Reserve ¼ of each for thick icing. Add 1-2 teaspoons of water to the remaining portions to thin slightly for flooding.
- Fill Icing Bags: Transfer the thick and thin icings into separate piping bags.
- Outline Cookies: Using thick icing, pipe an outline around each cookie, leaving a small border.
- Flood Cookies: Fill the interior of each outlined cookie with thin icing. Use a toothpick to spread evenly.
- Decorate: While the icing is still slightly wet, sprinkle superfine sugar and immediately add sprinkles to decorate.
- Serve: Allow the icing to set before serving and enjoy these festive Christmas tree sugar cookies.
Notes
- Ensure the mixer bowl and whisk are completely dry before beating egg whites to achieve proper volume.
- Wrapping the dough in plastic and chilling is essential to prevent spreading during baking.
- Adjust the amount of water added to the icing to get the perfect consistency for outlining and flooding.
- Use gel food coloring to avoid thinning out the icing.
- Store cookies in an airtight container to maintain freshness for up to a week.
- For added flavor, consider adding a teaspoon of vanilla extract to the dough.
Nutrition
- Serving Size: 1 cookie
- Calories: 180
- Sugar: 14g
- Sodium: 60mg
- Fat: 8g
- Saturated Fat: 5g
- Unsaturated Fat: 3g
- Trans Fat: 0g
- Carbohydrates: 24g
- Fiber: 0.5g
- Protein: 2g
- Cholesterol: 35mg