If you’re anything like me, the holiday season is all about indulgence, joy, and lots of festive treats. That’s why I’m so excited to share this Christmas Kitchen Sink Cookies Recipe with you—it truly lives up to its name by throwing all my favorite goodies together into one irresistible cookie. These cookies are packed with candy, chips, and sprinkles, making every single bite a delightful surprise. Trust me, once you try them, they’ll become your new holiday obsession!
Why You’ll Love This Recipe
- Loaded with Variety: Every cookie has a little bit of sweet, salty, and crunchy—no bite is ever boring.
- Simple to Make: You probably have most of these mix-ins already, and it comes together so quickly.
- Perfect Holiday Treat: The festive red and green M&M’s and sprinkles make them look as joyful as they taste.
- Great for Sharing: Your friends and family will go crazy for these—trust me, they don’t last long at my gatherings!

Ingredients You’ll Need
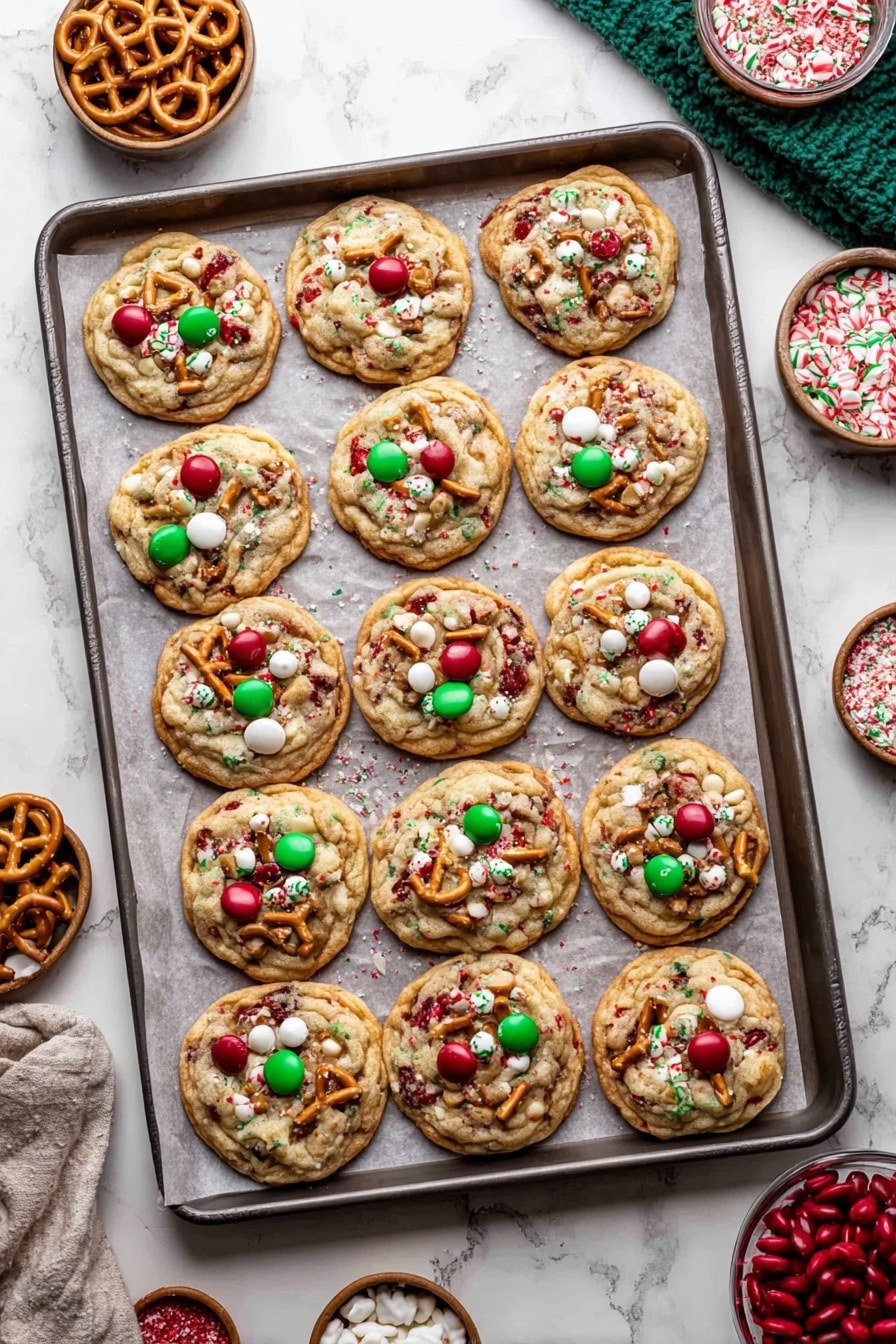
These ingredients come together in a perfect harmony of textures and flavors. I love how the salty crunch of pretzels and potato chips balances the sweetness of M&M’s and white chocolate chips. Let me give you a quick tip about a few key ingredients to get the best results.
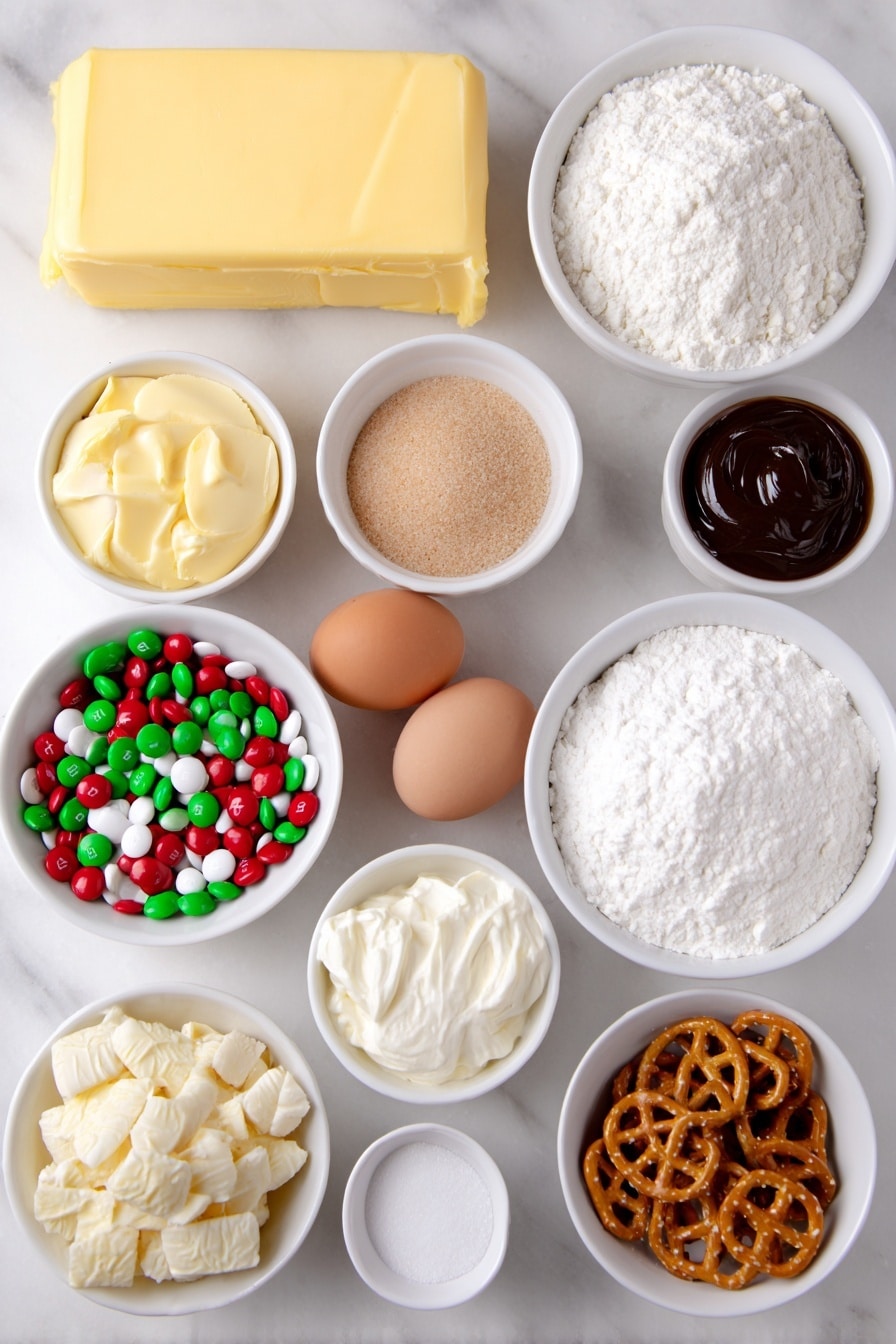
- Salted Butter: Using salted butter helps the flavors pop—it adds just the right amount of savory contrast.
- Light Brown Sugar: This keeps the cookies soft and chewy with a subtle caramel undertone.
- Egg Yolks: I always use yolks at room temperature for a richer, softer crumb.
- Vanilla Bean Paste or Extract: Vanilla bean paste gives a lovely speckled look and deep flavor—use what you have on hand.
- Flour: Spoon and level your flour instead of scooping to avoid dense cookies (more on this in the pro tips!).
- M&M’s (Red and Green): The festive colors add Christmas spirit—feel free to swap with any peanut-free version if needed.
- White Chocolate Chips: Their creamy sweetness softens the cookie’s flavor.
- Pretzel Pieces: Adds an amazing salty crunch you won’t want to skip.
- Potato Chip Pieces: Don’t underestimate these! They bring an unexpected and delightful texture.
- Red and Green Jimmies (Sprinkles): These are optional but add a playful touch and more color.
Variations
I love that this Christmas Kitchen Sink Cookies Recipe is so flexible. Over the years, I’ve played around with different mix-ins based on what I had on hand or what the family was craving. Feel free to turn this into your own signature holiday treat!
- Nut-Free Variation: When I need to keep it nut-free, I simply use allergy-safe chocolate candies and swap pretzels for extra potato chips—still super tasty!
- Extra Chocolate: For my serious chocolate lovers, I add mini chocolate chips or drizzle melted chocolate on top after baking.
- Spiced Version: A pinch of cinnamon or nutmeg in the dough can add a warm holiday twist that’s delightful.
- Sweet & Salty Swap: Try swapping potato chips out for crushed buttery crackers for a slightly different crunch.
How to Make Christmas Kitchen Sink Cookies Recipe
Step 1: Cream the Butter and Sugars Until Light and Fluffy
Start by preheating your oven to 350°F and lining your baking sheets with parchment paper—you want those cookies to bake evenly and come off the tray easily. Then, toss softened salted butter, light brown sugar, and granulated sugar into your mixing bowl. Using an electric mixer, cream them together for about two minutes until the mixture looks pale and fluffy. This step is key—it traps air that helps your cookies rise and stay tender.
Step 2: Add Egg Yolks and Vanilla for Rich Flavor and Texture
Mix in your room temperature egg yolks and vanilla on medium speed for another two minutes. I usually pause here to scrape down the sides of my bowl—no one wants uneven batter! You’ll notice the mixture turns lighter and fluffier, which means you’re on the right track.
Step 3: Combine the Dry Ingredients Carefully
Now, sift in the all-purpose flour, baking powder, baking soda, and salt. Mixing this just until combined is crucial—overmixing will make your cookies tough. This is one area where I learned to be patient: mix slowly and stop as soon as you don’t see dry patches.
Step 4: Fold in All the Festive Mix-Ins
Gently fold in the red and green M&M’s, white chocolate chips, pretzel pieces, potato chip pieces, and those cheerful jimmies with a spatula. I love folding instead of stirring because it keeps everything intact and distributes the goodies evenly. Plus, it helps keep that soft dough texture.
Step 5: Scoop, Decorate, and Bake
Scoop the dough into 20 generous balls and arrange them two inches apart on your baking sheets. I like to add a few extra mix-ins on top of each dough ball—it’s totally optional, but I think it makes the cookies look so inviting and festive. Pop them in the oven and bake for 10-12 minutes: 10 minutes if you want chewy centers, 12 if you prefer crispier edges.
Step 6: Perfect Those Cookie Shapes
Here’s a trick I discovered that really elevates these cookies: as soon as they come out of the oven, swirl a large circular cookie cutter around each one to push everything together into a perfect circle. It helps the cookies hold their shape and makes them look professional without extra effort. Then, let them cool on the sheets for 5 minutes before transferring to a wire rack to cool completely.
Pro Tips for Making Christmas Kitchen Sink Cookies Recipe
- Proper Flour Measurement: I cannot stress this enough—always spoon and level your flour instead of scooping to avoid dense cookies. I’ve made this mistake, and it’s no fun.
- Room Temperature Yolks: Using yolks at room temp helps the batter emulsify better, leading to a smoother, richer dough.
- Extra Mix-Ins on Top: Adding a few candies or chips on top before baking not only looks festive but gives a nice texture contrast in every bite.
- Shaping Hot Cookies: Don’t skip the cookie cutter swirl right out of the oven—it makes your cookies look beautiful and uniform every time.
How to Serve Christmas Kitchen Sink Cookies Recipe
Garnishes
I typically keep these cookies pretty straightforward—those colorful M&M’s and sprinkles are already such a fun garnish. But if I’m feeling extra festive, I’ll dust them lightly with powdered sugar or drizzle a bit of melted white chocolate over the top. It’s such a simple way to add an elegant touch that also amps up the holiday vibe.
Side Dishes
These cookies pair perfectly with a warm cup of cocoa or a festive spiced latte. I’ve also served them alongside a cheese board at holiday parties—the salty cheese actually complements the cookies’ sweet and salty mix-ins surprisingly well, offering a nice balance for the palate.
Creative Ways to Present
For special occasions, I like to stack these cookies in a tiered holiday cookie platter and scatter fresh pine branches and cranberries around for decoration. Wrapping a small bundle of them in parchment and tying with a festive ribbon makes for wonderful edible gifts. Kids especially love helping me pack these up for friends and neighbors!
Make Ahead and Storage
Storing Leftovers
Leftover cookies stay fresh best stored in an airtight container at room temperature. I like to place a slice of bread inside the container to keep them soft—it really works wonders! These usually last around three days before they start to dry out.
Freezing
I often freeze the cookie dough balls before baking. Just scoop them onto a tray, freeze until firm, then transfer to a freezer-safe bag. When you want cookies, bake straight from frozen—it usually takes an extra minute or two in the oven. This trick is a lifesaver for spontaneous holiday cravings!
Reheating
If you have leftover baked cookies that have lost a bit of their freshness, a quick 10-second zap in the microwave can warm them up and bring back that melty chocolate goodness. Just watch closely so they don’t overheat and dry out.
FAQs
-
Can I use other types of candy instead of M&M’s in this Christmas Kitchen Sink Cookies Recipe?
Absolutely! Feel free to swap M&M’s for other colorful candies like Reese’s Pieces, chocolate-covered raisins, or even chopped up holiday-themed candy bars. Just keep in mind the mix-in sizes to keep the cookie texture balanced.
-
How do I make sure my Christmas Kitchen Sink Cookies don’t spread too much while baking?
Using room temperature butter and properly measuring your flour are your best bets. Chilling the dough for 20-30 minutes before baking can also help control spread if you find your cookies are too flat.
-
Can I make this recipe gluten-free?
Yes, you can substitute the all-purpose flour with a gluten-free baking blend that has xanthan gum included. Expect a slightly different texture, but the cookies will still be delicious and festive!
-
What if I only have salted or unsalted butter?
This recipe calls for salted butter to balance the sweet and salty mix-ins. If you only have unsalted, just add an extra 1/4 teaspoon of salt to the dough.
-
Can I use whole eggs instead of egg yolks?
Technically yes, but egg yolks add richness and softness that whole eggs won’t quite replicate. If you substitute whole eggs, try using one whole egg plus one additional yolk to maintain texture.
Final Thoughts
I absolutely love how this Christmas Kitchen Sink Cookies Recipe comes together—it’s like a little celebration in every bite. From the mix of textures to the festive colors, these cookies never fail to bring smiles at holiday gatherings. I hope when you try them, you’ll feel just as excited as I do, and maybe create some new memories with your loved ones around the kitchen table. Happy baking, and enjoy every sneaky sweet and salty morsel!
Print
Christmas Kitchen Sink Cookies Recipe
- Prep Time: 15 minutes
- Cook Time: 10-12 minutes
- Total Time: 27 minutes
- Yield: 20 cookies 1x
- Category: Dessert
- Method: Baking
- Cuisine: American
Description
These Christmas Kitchen Sink Cookies are a festive and fun treat packed with a delightful mix of ingredients like M&M’s, white chocolate chips, pretzels, potato chips, and colorful sprinkles. Perfect for holiday celebrations, these cookies combine sweet, salty, and crunchy textures for a truly indulgent cookie experience.
Ingredients
Cookie Dough
- 3/4 cup salted butter, softened
- 3/4 cup light brown sugar, packed
- 1/4 cup granulated white sugar
- 2 egg yolks, at room temperature
- 2 tsp vanilla bean paste or extract
- 1 1/2 cups all-purpose flour, spooned and leveled
- 1/2 tsp baking powder
- 1/2 tsp baking soda
- 1/2 tsp salt
Mix-Ins
- 1/2 cup red and green M&M’s
- 1/3 cup white chocolate chips
- 1/3 cup pretzel pieces
- 1/3 cup potato chip pieces
- 2 tbsp red and green jimmies (sprinkles)
Instructions
- Preheat and Prepare Baking Sheets: Preheat your oven to 350°F (175°C). Line two baking sheets with parchment paper and set them aside for easy cookie removal and cleaning.
- Cream Butter and Sugars: In a large mixing bowl, add the softened salted butter, light brown sugar, and granulated sugar. Using an electric mixer, cream them together for about two minutes until the mixture is light and fluffy, which helps create a tender cookie texture.
- Add Egg Yolks and Vanilla: Mix in the egg yolks and vanilla bean paste or extract on medium speed for two minutes until the mixture becomes pale in color and fluffy, incorporating air for a better crumb.
- Incorporate Dry Ingredients: Add the all-purpose flour, baking powder, baking soda, and salt to the wet mixture. Mix on low speed or fold gently until just combined, ensuring not to overmix to keep cookies tender.
- Add Mix-Ins: Fold in the red and green M&M’s, white chocolate chips, pretzel pieces, potato chip pieces, and red and green jimmies using a spatula until evenly distributed throughout the dough.
- Form Cookie Balls: Scoop the dough into 20 equal-sized balls and place them two inches apart on the prepared baking sheets to allow room for spreading.
- Optional Decoration: Optionally, press a few extra mix-ins on top of each cookie dough ball for a festive appearance, as pictured in the original recipe.
- Bake the Cookies: Bake in the preheated oven for 10 to 12 minutes. Bake for 10 minutes to achieve chewier centers or 12 minutes for crisper edges, depending on your preference.
- Optional Shaping: Immediately after removing from the oven, use a large circular cookie cutter to gently swirl around each cookie to create perfectly round shapes by pushing the cookie together.
- Cooling: Let the cookies cool on the baking sheets for 5 minutes to set, then transfer them to a wire rack to cool completely for about 10 minutes, ensuring they firm up properly.
- Storage: Store any leftovers in an airtight container at room temperature for up to three days to maintain freshness.
Notes
- Measure your flour properly: Avoid scooping flour directly with the measuring cup, which can lead to using too much flour. Instead, spoon flour into the cup and level it off with a knife, or weigh your flour for accuracy (1 cup = 125 grams).
- Use a cookie cutter after baking: To achieve perfectly round cookies, swirl a large circular cookie cutter around each cookie right when they come out of the oven. This technique pushes the cookie dough into a uniform shape.
- Add extra mix-ins on top: Pressing additional M&M’s, chips, or sprinkles on top of the cookie dough balls before baking is totally optional but adds a cute and festive look to your cookies.
Nutrition
- Serving Size: 1 cookie
- Calories: 180
- Sugar: 12g
- Sodium: 120mg
- Fat: 9g
- Saturated Fat: 5g
- Unsaturated Fat: 3g
- Trans Fat: 0g
- Carbohydrates: 22g
- Fiber: 1g
- Protein: 2g
- Cholesterol: 30mg