
Let me share with you a fan-freaking-tastic dessert that’s become a favorite in my kitchen: the Chocolate Peppermint Cheesecake Recipe. This cheesecake perfectly balances rich, creamy chocolate with refreshing peppermint, making it the ultimate indulgence during the holiday season or really any time you want to treat yourself. Stick with me as I walk you through every detail—trust me, you’ll fall in love just like I did the first time I baked it.
Why You’ll Love This Recipe
- Perfect Holiday Vibes: The combination of chocolate and peppermint is a classic that instantly feels festive and comforting.
- Creamy Texture: The silky smooth filling makes every bite melt in your mouth, thanks to softened cream cheese and heavy cream.
- Simple Yet Impressive: Though it looks like a bakery masterpiece, it’s surprisingly easy to make with everyday ingredients.
- Showstopper Presentation: That glossy chocolate ganache topped with crushed candy canes will have guests oohing and aahing.

Ingredients You’ll Need
The ingredients here come together beautifully to balance chocolate richness with a cooling peppermint finish. Having cream cheese and heavy cream at room temperature really helps achieve that ultra-smooth texture you want.

- Oreo cookies: Keep the filling intact; it adds depth and sweetness to the crust without extra steps.
- Unsalted butter: Melted butter binds the crust perfectly—don’t substitute with salted to keep flavor balanced.
- Semisweet chocolate: Chopped for easier melting, it gives the filling that deep chocolate flavor.
- Cream cheese: Full fat and fully softened to room temperature; this is key for a creamy, lump-free cheesecake.
- Granulated sugar: Provides just the right amount of sweetness without overpowering the chocolate.
- Heavy cream: Adds richness and smoothness to the filling – use it at room temp so it blends seamlessly.
- Unsweetened cocoa powder: For an extra chocolate punch and beautiful color.
- Large eggs plus egg yolk: Bring structure to the cheesecake, ensuring it sets up nicely but stays creamy.
- Peppermint extract: Adds that unmistakable cool vibrancy—don’t skip, or your cheesecake will miss the magic!
- Chocolate chips (for topping): Melts easily for a shiny ganache finish.
- Crushed candy canes: The festive crunch and peppermint sprinkle that take this cheesecake over the top.
Variations
I love how customizable this Chocolate Peppermint Cheesecake Recipe is. Whether you want a little twist on flavors or need to accommodate dietary needs, you can mix it up while keeping that crowd-pleasing charm.
- Mint Swiss Chocolate: Once, I swapped out semisweet chocolate for mint-flavored chocolate—I got rave reviews, and the peppermint came through even stronger.
- Gluten-Free Crust: Swap Oreos for gluten-free chocolate sandwich cookies; just watch the crust moisture level.
- Dairy-Free Option: Use vegan cream cheese and coconut cream; it’s a bit different but absolutely delicious.
- Intense Peppermint: Add crushed peppermint extract or more candy canes on top if you’re a peppermint fan like me!
How to Make Chocolate Peppermint Cheesecake Recipe
Step 1: Prep Your Pan & Crust
Start by preheating your oven to 325°F. I always recommend using a water bath for cheesecakes—it keeps the edges from cracking and bakes the cheesecake evenly. Wrap your 9-inch springform pan with three layers of heavy-duty foil to ensure it’s watertight. Spray it with nonstick spray, then get ready for the crust.
Step 2: Craft the Oreo Crust
Using a food processor, pulse your Oreos (with filling intact) until you have about a cup of finely ground crumbs. Add melted butter and pulse again until the crumbs look moist and stick together. Press this mixture not just onto the bottom but halfway up the sides of your pan—this gives the cheesecake extra structure and a crisp, satisfying edge. Bake the crust for 10 minutes until fragrant, then let it cool slightly. Meanwhile, keep the oven temperature steady.
Step 3: Melt Your Chocolate
I like melting my chopped semisweet chocolate in short bursts in the microwave—30 seconds at a time—and stirring in between. This prevents scorching and keeps the chocolate silky smooth. Once melted, set it aside to cool just a little while you work on the cheesecake filling.
Step 4: Whip Up the Filling
This is where patience really pays off. Beat your cream cheese on medium speed until it’s completely smooth and lump-free—scrape the bowl often because you want that dense creaminess. Blend in sugar, room temp heavy cream, and cocoa powder until it’s luscious and even. Then add eggs and yolk one by one, mixing just enough to combine—overmixing can add air and cause cracks later. Finally, fold in the peppermint extract and melted chocolate gently but thoroughly.
Step 5: Bake with a Water Bath
Pour your batter into the cooled Oreo crust and gently tap the pan on the counter to release any trapped air bubbles (this really helps prevent cracks). Place the springform pan into a large roasting pan and carefully pour boiling water around it until it reaches halfway up the sides. Bake at 325°F for about 1 hour to 1 hour 15 minutes. You’re looking for slightly dry edges but a wobble in the center—think Jell-O wobble. I learned that erring on the side of underbaking results in the creamiest cheesecake.
Step 6: Cool Slowly to Prevent Cracks
Once your cheesecake is out of the oven, turn off the heat and crack the oven door wide open letting it cool in there for 45 minutes. This gradual cooling is a game changer for avoiding that dreaded top cracking. Then move it to a wire rack to reach room temperature before refrigerating for at least 4 hours—or overnight if you can wait.
Step 7: Make the Ganache Topping
Heat your heavy cream until just simmering (don’t boil!), then pour it over semisweet chocolate chips. Let it sit for about 3 minutes, then stir gently until smooth and glossy. Cool slightly so it thickens but is still pourable, then drizzle it over your chilled cheesecake. Finish with generous crushed candy canes for that perfect peppermint pop!
Pro Tips for Making Chocolate Peppermint Cheesecake Recipe
- Room Temperature Ingredients: I can’t stress enough how important it is to have your cream cheese, eggs, and cream at room temp—it’s the secret to a smooth, luxurious filling.
- Water Bath Wrapping: Wrapping your pan well with foil prevents water leaks and soggy crusts; I always triple-layer the foil for peace of mind.
- Don’t Overbeat Eggs: Adding eggs one at a time and mixing just until combined minimizes cracks and keeps the cheesecake dense but creamy.
- Cool Slowly: Leaving the cheesecake in the oven with the door ajar for 45 mins after baking avoids cracking and uneven textures.
How to Serve Chocolate Peppermint Cheesecake Recipe

Garnishes
I’m all about simplicity here—crushed candy canes sprinkled over the ganache add the perfect peppermint crunch, plus a festive look. Sometimes I add a dollop of whipped cream on each slice with a whole mini candy cane for extra charm. Fresh mint leaves can also brighten the presentation and flavor.
Side Dishes
This cheesecake is rich on its own but pairs beautifully with a light fruit salad—think citrus segments or pomegranate seeds—to cut through the richness. Hot coffee or peppermint tea complements the flavors and makes for a cozy dessert experience.
Creative Ways to Present
For special occasions, I sometimes make mini cheesecakes in cupcake tins lined with foil cups—perfect for gifting or individual servings. Another fun idea is to drizzle extra white chocolate in a peppermint swirl pattern over the ganache and add edible glitter for sparkle. Presentation makes every bite feel extra special!
Make Ahead and Storage
Storing Leftovers
Once chilled, cover the cheesecake tightly with plastic wrap or store it in an airtight container in the fridge. It keeps beautifully for up to 5 days, so you can enjoy leftover slices during the week without worry.
Freezing
I’ve frozen this cheesecake both sliced and whole wrapped in layers of plastic wrap and foil. Just thaw it overnight in the fridge before serving. Freezing can dull the ganache a little, but the flavors stay intact—and who doesn’t want a cheat day emergency dessert stash?
Reheating
Cheesecake is best served chilled, but if you prefer it slightly less cold, take it out of the fridge about 20 minutes before serving. Avoid microwaving, as it can affect the texture. I like that soft, creamy coolness best!
FAQs
-
Can I make this Chocolate Peppermint Cheesecake Recipe without a water bath?
You technically can bake this cheesecake without a water bath, but I don’t recommend it. The water bath helps regulate oven heat and keeps the cake moist and crack-free. Without it, you may end up with a dry texture and noticeable cracks on top.
-
What’s the best way to prevent cracks in my cheesecake?
Using room temperature ingredients, gradually cooling your cheesecake (like leaving it in the oven with the door ajar), and not overmixing the eggs are my top tips for crack-free cheesecakes. Also, the water bath is a huge help.
-
Can I use a different type of chocolate for the filling?
Absolutely! Semisweet chocolate is classic, but you can try dark chocolate for a richer taste or milk chocolate if you prefer it sweeter. Just make sure to adjust sugar amounts slightly based on chocolate sweetness.
-
How far ahead can I make this cheesecake?
You can make this cheesecake up to 3 days ahead of serving. It actually tastes even better after resting as the flavors meld beautifully. Just keep it tightly covered in the refrigerator.
-
Is this recipe difficult for beginner bakers?
Not at all! While there are a few steps, like the water bath, that require attention, I’ve broken it down simply because I want you to succeed. Follow the instructions and tips, and you’ll nail this cheesecake on your first try.
Final Thoughts
This Chocolate Peppermint Cheesecake Recipe is one of those desserts that fills your kitchen with cozy scents and your heart with joy. When I first made it, my whole family went crazy for it, and it’s since become my go-to for holiday gatherings and special treats. It’s approachable, festive, and absolutely delicious—you really can’t go wrong. So grab your ingredients, roll up your sleeves, and make a cheesecake that’ll wow everyone at your table. You deserve it.
Print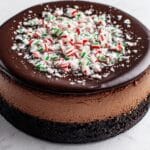
Chocolate Peppermint Cheesecake Recipe
- Prep Time: 30 minutes
- Cook Time: 1 hour 10 minutes
- Total Time: 6 hours 25 minutes
- Yield: 12 servings 1x
- Category: Dessert
- Method: Baking
- Cuisine: American
Description
This decadent Chocolate Peppermint Cheesecake combines a rich, creamy chocolate filling infused with refreshing peppermint extract on top of a crisp Oreo cookie crust. Topped with a luscious chocolate ganache and festive crushed candy canes, it’s the perfect holiday dessert with a smooth, velvety texture and a hint of minty brightness.
Ingredients
For the crust:
- 24 Oreo cookies (278 grams), filling intact
- 4 tablespoons (57 grams) unsalted butter, melted
For the filling:
- 8 ounces (227 grams) semisweet chocolate, chopped
- 24 ounces (680 grams) full fat cream cheese, completely softened to room temperature
- 1 cup (200 grams) granulated sugar
- 1/2 cup heavy cream, at room temperature
- 1/4 cup (21 grams) unsweetened cocoa powder
- 4 large eggs plus 1 egg yolk, at room temperature
- 1 teaspoon peppermint extract
For the topping:
- 1 cup (170 grams) semisweet chocolate chips
- 1/2 cup heavy cream
- Crushed candy canes
Instructions
- Preheat the oven: Set your oven to 325°F (163°C) to prepare for baking the cheesecake and crust.
- Prepare the pan for water bath: Line a 9-inch springform pan with three layers of heavy-duty aluminum foil wrapped carefully to create a waterproof seal. Spray the pan with nonstick cooking spray to prevent sticking.
- Make the crust: In a food processor, pulse the Oreo cookies until finely ground to make about 1 cup of crumbs. Add the melted butter and pulse until combined. Press the crumb mixture firmly into the bottom and halfway up the sides of the prepared pan.
- Bake the crust: Bake the crust in the preheated oven for 10 minutes, until it releases a fragrant aroma. Let it cool slightly and keep the oven temperature steady for the filling.
- Melt the chocolate for filling: Microwave the chopped semisweet chocolate in 30-second bursts, stirring between each, until melted and smooth. Set aside to cool slightly.
- Prepare the filling: In a large bowl, beat the softened cream cheese on medium speed until smooth and free of lumps. Add sugar, heavy cream, and cocoa powder; beat until well combined. Scrape down the bowl, then add eggs and egg yolk one at a time, beating just until smooth. Gently mix in peppermint extract and melted chocolate until just combined, avoiding overmixing.
- Pour and bake with water bath: Pour the batter into the cooled crust and tap the pan on the counter to release air bubbles. Place the springform pan inside a larger roasting pan and pour boiling water into the outer pan until halfway up the springform pan’s sides. Bake at 325°F for 1 hour to 1 hour 15 minutes until the top looks set but the center is still slightly jiggly.
- Cool gradually: Turn off the oven, leave the door slightly open, and let the cheesecake cool for 45 minutes to reduce cracks.
- Room temperature cooling: Remove the cheesecake from the oven and foil, then transfer to a wire rack to cool completely to room temperature.
- Chill: Refrigerate the cheesecake for at least 4 hours or until fully chilled and set.
- Make the topping: Heat heavy cream in a small saucepan just until it simmers, then pour it over the semisweet chocolate chips in a heatproof bowl. Let sit for 3 minutes, then stir until smooth and melted. Cool slightly for thickening if needed.
- Finish and serve: Pour the ganache over the chilled cheesecake and sprinkle generously with crushed candy canes. Serve immediately or store in the refrigerator for up to 5 days.
Notes
- You can use an oven-safe roasting bag wrapped around your springform pan to prevent leaks during the water bath. Secure the bag with foil and leave the top open for accessibility.
- Ensure cream cheese is at room temperature and completely softened to avoid lumps and unincorporated bits in the filling.
- The gentle cooling method with the oven door cracked helps prevent cracking on the surface of the cheesecake.
- Underbake slightly for best texture; the center should remain a bit wobbly when done.
- Store leftover cheesecake covered in the refrigerator for up to 5 days to maintain freshness.
Nutrition
- Serving Size: 1 slice (approx. 1/12th of cheesecake)
- Calories: 480
- Sugar: 35g
- Sodium: 220mg
- Fat: 36g
- Saturated Fat: 20g
- Unsaturated Fat: 14g
- Trans Fat: 0g
- Carbohydrates: 34g
- Fiber: 2g
- Protein: 7g
- Cholesterol: 120mg


