
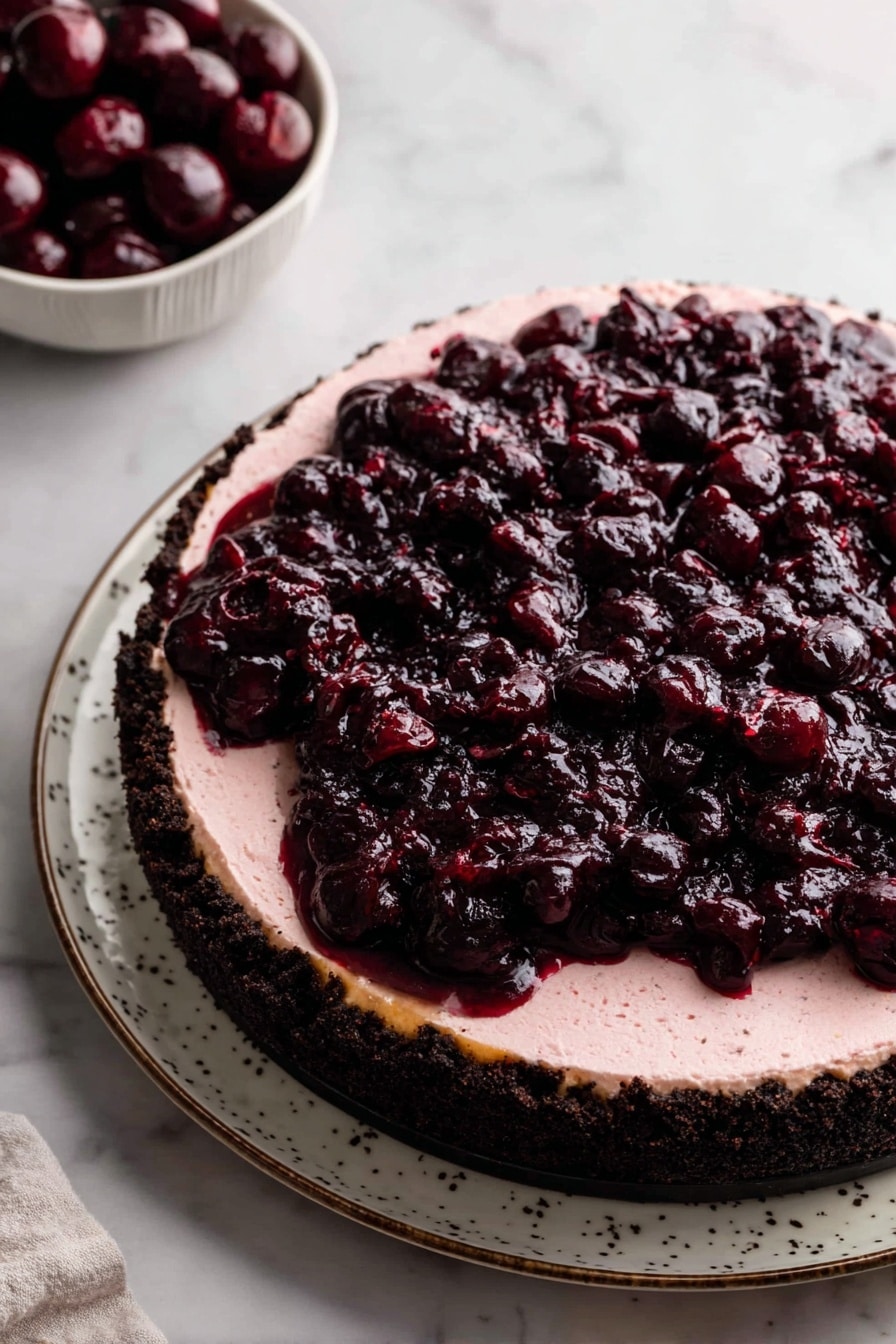
If you’re a cheesecake lover like me, you’re in for a real treat with this Cherry Cheesecake with Oreo Crust Recipe. Picture a luscious, creamy cheesecake with a subtle pink hue from real cherries, all resting on a rich, chocolatey Oreo crust. It’s the perfect mix of tart, sweet, and indulgent that always impresses guests and delights the family. I’m going to walk you through every step, share my personal tips, and set you up for cheesecake success every time.
Why You’ll Love This Recipe
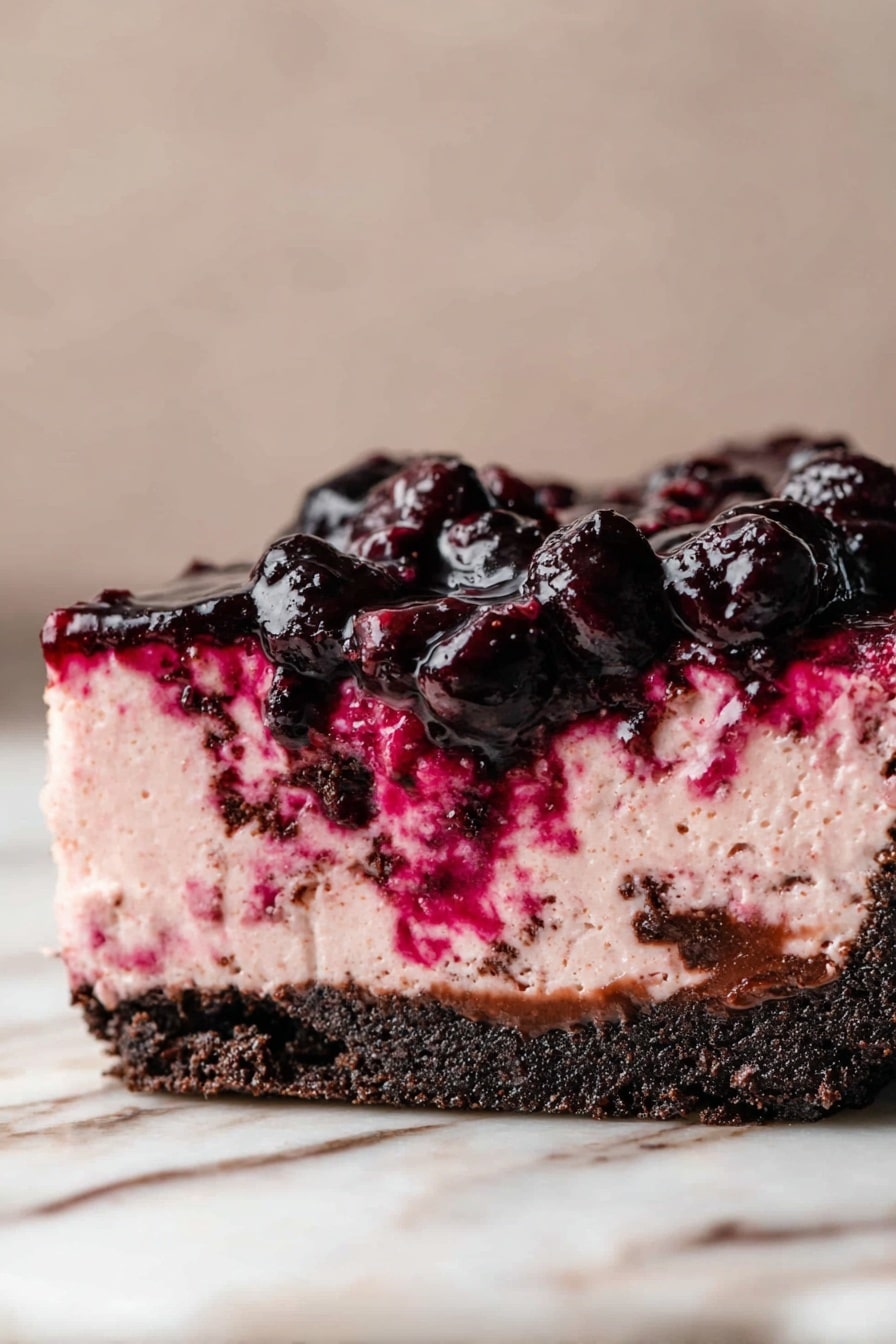
- A Stunning Oreo Twist: The chocolatey Oreo crust adds a rich, crunchy base that perfectly balances the creamy cheesecake filling.
- Bursting Cherry Flavor: The homemade cherry topping isn’t just for looks—it adds tart sweetness and a gorgeous pop of color.
- Easy to Follow Steps: I break down the process with simple methods and pro tips to help you avoid common cheesecake mishaps.
- Perfect Every Time: This recipe’s water bath technique ensures a smooth, crack-free surface you’ll be proud to serve.
Ingredients You’ll Need
The ingredients here blend classic cheesecake elements with some special touches. Using Oreos for the crust is a game changer, giving you a flavor and texture combo that regular graham crackers just can’t match. And the fresh or frozen cherries bring real fruit goodness—no artificial flavors here!
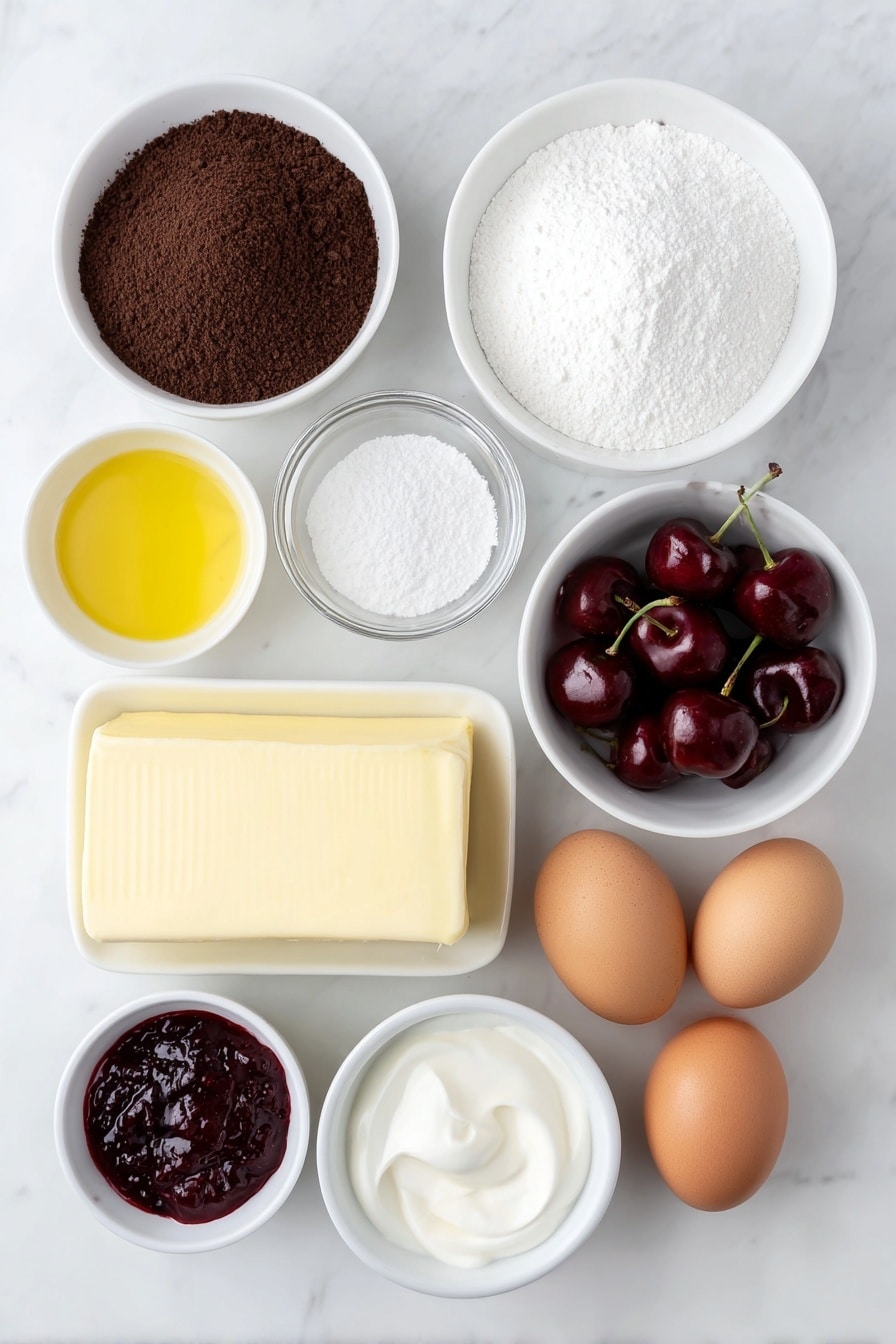
- Oreo crumbs: Keep the filling on the Oreos when you blend them for extra moisture and flavor.
- Unsalted butter: Melted to bind the crust crumbs—unsalted lets you control the salt perfectly in the recipe.
- Cherries: Fresh or frozen both work well; just make sure they’re pitted for easy cooking.
- White granulated sugar: Used in both the cherry topping and the cheesecake filling for balanced sweetness.
- Cornstarch: Thickens the cherry topping to a glossy, jammy consistency.
- Cream cheese: Room temperature is key—it blends smooth without lumps.
- Sour cream: Adds a subtle tang and creamy texture to the cheesecake.
- Pure vanilla extract: Elevates the cheesecake’s flavors beautifully.
- Large eggs: Also room temperature to help everything mix evenly.
Variations
I’m all about tweaking big favorites to match your mood and pantry. For this Cherry Cheesecake with Oreo Crust Recipe, getting creative with the cherry topping or crust can totally change up your experience. Don’t be shy to adjust to your tastes!
- Cherry Varieties: I’ve swapped fresh cherries for frozen ones during winter, and it still turns out fantastic—just thaw and drain excess juice before cooking.
- Crust Alternatives: For a fun twist, try mixing crushed chocolate-covered pretzels or even adding a pinch of cinnamon to the Oreo crumbs.
- Dairy-Free Option: Substitute cream cheese and sour cream with plant-based equivalents to cater to dairy-free diets.
- Extra Boozy: Add a splash of kirsch or cherry brandy to the cherry topping for a grown-up kick.
How to Make Cherry Cheesecake with Oreo Crust Recipe
Step 1: Prepare that fabulous Oreo crust
First things first, preheat your oven to 325°F and grease a 9-inch springform pan, then line the bottom with parchment paper for easy release. I love using a food processor to blitz the Oreos whole with the filling intact—that locks in moisture and flavor. Mix those crumbs with melted butter until the texture is like wet sand. Press the mixture firmly into the bottom and slightly up the sides of the pan, using the bottom of a measuring cup to really compact it. Bake this crust for 12 minutes—this little bake step firms it up and creates that perfect base that holds tight and tastes like heaven.
Step 2: Cook up the fresh cherry topping
While the crust is baking, combine your cherries, sugar, and cornstarch in a saucepan over medium heat. I like to gently mash about half of the cherries after the juices start bubbling—this gives you a chunky yet smooth topping that’s just perfect. Let it thicken a bit, then scoop out ½ cup and blitz it in a blender to create the puree that will go into the cheesecake filling. Pop that puree into the freezer for about 15 minutes to help it cool down quickly (this step is a game-changer so your batter stays smooth!). Keep the rest of the cherry topping refrigerated—it’s going to be your gorgeous final topping.
Step 3: Whip up the creamy cheesecake filling
With your mixer, beat room-temperature cream cheese and sugar on high speed for two minutes until silky smooth and fluffy—scraping down the sides halfway through is essential to getting every lump out. Next, add your cooled cherry puree, sour cream, and vanilla on medium speed. Finally, add your eggs one at a time, mixing on low just until combined. Your batter will have a lovely pale pink tint from those cherries, hinting at the deliciousness to come.
Step 4: Bake it right, with a water bath
Pour the batter gently over your prebaked Oreo crust, then set up a water bath to prevent cracks—this is a tip I learned after some rocky cheesecake experiences! You have two choices: either place your springform pan inside a slightly larger cake pan, then set this into a roasting pan filled halfway with hot water, or wrap the springform pan twice with foil and set it directly in the roasting pan with water halfway up the sides. Both work well, but the first method keeps water out better. Bake for 70-80 minutes, watching for set edges and a slight jiggle in the center—that jiggle ensures it’s creamy and not overbaked.
Step 5: Cool and chill for the best texture
Once you take the cheesecake out, turn off the oven and crack the door open—let it cool slowly for 30 minutes; I promise this helps avoid cracking. Then, transfer it to a wire rack to come completely to room temperature before covering and chilling it overnight (or at least six hours). This patience rewards you with that dense, creamy, sliceable texture that I absolutely love. When it’s ready, gently remove the springform ring and parchment paper from the crust, then generously spoon that reserved cherry topping over the cheesecake right before serving.
Pro Tips for Making Cherry Cheesecake with Oreo Crust Recipe
- Room Temp Ingredients: Always bring cream cheese, eggs, and sour cream to room temp for lump-free batter and smooth texture.
- Water Bath Setup: I use the double-pan method because it helps prevent water from leaking into my crust—no soggy bottoms here!
- Don’t Overmix Eggs: Adding eggs on low speed and just until combined keeps the filling velvety, preventing cracks.
- Slow Cooling: Let your cheesecake cool gradually in the oven with door cracked; it’s the secret to that flawless finish.
How to Serve Cherry Cheesecake with Oreo Crust Recipe
Garnishes
I usually keep it classic and simple—a generous spoonful of the homemade cherry topping sits beautifully on each slice. Sometimes, I like to sprinkle a little shaved dark chocolate or finely chopped toasted almonds on top for texture and an extra layer of flavor. Fresh mint leaves are a nice fresh contrast visually and taste-wise, especially if you’re serving this cheesecake at a dinner party.
Side Dishes
This cheesecake is pretty rich on its own, so I usually keep sides light. A cup of freshly brewed coffee, a small scoop of vanilla bean ice cream, or even a mixed berry salad all pair nicely. For gatherings, I like to present some lightly salted nuts or a crunchy biscotti on the side to complement the creamy texture.
Creative Ways to Present
For special occasions, I’ve tried serving this cheesecake as mini individual portions in small glass jars or ramekins with layers of cherry topping and some whipped cream swirl—everyone loved it! Another fun idea is to drizzle melted white chocolate over the top of the cherry layer or dust lightly with edible gold dust for an elegant touch.
Make Ahead and Storage
Storing Leftovers
I wrap leftover cheesecake tightly with plastic wrap, then a layer of foil, and keep it in the fridge. It stays fresh for up to four days, but honestly, it rarely lasts that long in my house! If you’ve cut slices, I also recommend storing them individually wrapped to preserve flavor and texture.
Freezing
I freeze leftover cheesecake by wrapping well with plastic wrap and then aluminum foil to prevent freezer burn. When thawing, I let it sit overnight in the fridge. I’ve found that the creamy texture holds up quite well, and it’s a fantastic make-ahead option for parties.
Reheating
Cheesecake is best enjoyed chilled, so I don’t recommend reheating. If you’re craving something warm, a quick microwave zap of your cherry topping alone (about 20 seconds) makes a great warm sauce to pour over cold cheesecake. Trust me, that contrast is delightful.
FAQs
-
Can I use store-bought cherry pie filling instead of making the cherry topping?
You can absolutely use store-bought cherry pie filling if you’re short on time, but keep in mind the homemade topping has a fresher, less sweet taste and better texture. If you do use pie filling, I recommend heating and thickening it slightly with a teaspoon of cornstarch for best results.
-
Why do I need to chill the cheesecake overnight?
Chilling overnight allows the cheesecake to set properly, develop its creamy texture, and makes it easier to slice cleanly. Rushing this step often results in a softer, less structured cheesecake.
-
What if my cheesecake cracks?
Cracks usually happen due to overbaking, rapid temperature changes, or overmixing the batter. Using the water bath method and letting the cheesecake cool slowly inside the oven with the door cracked helps prevent cracks. If cracks do appear, you can disguise them with the cherry topping or whipped cream.
-
Can I make this recipe gluten-free?
You’ll need to swap the Oreos crust for a gluten-free cookie crust, or use gluten-free Oreos if you can find them. The filling is naturally gluten-free, so this swap is all you need.
-
Do I need to use a springform pan?
Yes, a springform pan is ideal for cheesecakes because it lets you remove the sides easily without damaging the crust or cake. If you don’t have one, you might struggle to get clean edges when removing your cheesecake.
Final Thoughts
This Cherry Cheesecake with Oreo Crust Recipe has become one of my go-to desserts because it brings out the best of fresh fruit and rich cheesecake in one beautiful package. I love sharing it with friends during holidays and special celebrations, and the smiles it gets make all the effort worth it. You’ll find it’s easier than it looks, especially with these tips, and I can’t wait for you to try it yourself. Trust me—once you make it, this cherry cheesecake will be your new favorite showstopper dessert too!
Print
Cherry Cheesecake with Oreo Crust Recipe
- Prep Time: 30 minutes
- Cook Time: 82 minutes
- Total Time: 8 hours 52 minutes
- Yield: 16 servings 1x
- Category: Dessert
- Method: Baking
- Cuisine: American
Description
This luscious Cherry Cheesecake features a rich Oreo crust, a creamy cherry-infused cheesecake layer, and a fresh cherry topping. Perfectly balanced between sweet and tangy, this elegant dessert is ideal for special occasions or whenever you’re craving a deliciously decadent treat.
Ingredients
Oreo Crust
- 2 1/2 cups Oreo crumbs (including filling)
- 4 tablespoons unsalted butter, melted
Cherry Topping
- 1 lb fresh or frozen pitted cherries
- 1/2 cup white granulated sugar
- 2 tablespoons cornstarch
Cherry Cheesecake
- 24 oz cream cheese, room temperature
- 3/4 cup white granulated sugar
- 1/2 cup sour cream, room temperature
- 1/4 cup cherry filling pureed (from cherry topping)
- 1 teaspoon pure vanilla extract
- 4 large eggs, room temperature
Instructions
- Prepare the Oreo Crust: Preheat the oven to 325°F (163°C). Spray a 9-inch springform pan with nonstick baking spray and line the bottom with a 9-inch parchment paper circle. Spray the parchment paper lightly as well.
- Make the Crust Mixture: Using a food processor or blender, grind the Oreos (including filling) into fine crumbs. In a small bowl, mix the Oreo crumbs with the melted butter until combined.
- Form the Crust: Pour the crumb mixture into the pan and use your hands to press it firmly up the sides and bottom of the pan. Press down evenly using the bottom of a measuring cup to compact the crust.
- Bake the Crust: Bake the crust in the preheated oven for 12 minutes, then remove and set aside to cool.
- Make the Cherry Topping: In a medium saucepan over medium heat, combine cherries, sugar, and cornstarch. Stir frequently until the juice starts to separate from the cherries.
- Cook and Thicken: Lightly mash half of the cherries and continue cooking until the mixture thickens slightly.
- Puree Cherry Filling: Take 1/2 cup of the cherry topping and blend it until smooth to yield approximately 1/4 cup of puree. Place this puree in the freezer to cool for about 15 minutes before adding to the cheesecake batter.
- Store Remaining Topping: Transfer the remaining cherry topping into an airtight container and refrigerate until serving.
- Prepare the Cheesecake Batter: Using a mixer, beat the cream cheese and sugar on high speed for 2 minutes until smooth and creamy. Scrape down the bowl as needed.
- Add Wet Ingredients: Mix in the sour cream, chilled cherry puree, and vanilla extract on medium speed. Then, add the eggs one at a time and mix on low speed just until combined to avoid overmixing. The batter will turn a light pink color.
- Assemble the Cheesecake: Pour the batter into the prepared Oreo crust.
- Set Up Water Bath: To ensure even baking and prevent cracking, use a water bath. Method 1: Place the springform pan inside a 10-inch cake pan, then place both inside a large roasting pan. Pour hot water into the roasting pan to come halfway up the sides of the cake pan. This prevents water from touching the crust. Method 2: Wrap the springform pan twice with aluminum foil tightly and place it directly in the roasting pan filled halfway with hot water. This method works well but carries some risk of water leaking into the crust.
- Bake the Cheesecake: Bake at 325°F (163°C) for 70 to 80 minutes until the edges are set but the center still has a slight jiggle.
- Cool Gradually: Turn off the oven, crack open the door, and let the cheesecake cool slowly for 30 minutes inside the oven. Then transfer the pan to a wire rack and cool completely at room temperature.
- Chill the Cheesecake: Cover the pan with foil and refrigerate overnight or for at least 6 hours to allow it to fully set.
- Serve: Remove the sides of the springform pan and the parchment paper from the bottom. Spoon the chilled cherry topping evenly over the cheesecake and serve.
Notes
- Remove dairy ingredients (cream cheese and sour cream) from the refrigerator 2 hours before starting to ensure smooth mixing and texture.
- Use fresh or frozen cherries; if frozen, thaw and drain excess juice before using.
- Be careful not to overmix eggs into the batter to avoid cracking during baking.
- The water bath is essential for smooth, crack-free cheesecake texture.
- Let the cheesecake cool slowly in the oven to prevent cracks caused by sudden temperature changes.
- Chilling overnight is critical for best flavor and firm slicing.
Nutrition
- Serving Size: 1 slice (1/16 of cheesecake)
- Calories: 380
- Sugar: 28 g
- Sodium: 160 mg
- Fat: 25 g
- Saturated Fat: 15 g
- Unsaturated Fat: 8 g
- Trans Fat: 0.5 g
- Carbohydrates: 32 g
- Fiber: 1 g
- Protein: 6 g
- Cholesterol: 95 mg


