
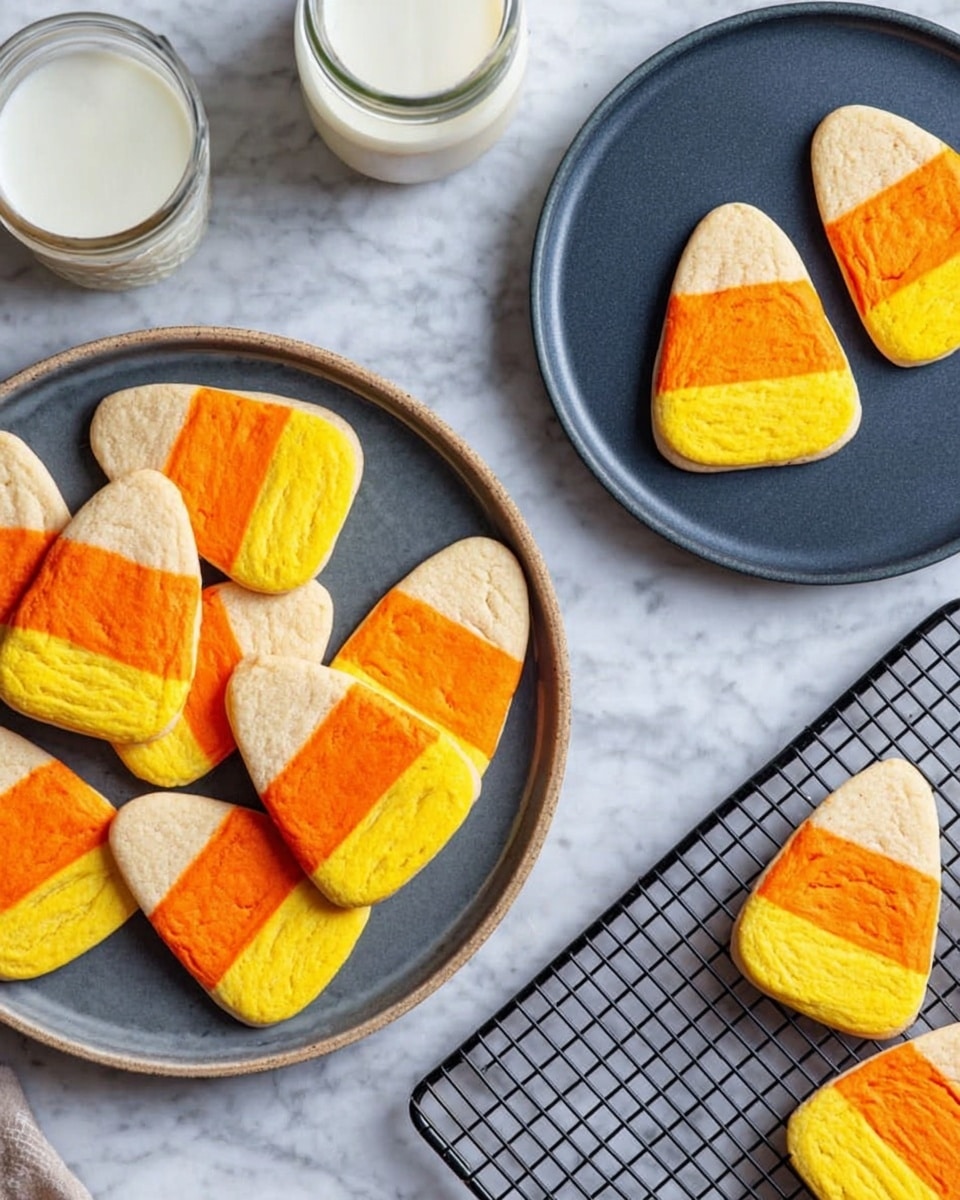
If you’re looking for a fun and festive treat that really nails the Halloween vibe, you’ve got to try this Candy Corn Cookies Recipe. I absolutely love how these cookies turn out — they’re colorful, delicious, and even a little nostalgic, reminding me of the sweet candy corn we all grew up enjoying. Plus, they’re surprisingly simple to make, and I’ll walk you through every step so that you end up with perfect, bite-sized pieces of candy-coated goodness.
Why You’ll Love This Recipe
- Playful & Festive: These cookies look just like candy corn, making them perfect for Halloween parties or fall get-togethers.
- Simple Ingredients: You probably have most of what you need already, so no special trips to the store required.
- Family Favorite: My kids and guests always go crazy for these — they’re as tasty as they are cute!
- Versatile Prep: Make dough ahead and slice when ready, perfect for stress-free holiday baking.
Ingredients You’ll Need
Everything about these ingredients just works together to create that soft, buttery cookie with beautiful candy corn colors. You’ll want to use good-quality butter and real vanilla extract if possible — it really makes a difference in flavor.
- Butter: Use softened unsalted butter for the best creamy texture and control over saltiness.
- Sugar: Granulated sugar helps create that classic cookie sweetness and a lovely light crust.
- Vanilla Extract: Pure vanilla adds warm, subtle flavor depth that pairs wonderfully with the buttery base.
- All-Purpose Flour: The backbone of your cookie dough for structure — scoop and level for accuracy.
- Baking Soda: Just enough leavening to give a light, tender crumb without puffing too much.
- Salt: Balances and enhances the sweetness, essential even in sweet cookies.
- Yellow and Orange Paste Food Coloring: Use paste or gel colors to keep your dough from becoming too wet, ensuring vibrant candy corn shades.
Variations
I love how versatile this Candy Corn Cookies Recipe is — feel free to tweak it to your liking or dietary needs. I often play around with extra mix-ins or different color combos just to keep things interesting around the holidays.
- Chocolate Chip Version: Sometimes I add mini chocolate chips in the plain dough layer for a sweet surprise.
- Gluten-Free: You can swap in a gluten-free flour blend with similar results; just watch your dough consistency as some blends absorb more liquid.
- Spiced Up: Adding a pinch of cinnamon or pumpkin pie spice to the dough creates an autumnal twist I adore.
- Color Swaps: If you want to get creative, try pastel shades or add white chocolate drizzle on top after baking.
How to Make Candy Corn Cookies Recipe
Step 1: Creaming the Butter and Sugar
Start by beating your softened butter and sugar together until the mixture is light and fluffy — about 5 to 7 minutes. This bit is crucial because it’s what gives these cookies their tender crumb and slight lift. Don’t rush this step; I once tried speeding it up and ended up with dense cookies. Use a stand mixer or hand mixer on medium speed and scrape down the sides occasionally.
Step 2: Mix the Dry Ingredients
In a separate bowl, whisk together the all-purpose flour, baking soda, and salt. Whisking helps distribute the baking soda evenly so that your dough rises uniformly. Gradually add this dry mix to your creamed butter and sugar mixture, beating on low speed just until combined. Overmixing can make cookies tough — so stop when you see no more flour streaks.
Step 3: Divide and Color the Dough
Now for the fun part! Divide your dough into three portions as instructed: half for yellow, two-thirds of the other half for orange, and the remaining third plain. Use paste or gel food coloring to tint each dough portion. I discovered that a toothpick’s worth of coloring goes a long way — start small and add more if needed. Remember, it will get slightly lighter when baked.
Step 4: Shape the Candy Corn Logs
Shape each colored dough into two 8-inch logs. Here’s the trick I found: flatten the top of each log slightly and gently push the sides in at a slight angle to mimic the candy corn shape. Layer the logs by placing orange dough on top of the yellow logs, then top with the plain dough logs, forming a slightly rounded top. This layering is what creates that unmistakable candy corn look when sliced.
Step 5: Chill Until Firm
Wrap your logs tightly in plastic wrap and refrigerate for about 4 hours. This chilling step is key — it makes slicing much easier and helps the cookies hold their shape in the oven. I’ve skipped this before, and the cookies spread too much, so definitely make time for this resting phase.
Step 6: Slice and Bake
Preheat your oven to 350°F. Unwrap the dough logs and slice them into 1/4-inch thick pieces. Place the slices about 2 inches apart on ungreased baking sheets — these cookies don’t need greasing because of the butter content. Bake each batch for 10 to 12 minutes, or until the sides are set but centers remain slightly soft. Remove from the oven and transfer to wire racks to cool completely.
Pro Tips for Making Candy Corn Cookies Recipe
- Don’t Skip Chilling: Chilling your dough logs is a total game changer for neat, uniform slices and neat cookies.
- Use Paste Food Coloring: Gel or paste colors won’t alter your dough’s consistency, ensuring smooth mixing and even hues.
- Even Thickness Matters: Slice your cookies evenly so they bake uniformly — I use a sharp serrated knife and steady hand.
- Watch Bake Time Closely: A few minutes difference makes a big texture change — soft centers are best!
How to Serve Candy Corn Cookies Recipe

Garnishes
I usually keep these cookies simple and skip additional garnishes—they’re colorful and festive enough on their own! But if I’m feeling extra, a light dusting of powdered sugar or a drizzle of melted white chocolate adds a little flair without overpowering. Sometimes sprinkles or edible glitter make kids’ eyes light up, so I’ve got those on hand for parties.
Side Dishes
This Candy Corn Cookies Recipe pairs beautifully with a warm cup of spiced apple cider or a creamy hot chocolate. If you’re hosting a Halloween brunch, they’re great alongside pumpkin muffins or cinnamon rolls too. These cookies bring a nostalgic sweet note without being overly filling.
Creative Ways to Present
For holiday gatherings, I love arranging these cookies on a black or orange platter lined with autumn leaves or Halloween-themed napkins. Another fun idea is to stack them in mini mason jars tied with festive ribbons — perfect for gifting neighbors or handing out at school events.
Make Ahead and Storage
Storing Leftovers
Your Candy Corn Cookies will keep well in an airtight container at room temperature for up to 5 days. I like to layer them with parchment paper to prevent sticking and maintain their pretty shape. Leftover cookies actually taste even better after a day as the flavors mellow.
Freezing
If you want to freeze your cookies, I recommend freezing the dough logs before slicing. Wrap them tightly in plastic wrap and place in a freezer bag; they’ll keep up to 3 months. When ready, thaw in the fridge overnight and then slice and bake as usual. I’ve tried freezing baked cookies too — just keep them airtight and thaw on the counter for best texture.
Reheating
To refresh leftover cookies, pop them in a 300°F oven for 3-5 minutes to warm through without drying them out. Alternatively, a few seconds in the microwave can soften them, but be careful not to overheat or they get chewy and lose their perfect crumb.
FAQs
-
Can I use regular food coloring instead of paste for this Candy Corn Cookies Recipe?
While you can use liquid food coloring, paste or gel colors are better because they don’t add extra moisture to the dough. Too much liquid can make the dough sticky and harder to shape, so paste food coloring helps keep that perfect consistency while giving vibrant colors.
-
How do I prevent the cookies from spreading too much when baking?
Chilling the dough logs for at least 4 hours is key to preventing spreading. The chilled dough holds its shape better and slices nicely. Also, avoid using too much butter or melting it before mixing, as that can cause cookies to spread.
-
Can I make this recipe vegan or dairy-free?
Yes! Substitute the butter with a plant-based vegan butter substitute, and use a vegan vanilla extract. Make sure your food coloring is vegan-friendly too. Keep in mind that texture might be slightly different, but it’s a fun way to make these cookies for all diets.
-
How should I store leftover Candy Corn Cookies?
Store leftovers in an airtight container at room temperature, layering with parchment paper to prevent sticking. They last about 5 days and retain their soft texture beautifully.
Final Thoughts
This Candy Corn Cookies Recipe holds a special place in my heart because it’s a delightful blend of taste and nostalgia wrapped into one easy-to-make treat. Every fall, when I pull these out of the oven, it’s like sharing a little slice of happy childhood memories with my family — and that, to me, is what cooking is all about. I wholeheartedly recommend making these cookies if you want to wow your guests or simply enjoy a sweet seasonal snack. Trust me, you’ll be hooked from the very first bite!
Print
Candy Corn Cookies Recipe
- Prep Time: 35 minutes (including shaping and coloring dough) plus 4 hours chilling
- Cook Time: 10-12 minutes per batch
- Total Time: Approximately 5 hours
- Yield: 5 dozen cookies 1x
- Category: Dessert
- Method: Baking
- Cuisine: American
Description
These Candy Corn Cookies are a festive and colorful treat perfect for Halloween or any candy-themed celebration. Soft, buttery sugar cookies are tinted in classic candy corn colors—yellow, orange, and plain—then layered and sliced to showcase the vibrant stripes in every bite.
Ingredients
Cookie Dough
- 1–1/2 cups butter, softened
- 1–1/2 cups sugar
- 1/2 teaspoon vanilla extract
- 3 cups all-purpose flour
- 1 teaspoon baking soda
- 1/2 teaspoon salt
Food Coloring
- Yellow paste food coloring
- Orange paste food coloring
Instructions
- Cream Butter and Sugar: In a large bowl, cream together the softened butter and sugar until the mixture is light and fluffy, which typically takes about 5 to 7 minutes. Beat in the vanilla extract to combine.
- Mix Dry Ingredients: In a separate bowl, whisk together the all-purpose flour, baking soda, and salt. Gradually add this dry mixture into the creamed butter and sugar mixture, beating until fully incorporated to form a dough.
- Divide and Color Dough: Split the dough in half. Tint one half yellow using the yellow paste food coloring. Divide the other half into two portions—a larger portion (two-thirds of this half) and a smaller portion (one-third). Color the larger portion orange; leave the smaller portion plain (uncolored).
- Form Dough Logs: Shape each colored dough portion into two logs about 8 inches long. Flatten the tops and gently push the sides in at a slight angle to create the characteristic candy corn shape. For each cookie stack, place the orange logs on top of the yellow logs and push the sides in at an angle again. Top with the plain dough logs, forming a slightly rounded top.
- Chill the Dough: Wrap the stacked dough logs tightly in plastic wrap and refrigerate until firm, approximately 4 hours, to make slicing easier and to maintain shape during baking.
- Preheat Oven and Slice: When ready, preheat the oven to 350°F (175°C). Unwrap the chilled dough and slice into 1/4-inch thick pieces.
- Bake Cookies: Arrange cookie slices about 2 inches apart on ungreased baking sheets. Bake for 10 to 12 minutes or until set but not browned.
- Cool: Remove cookies from the oven and transfer them to wire racks to cool completely before serving or storing.
Notes
- Using paste food coloring prevents the dough from becoming too wet, helping maintain the right consistency.
- Chilling the dough is essential to prevent spreading during baking and to keep the candy corn shape defined.
- For perfectly even slices, use a sharp knife and cut the logs on a cutting board.
- Store cookies in an airtight container for up to a week to maintain freshness.
Nutrition
- Serving Size: 1 cookie
- Calories: 110
- Sugar: 7g
- Sodium: 90mg
- Fat: 6g
- Saturated Fat: 3.5g
- Unsaturated Fat: 2g
- Trans Fat: 0g
- Carbohydrates: 14g
- Fiber: 0.3g
- Protein: 1g
- Cholesterol: 20mg


