
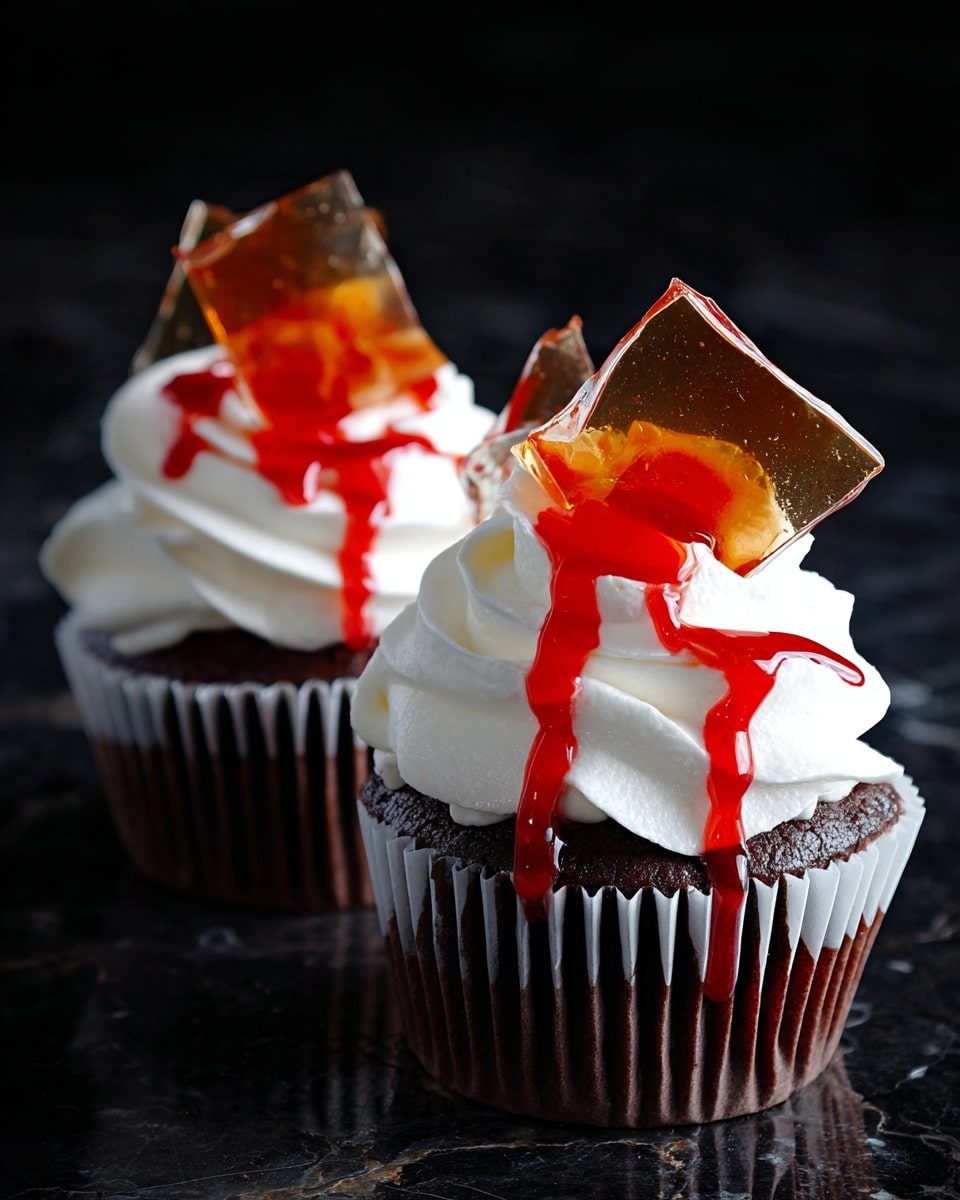
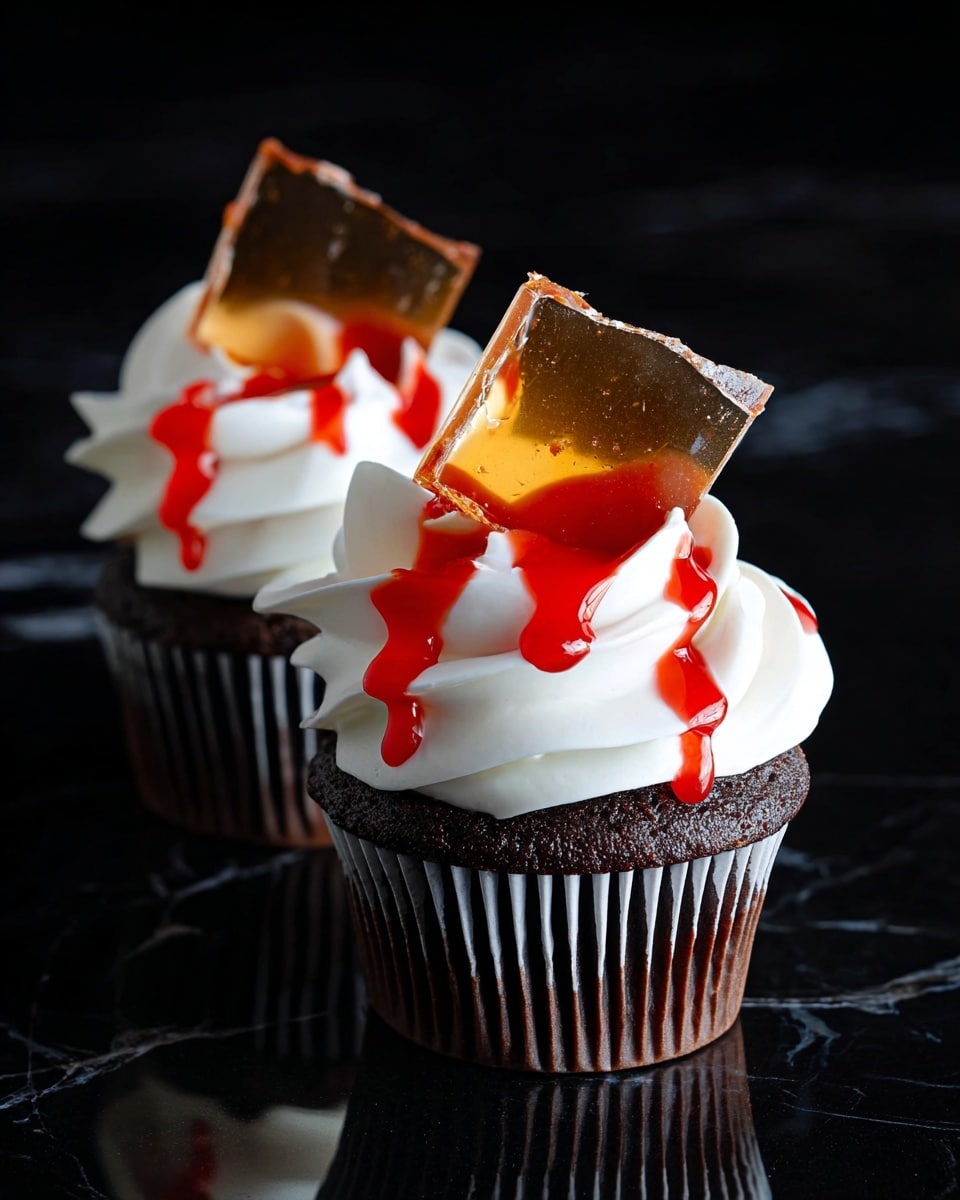
If you’re looking for a spooky, show-stopping treat to wow your friends and family, this Blood Drip Cupcakes Recipe is absolutely your answer. I love this because it combines rich, fudgy cupcakes with a stunning red “blood” drip and shards of glass candy that crackle delightfully—making it perfect for Halloween parties or whenever you want a dramatic dessert. Stick with me, and I’ll take you through every detail to make sure your cupcakes come out both delicious and hauntingly beautiful.
Why You’ll Love This Recipe
- Richly flavored cupcakes: The combination of cocoa, malt powder, and coffee gives the cupcakes a deep, complex chocolate taste.
- Eye-catching presentation: The blood drip effect with red gel and glass candy shards makes every cupcake look like a spooky work of art.
- Perfect for special occasions: Whether it’s Halloween, a themed party, or just a fun baking day, these cupcakes impress every time.
- Easy to follow steps: The recipe breaks down each element clearly so you won’t feel overwhelmed making the candy or frosting.
Ingredients You’ll Need
The magic of this Blood Drip Cupcakes Recipe lies in the thoughtful balance of ingredients. The malt powder alongside cocoa makes the cupcakes moist and flavorful, while using buttermilk ensures they’re tender. As for the glass candy, careful sugar handling is key, but I’ll guide you step-by-step.
- All-purpose flour: Provides structure to your cupcakes; don’t swap with gluten-free here unless you want to experiment.
- Unsweetened cocoa powder: Choose a high-quality cocoa for the richest chocolate taste.
- Malt powder: Adds a subtle malted note that deepens the chocolate flavor wonderfully.
- Sugar: Sweetens and tenderizes; standard granulated works perfectly.
- Instant coffee: Enhances the chocolate without adding a coffee flavor.
- Baking soda and baking powder: Both work together to help your cupcakes rise nicely.
- Kosher salt: Balances sweetness and boosts flavors.
- Eggs: Bind ingredients and add moisture.
- Buttermilk: Gives the cupcakes a tender crumb; if you don’t have it, you can make a substitute with milk and vinegar.
- Unsalted butter: Melted butter adds richness and moistness.
- Pure vanilla extract: A classic flavor enhancer for sweetness and depth.
- Buttercream frosting: Silky frosting for topping; I like making mine from scratch but store-bought can work too.
- Light corn syrup: Essential for the glass candy to prevent crystallization and create that shiny finish.
- Sugar (for candy): You’ll use a good amount here—important to handle carefully.
- Cream of tartar: Helps keep the candy smooth and prevents crystallization.
- Water: For dissolving sugar and making the candy syrup.
- Red food coloring gel: The star of the show—it’s what makes the “blood” drip vividly dramatic.
Variations
I’m all about tweaking this Blood Drip Cupcakes Recipe to suit your vibe and ingredients at hand. Feel free to get playful—whether by swapping out flavors or adjusting the level of spookiness!
- Flavor twist: I once swapped malt powder for cinnamon and nutmeg for a warmer, fall-inspired cupcake that everyone adored.
- Dietary modification: You can make these gluten-free by using a blend of almond and oat flours, but the texture will be a bit denser.
- Color variations: For a Halloween party, try orange or black frosting with the red drip for extra impact.
- Frosting alternatives: Cream cheese frosting adds a tangy contrast if you want to experiment beyond buttercream.
How to Make Blood Drip Cupcakes Recipe
Step 1: Get Your Oven and Pans Ready
Preheat your oven to 350°F (175°C) because lots of recipes get that wrong and cupcakes can end up dense or dry. Line your cupcake pan with liners —go for a sturdy paper or silicone liner so the cupcakes slide out easily when cooled.
Step 2: Mix the Dry Ingredients Thoroughly
In a large bowl, whisk together the flour, cocoa, malt powder, sugar, instant coffee, baking soda, baking powder, and kosher salt. This step is crucial to ensure the dry components are evenly distributed—it helps the cupcakes bake uniformly.
Step 3: Combine the Wet Ingredients and Blend
Add the eggs, buttermilk, melted butter, and vanilla extract to your dry mixture. I use my stand mixer with the whisk attachment on medium speed for about two minutes—this gives the batter a nice, smooth texture. Then, pour in ¾ cup boiling water carefully while mixing; it thins out the batter and makes the cupcakes ultra-moist without sacrificing structure.
Step 4: Bake Until Perfectly Moist
Fill each cupcake liner about two-thirds full. This ensures the cupcakes rise but don’t overflow. Bake for 18 to 22 minutes—start checking at 18 by poking a toothpick in the center. If it comes out clean or with just a few moist crumbs, they’re ready. Move them to a wire rack and let them cool completely before frosting—warm cupcakes will melt your buttercream!
Step 5: Craft the Glass Candy Shards
Line a baking sheet with foil to prepare for your shards. In a small saucepan over medium-high heat, combine light corn syrup, sugar, cream of tartar, and water. Stir gently until it boils, then clip on a candy thermometer. Wash down any sugar crystals on the sides with a wet pastry brush—this prevents gritty candy. Let the mixture reach 300°F (hard crack stage), then pour onto your prepared sheet. Let it cool and harden at least an hour, then break it into jagged shards. I discovered this trick after a few burnt batches—keep a close eye on the thermometer!
Step 6: Assemble with Frosting and Blood Drip
Pipe a generous swirl of buttercream frosting onto each cooled cupcake. Then, stick a few glass candy shards into the center so they “pierce” the top—that visual effect never fails to get wowed reactions. Finally, use red food coloring gel to pipe thin drips starting from the frosting top edges, mimicking blood dripping down. I like to use a small piping bag or even a toothpick for controlled drips.
Pro Tips for Making Blood Drip Cupcakes Recipe
- Use a reliable candy thermometer: I once guessed the candy stage and ended up with sticky shards—don’t skip this for perfect glass shards every time.
- Cool cupcakes completely before frosting: Warm cakes melt the buttercream and ruin the drip effect.
- Make the glass candy a day ahead: It actually gets easier to break the candy into shards after it’s fully set overnight.
- Keep red gel drips simple: Less is more with dripping blood to avoid a messy look—start lightly and add more if needed.
How to Serve Blood Drip Cupcakes Recipe
Garnishes
I usually add extra glass shards, a few edible black glitter sprinkles, or even a small fondant spider for that perfect creepy crawl vibe. These little touches add fun textures and goopy looks that will have your guests intrigued before the first bite.
Side Dishes
Pair these cupcakes with a rich hot chocolate or a blood-red berry punch—for me, the combo feels like a mini spooky feast. Fresh berries on the side also balance the sweetness nicely and keep things from feeling too heavy.
Creative Ways to Present
One time for a Halloween party, I arranged the cupcakes inside a vintage bathtub cake stand, sprinkled with dry ice fog for that eerie mist effect. Setting them on a dark slate platter with flickering candles around really amps up the drama. Try displaying them with edible “broken glass” shards scattered around for a convincing scene.
Make Ahead and Storage
Storing Leftovers
If you manage to have leftovers (unlikely in my house!), keep cupcakes in an airtight container in the fridge. The glass candy stays crunchy and the cupcakes remain moist for up to three days, but the frosting can firm up in cooler temps.
Freezing
I’ve frozen these cupcakes without the candy shards before, wrapping them tightly in plastic and foil. When thawed slowly in the fridge overnight, the texture stays moist and the frosting mostly holds up. Add your glass candy just before serving for the best effect.
Reheating
I don’t recommend reheating because the frosting can melt, but if you want a warm bite, take the cupcake out of the fridge and let it reach room temperature naturally. You can give it a quick 10-second zap in the microwave if needed, but watch closely to avoid melting the decorations.
FAQs
-
Can I make the glass candy without a candy thermometer?
While it’s possible, I highly don’t recommend it because hitting the right temperature (300°F) is crucial to getting hard, clear shards instead of sticky or soft candy. If you don’t have a thermometer, consider borrowing one or investing—you’ll use it for lots of candy recipes!
-
What can I substitute if I don’t have malt powder?
If malt powder isn’t available, you can omit it and add an extra teaspoon of cocoa powder or a teaspoon of espresso powder to maintain the deep chocolate notes. The cupcakes may be slightly less complex, but still delicious.
-
How do I get the blood drip effect to look realistic?
Use a thick red food coloring gel, not liquid, so it holds its shape. Pipe it slowly near the frosting edges with a small tip or toothpick, allowing the gel to drip naturally down. Less is more here; too much can look messy. Let your drips dry for a few minutes before serving.
-
Can I prepare the cupcakes a day in advance?
Absolutely! Bake and cool the cupcakes fully, then store them in an airtight container at room temperature for one day. Frost and add glass candy just before serving for best texture and freshness.
Final Thoughts
This Blood Drip Cupcakes Recipe is one of my all-time favorites to whip up when I want to impress with minimal stress. The layered flavors, the stunning presentation, and the “wow” factor make it a total showstopper. I hope you have as much fun making (and eating) these as I do—I recommend trying it with a friend for maximum laughs and spooky delight. Trust me, once your guests see those blood drips and shiny shards, they’ll be begging you for your secret recipe!
Print
Blood Drip Cupcakes Recipe
- Prep Time: 25 mins
- Cook Time: 25 mins
- Total Time: 1 hr 50 mins
- Yield: 16 – 18 cupcakes 1x
- Category: Dessert
- Method: Baking
- Cuisine: American
Description
These Blood Drip Cupcakes are spooky and delicious treats perfect for Halloween or any horror-themed party. Rich chocolate cupcakes are moist and flavorful, combined with malt powder and a hint of coffee for depth. They are topped with creamy buttercream frosting and finished with a striking homemade glass candy shard that mimics shattered blood-red glass dripping down the sides, creating a dramatic and fun presentation.
Ingredients
For the Cupcakes
- 1 1/4 cups all-purpose flour
- 1/2 cup unsweetened cocoa powder
- 1/4 cup malt powder
- 1 3/4 cups sugar
- 1 tsp instant coffee
- 1 tsp baking soda
- 1 tsp baking powder
- 1 tsp kosher salt
- 2 large eggs
- 1 cup buttermilk
- 2/3 cup unsalted butter, melted
- 2 tsp pure vanilla extract
- 3/4 cup boiling water
- 2 cups buttercream frosting
For the Glass Candy
- 1/2 cup light corn syrup
- 3 cups sugar
- 1/4 tsp cream of tartar
- 1 1/2 cups water
- Red food coloring gel, for garnish
Instructions
- Preheat and prepare pans: Preheat your oven to 350°F (175°C). Line a cupcake pan with cupcake liners and set aside for filling.
- Mix dry ingredients: In a large bowl, combine the all-purpose flour, unsweetened cocoa powder, malt powder, sugar, instant coffee, baking soda, baking powder, and kosher salt. Use a hand mixer or stand mixer fitted with a whisk attachment to blend these ingredients well.
- Add wet ingredients and combine: Into the dry mixture, add the eggs, buttermilk, melted unsalted butter, and pure vanilla extract. Beat on medium speed for about 2 minutes until the batter is smooth and thoroughly combined. Then carefully pour in the 3/4 cup boiling water and continue beating until fully incorporated, resulting in a thin batter.
- Fill and bake cupcakes: Pour the batter into the prepared cupcake liners, filling each about two-thirds full. Bake in the preheated oven for 18 to 22 minutes or until a toothpick inserted into the center of a cupcake comes out clean. Remove from oven and transfer cupcakes to a wire rack to cool completely before frosting.
- Make glass candy: Line a baking sheet with foil and set aside. In a small saucepan over medium-high heat, combine light corn syrup, sugar, cream of tartar, and water. Stir gently until the sugar dissolves and the mixture starts to boil. Stop stirring once boiling begins and clip a candy thermometer to the side of the pan. Use a wet pastry brush to wash down any sugar crystals clinging to the pan sides. Continue heating until the temperature reaches 300°F (hard crack stage). Immediately pour the hot candy onto the prepared foil-lined pan and allow it to cool and harden for at least 1 hour. Once set, break the candy into jagged shards resembling shards of glass.
- Assemble cupcakes: Pipe buttercream frosting generously onto each cooled cupcake. Insert a shard of the red glass candy into the center of the frosting to simulate a blood-splattered effect. Finally, pipe red food coloring gel around the edges of the frosting to create a dripping blood finish for a striking visual impact.
Notes
- Use a candy thermometer to ensure the sugar reaches the correct temperature for glass candy to avoid sticky or soft candy.
- If you do not have malt powder, you can substitute with malted milk powder or omit; just note it changes the flavor profile slightly.
- The boiling water added to the cupcake batter thins it and creates extra moistness.
- Handle the glass candy carefully as it is very sharp once broken.
- Let the cupcakes cool completely before frosting to prevent the frosting from melting.
- Red food coloring gel works better than liquid for a vivid blood drip effect without altering frosting consistency.
Nutrition
- Serving Size: 1 cupcake
- Calories: 370
- Sugar: 38g
- Sodium: 210mg
- Fat: 18g
- Saturated Fat: 11g
- Unsaturated Fat: 6g
- Trans Fat: 0.5g
- Carbohydrates: 52g
- Fiber: 3g
- Protein: 4g
- Cholesterol: 65mg

