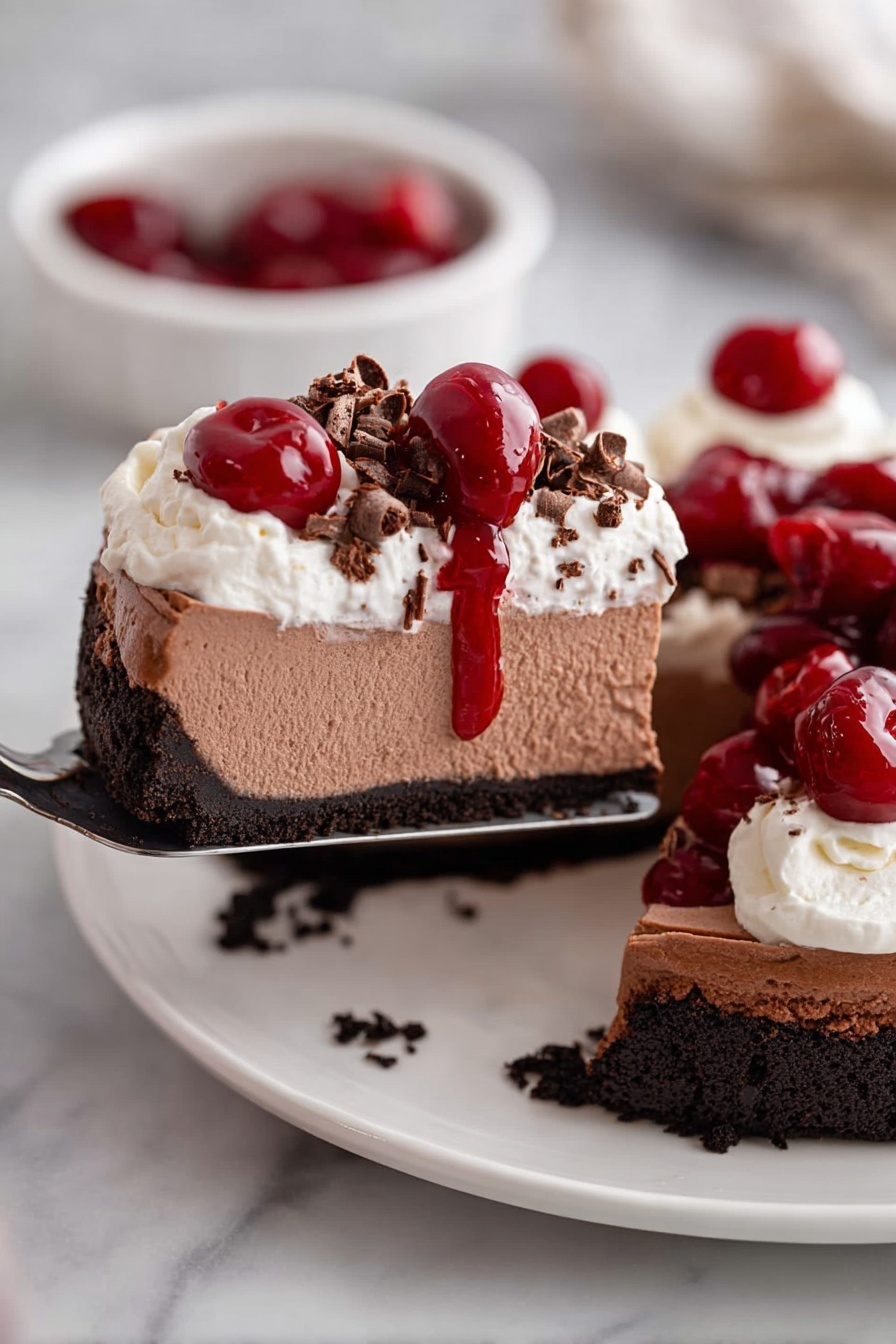
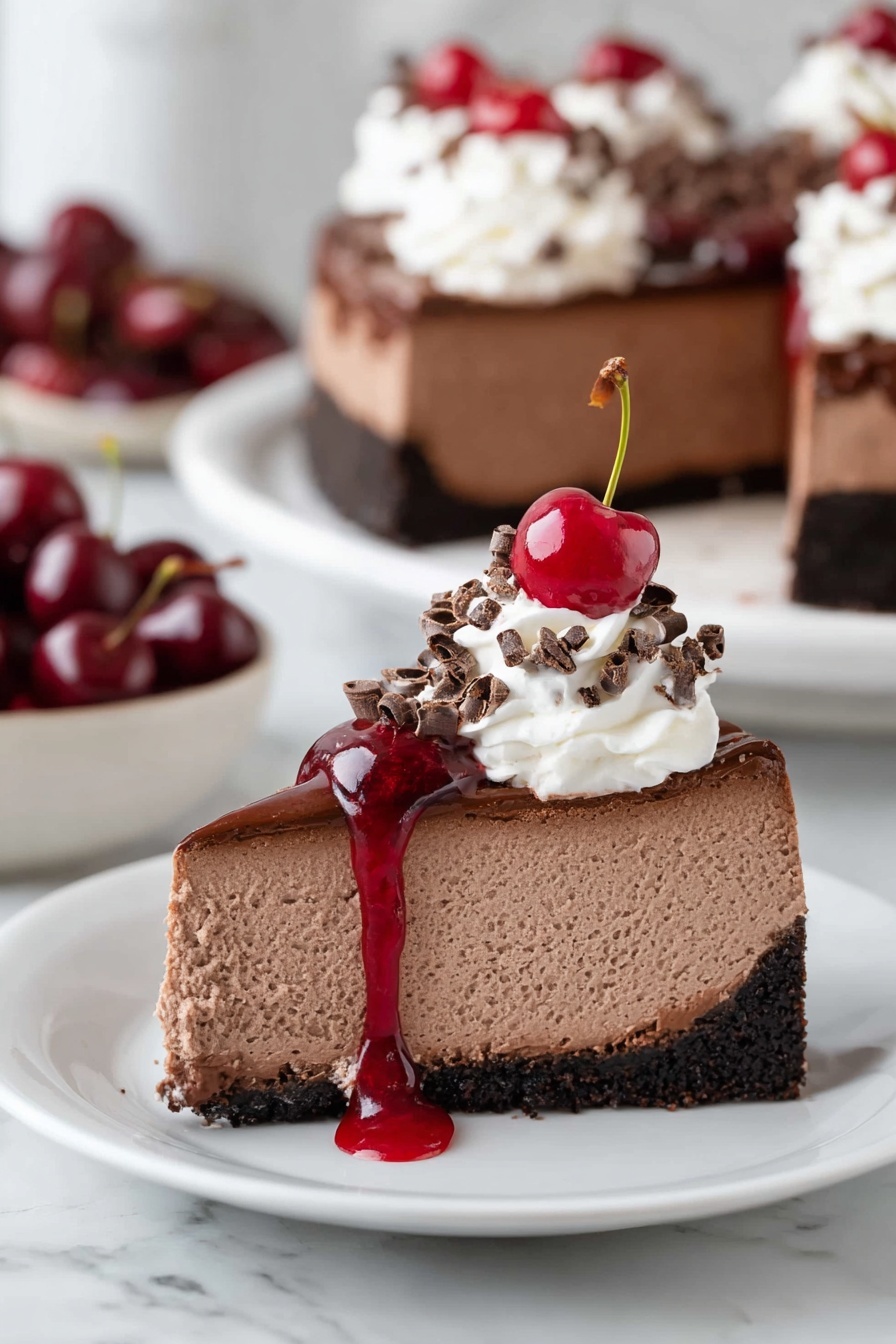
If you’re searching for a show-stopping dessert that combines the rich creaminess of cheesecake with the classic cherry-and-chocolate combo, you’re in for a treat. This Black Forest Cheesecake with Cherry Topping Recipe is honestly one of my all-time favorites to make and share. I love this because it captures everything I adore about Black Forest cake — chocolate, cherries, and cream — but with that silky cheesecake twist. Trust me, once you try it, you’ll see why this recipe quickly becomes a celebration staple.
Why You’ll Love This Recipe
- Decadently Chocolatey: The smooth chocolate-infused cheesecake filling is creamy but not overly sweet.
- Perfect Balance: Tart cherry topping adds a refreshing contrast to rich chocolate and cream cheese.
- Water Bath Baking: Creates a luxuriously smooth texture that sets beautifully every time.
- Crowd-Pleaser: My family goes crazy for this dessert at any holiday or gathering — it’s always the first to disappear!
Ingredients You’ll Need
This Black Forest Cheesecake with Cherry Topping Recipe brings together familiar ingredients that work harmoniously — from Oreo crust for that chocolatey crunch to luscious cream cheese and chocolate chips for the filling. Don’t forget the cherry pie filling to seal the deal! When shopping, pick good-quality ingredients; they make all the difference.
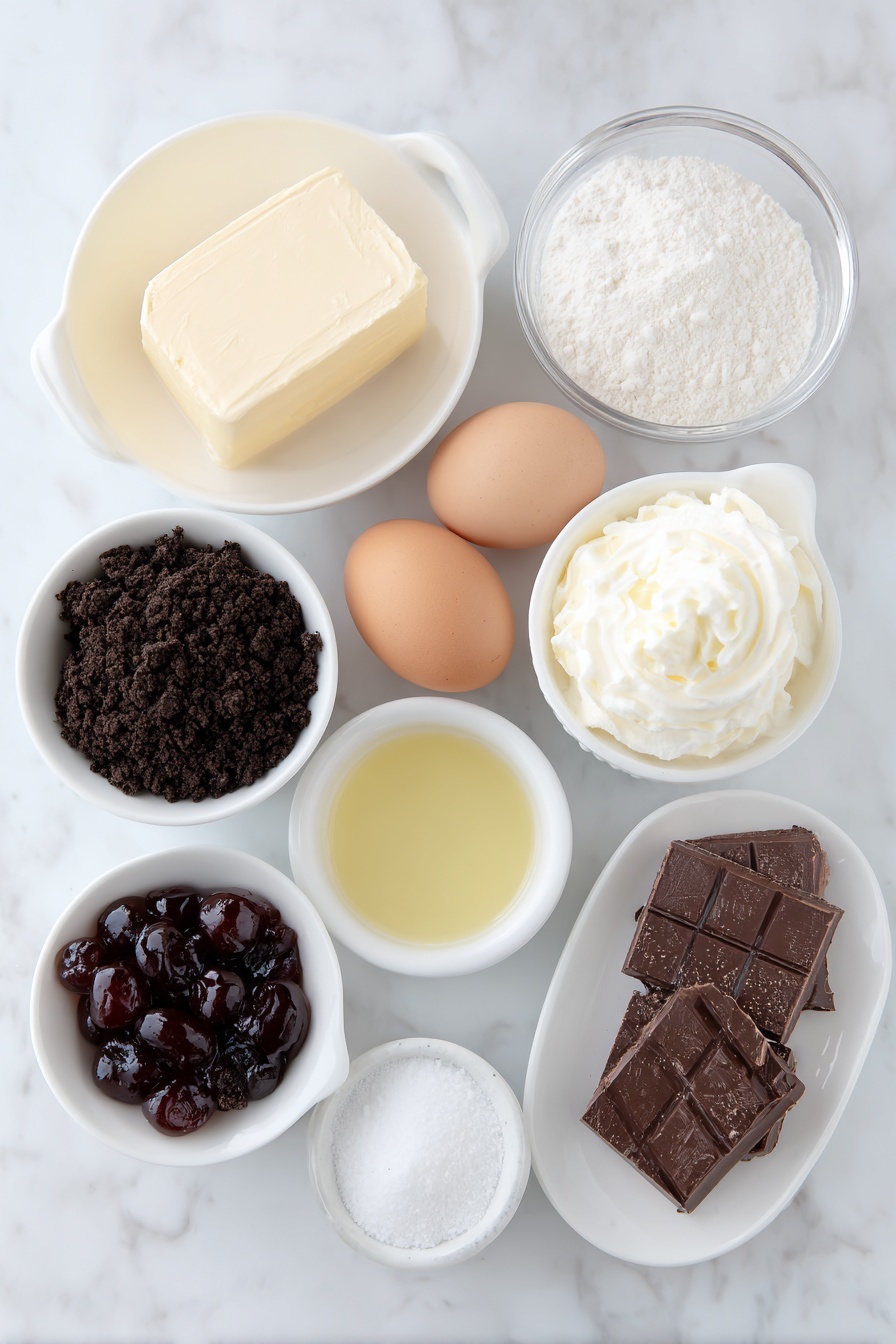
- Oreo cookies: Crushing them finely gives you that rich, chocolatey crust without needing separate cocoa powder.
- Unsalted butter: Melted butter binds the crust perfectly — room temp butter can leave you with uneven crust.
- Cream cheese: Make sure it’s softened at room temp for smooth mixing without lumps.
- Granulated sugar: Sweetens the cheesecake just right, balancing the chocolate bitterness.
- Eggs: Also room temperature, they help the filling set without cracking.
- Vanilla extract: For that warm, cozy flavor that rounds out the cheesecake.
- Heavy cream: Warmed to melt chocolate and add silkiness.
- Semisweet chocolate chips: Choose good-quality for the best melt and flavor.
- All-purpose flour: Just a touch to help stabilize the filling.
- Homemade cherry pie filling: Tart, juicy cherries are the perfect topper to cut through the richness.
- Whipped cream: Adds lightness and contrast on top.
- Chocolate shavings: For a decorative, extra chocolate punch.
Variations
One of the things I love about this Black Forest Cheesecake with Cherry Topping Recipe is how versatile it is. I often tweak small parts depending on what I have on hand or the occasion. Feel free to get creative — the cherry and chocolate flavors are pretty forgiving.
- Add a splash of kirsch: I discovered this trick a few years ago, adding 2-3 tablespoons to the cheesecake or cherry filling for authentic Black Forest flair. It’s optional but totally elevates the flavor.
- Make it gluten-free: Swap out the Oreo crust for gluten-free chocolate cookies or almond flour crust to suit dietary needs.
- Use fresh cherries: During cherry season, I replaced the pie filling with fresh macerated cherries for a fresher taste and lighter topping.
- Mini cheesecakes: If you want individual portions, try making this in a muffin tin lined with cupcake liners — perfect for parties!
How to Make Black Forest Cheesecake with Cherry Topping Recipe
Step 1: Prepare Your Crust with Care
Start by preheating your oven to 350°F, then crush those Oreo cookies until you have fine crumbs — I usually pulse in a food processor to get it just right. Melt the butter and mix it with the crumbs, then press the mixture firmly into the bottom of your springform pan. This is important; pressing helps the crust hold together and bake evenly. Pop the crust into the oven for about 8 minutes, then let it cool on a wire rack while you prep the filling. This slight baking step perks up the chocolate flavor and gives a nice firm base.
Step 2: Make the Luxurious Chocolate Mixture
Heat your heavy cream gently in a small saucepan until it’s very hot but not boiling — I like to watch it closely because boiling can scald the cream and alter the taste. Pour the hot cream over your chocolate chips in a heatproof bowl and let it sit for 3-4 minutes. This “melting” time makes whisking smooth chocolate sauce easy and mess-free. Whisk until completely combined and glossy, then set it aside to cool slightly while you work on the cheesecake filling.
Step 3: Mix the Cheesecake Filling to Perfection
Using a stand mixer with a paddle attachment, beat the room temperature cream cheese until it’s silky smooth – no lumps allowed! Add sugar and fully combine. Next, add eggs one at a time, making sure each is fully incorporated before adding the next; I always scrape down the bowl edges after each egg to ensure even mixing. Stir in vanilla extract. Then gently fold in your cooled chocolate mixture, followed by the flour. I learned the hard way that mixing just until smooth, without over-beating, keeps the cheesecake creamy and helps avoid cracks later.
Step 4: Bake Your Cheesecake in a Water Bath
Here’s a key trick: Wrap your 9-inch springform pan tightly in heavy-duty foil to prevent water leaks, then place it inside a larger roasting pan. Pour boiling water into the larger pan until it reaches halfway up the side of your cheesecake pan for that gentle, even heat bath. Bake for 60-70 minutes; you’re aiming for set edges but a slightly jiggly center — that jiggle means it’s perfectly creamy once cooled. After baking, turn off the oven, crack the door, and leave the cheesecake inside for an hour to cool slowly. This step really helps prevent cracks and makes the texture silky smooth.
Step 5: Chill and Add the Cherry Topping
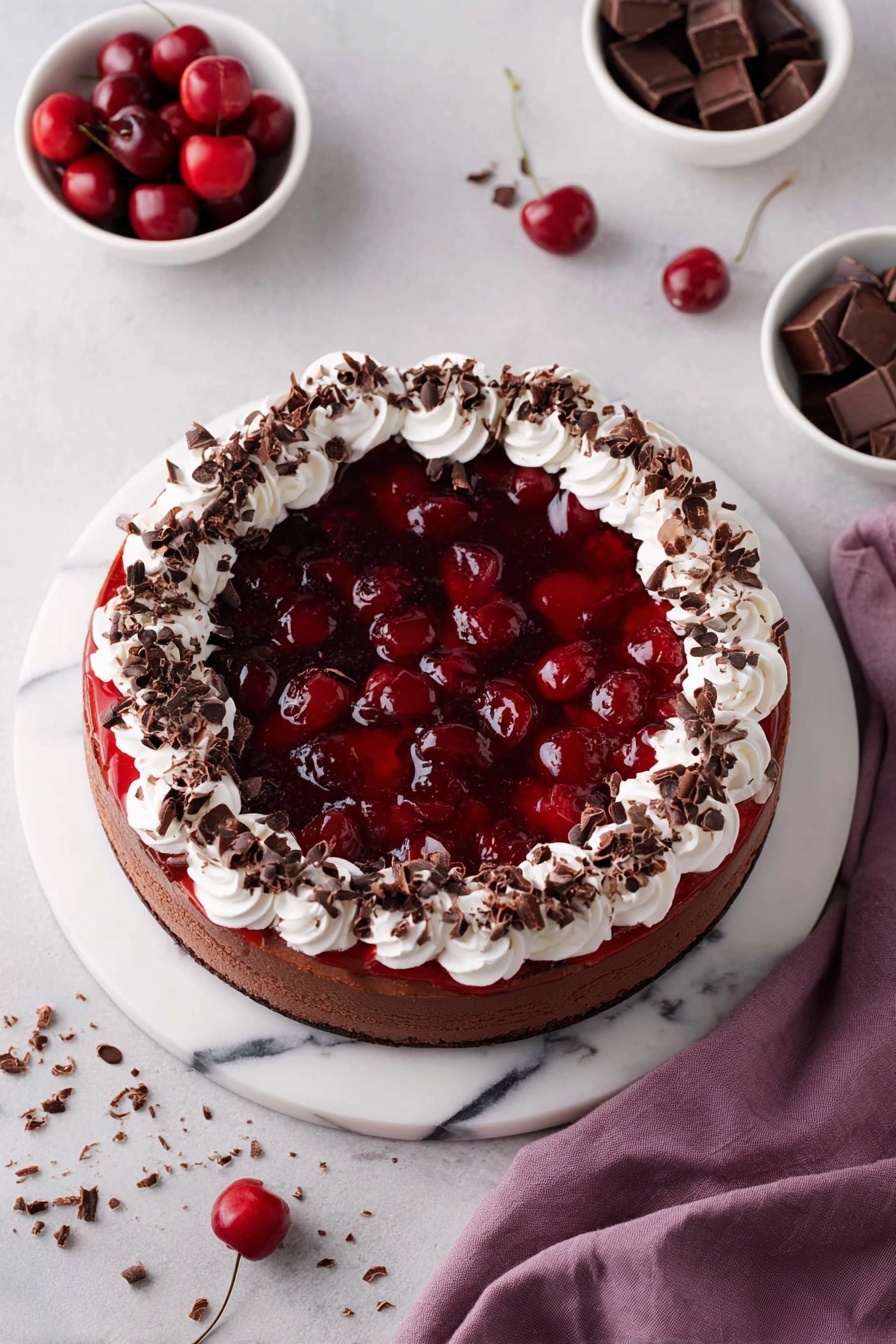
After the water bath cool down, transfer the cheesecake to a wire rack until it reaches room temperature, then refrigerate it for at least 8 hours or overnight — this resting time is absolutely non-negotiable in my book. It lets the flavors meld and the texture set perfectly. When you’re ready to serve, generously spoon homemade cherry pie filling on top, add a swirl of whipped cream, and finish with chocolate shavings for that authentic Black Forest presentation.
Pro Tips for Making Black Forest Cheesecake with Cherry Topping Recipe
- Room Temperature Ingredients: I always plan ahead to let cream cheese and eggs come to room temp — it makes mixing smoother and prevents lumps.
- Water Bath Setup: Wrapping your pan tightly in foil and water-bathing is the secret to creamy texture and crack-free cheesecake.
- Avoid Overbaking: Pull the cheesecake when the center jiggles slightly; it will continue to set as it cools for perfection.
- Cool Gradually: Leaving it in the oven with door cracked prevents sudden temperature changes that can crack your cheesecake.
How to Serve Black Forest Cheesecake with Cherry Topping Recipe
Garnishes
I’m a big fan of using freshly whipped cream and homemade cherry pie filling because it adds that fresh, authentic touch. I also love sprinkling chocolate shavings right before serving — it looks elegant and adds a nice textural contrast. If you have some toasted almond slivers, those add a lovely crunch and nutty flavor too.
Side Dishes
My go-to sides are simple — a cup of strong coffee or a glass of dessert wine pairs beautifully. For gatherings, I like serving it alongside fresh berries or a light sorbet to cut through the richness. It’s really flexible because the cheesecake is the star here.
Creative Ways to Present
For birthdays or special events, I’ve layered this cheesecake in a trifle bowl with layers of cherries and whipped cream for a fun twist. You can also make little individual cheesecakes in mason jars topped with cherry sauce for guests — it’s always a hit and super Instagram-worthy!
Make Ahead and Storage
Storing Leftovers
I tightly cover leftover cheesecake with plastic wrap and store it in the fridge. It stays fresh and creamy for up to 5 days — though honestly, I’ve rarely had leftovers last that long with my family around!
Freezing
If you want to make this ahead for a party, freezing works great. I freeze individual slices wrapped in plastic and foil. Just thaw overnight in the fridge and they taste almost as fresh as the day you baked them.
Reheating
Generally, I enjoy this cheesecake chilled to keep its perfect texture. But if you want to warm it slightly, I recommend letting it sit at room temp for 20-30 minutes — this brings out the chocolate aroma without compromising creaminess.
FAQs
-
Can I make the Black Forest Cheesecake with Cherry Topping Recipe without a water bath?
While it’s possible, I strongly recommend using a water bath because it ensures even baking and prevents cracks from forming on the cheesecake. Skipping this step often results in a less creamy texture and visible cracks on top.
-
What’s the secret to a crack-free Black Forest Cheesecake with Cherry Topping Recipe?
My biggest tips are to bake in a water bath, use room temperature ingredients, avoid overmixing, and let the cheesecake cool slowly in the oven with the door ajar. These steps reduce stress on the cake and keep it smooth.
-
Can I use store-bought cherry pie filling for the topping?
Absolutely! While I love making homemade cherry pie filling, store-bought works just fine and is a great time saver without sacrificing much flavor.
-
How long does the cheesecake need to chill?
Chilling for at least 8 hours is best, but overnight ensures the cheesecake sets properly and flavors marry beautifully. It’s worth the wait!
-
Can I add kirsch to this Black Forest Cheesecake with Cherry Topping Recipe?
Yes! Adding 2-3 tablespoons of kirsch to either the cheesecake filling or cherry topping adds a lovely authentic flavor twist that I highly recommend if you enjoy a touch of boozy flair.
Final Thoughts
This Black Forest Cheesecake with Cherry Topping Recipe holds a special place in my heart — it’s a dessert that impresses without being intimidating. When I first tried it, I couldn’t believe how the simple ingredients transformed into something so indulgent and memorable. Whether you’re treating yourself or celebrating with family, this cheesecake always feels like a warm hug in dessert form. Seriously, I hope you’ll give it a go and enjoy each bite as much as I do.
Print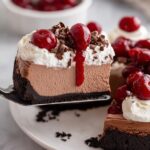
Black Forest Cheesecake with Cherry Topping Recipe
- Prep Time: 25 minutes
- Cook Time: 1 hour 10 minutes
- Total Time: 10 hours 35 minutes
- Yield: 12 servings 1x
- Category: Dessert
- Method: Baking
- Cuisine: American
Description
This decadent Black Forest Cheesecake combines a rich Oreo crust with a smooth chocolate cream cheese filling, topped with homemade cherry pie filling, whipped cream, and chocolate shavings. A perfect dessert for chocolate and cherry lovers, baked gently in a water bath for creamy texture and a classic Black Forest flavor twist.
Ingredients
For the crust:
- 20 Oreo cookies, crushed in a food processor until fine crumbs
- 3 tablespoons unsalted butter, melted
For the cheesecake:
- 32 ounces cream cheese, room temperature
- ½ cup granulated sugar
- 4 large eggs, room temperature
- 2 teaspoons pure vanilla extract
- ½ cup heavy cream
- 2 cups semisweet chocolate chips
- 2 tablespoons all-purpose flour
For the topping:
- Homemade cherry pie filling
- Whipped cream
- Chocolate shavings
Instructions
- Preheat the oven: Set your oven temperature to 350°F (175°C) to get it ready for baking the cheesecake.
- Prepare the springform pan: Tightly wrap a 9-inch springform pan with heavy-duty foil to prevent leaks during the water bath bake. Optionally, place the wrapped pan inside an oven bag for extra protection. Lightly spray the pan with nonstick cooking spray and set aside.
- Make and bake the crust: Combine the crushed Oreo cookie crumbs with melted butter and press the mixture firmly into the bottom of the prepared pan. Bake in the preheated oven for 8 minutes, then transfer to a wire rack to cool.
- Prepare water bath: Boil a pot or kettle of water to use later for the water bath baking method.
- Melt the chocolate: Warm heavy cream in a small saucepan over medium heat until very hot but not boiling. Place chocolate chips in a heat-safe bowl, pour the hot cream over the chocolate, and let sit for 3–4 minutes. Whisk until smooth and fully combined, then set aside to cool.
- Mix cheesecake batter: In a stand mixer fitted with a paddle attachment, beat cream cheese until smooth. Add sugar and combine. Add eggs one at a time, fully incorporating each egg and scraping down the bowl between additions. Add vanilla and mix until combined.
- Combine chocolate and flour: Add the cooled chocolate mixture to the cheesecake batter and beat until fully incorporated. Then, add flour and mix until smooth. Scrape down the bowl sides and beat again to ensure even texture.
- Assemble and bake: Pour the cheesecake batter over the cooled crust in the springform pan. Place this pan inside a larger roasting pan and pour boiling water into the larger pan until it reaches halfway up the sides of the cheesecake pan. Bake for 60 to 70 minutes until the edges are set but the center still has a slight jiggle. Turn off the oven and leave the door cracked open; allow the cheesecake to rest inside for 1 hour.
- Cool the cheesecake: Remove the cheesecake carefully from the water bath, transfer to a wire rack, and let it cool completely. Once cooled, refrigerate for at least 8 hours to firm up.
- Add toppings and serve: Before serving, top the cheesecake with homemade cherry pie filling, whipped cream, and chocolate shavings for the classic Black Forest finish.
Notes
- You can add 2-3 tablespoons of kirsch (cherry brandy) to the cheesecake batter or the cherry pie filling to enhance the authentic Black Forest flavor.
- Wrapping the springform pan with foil and optionally placing it inside an oven bag prevents water from the water bath leaking into the cheesecake during baking.
- Using room temperature ingredients (cream cheese and eggs) helps achieve a smoother batter and better texture.
Nutrition
- Serving Size: 1 slice (1/12 of cheesecake)
- Calories: 560
- Sugar: 38g
- Sodium: 210mg
- Fat: 40g
- Saturated Fat: 24g
- Unsaturated Fat: 14g
- Trans Fat: 0g
- Carbohydrates: 38g
- Fiber: 2g
- Protein: 8g
- Cholesterol: 155mg


