
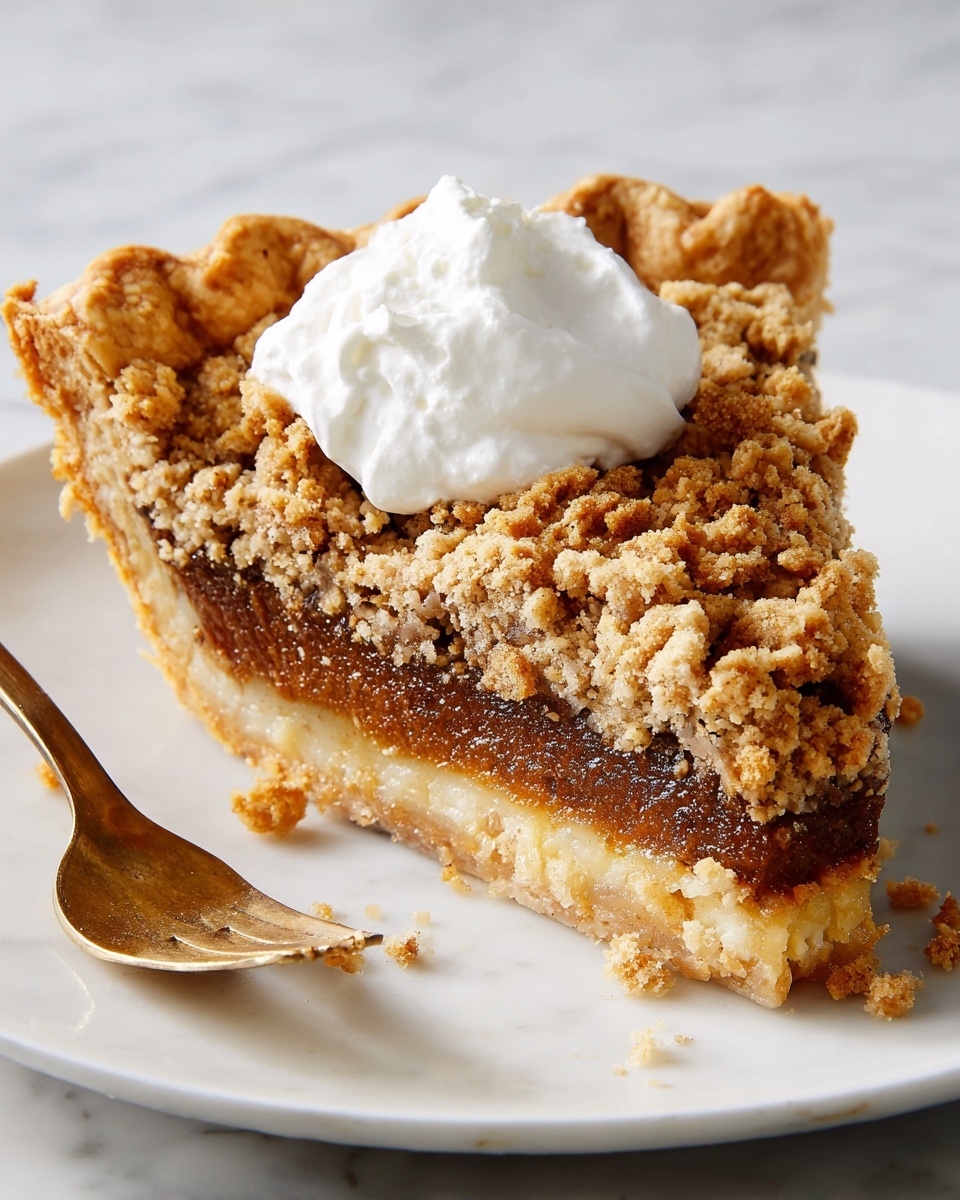
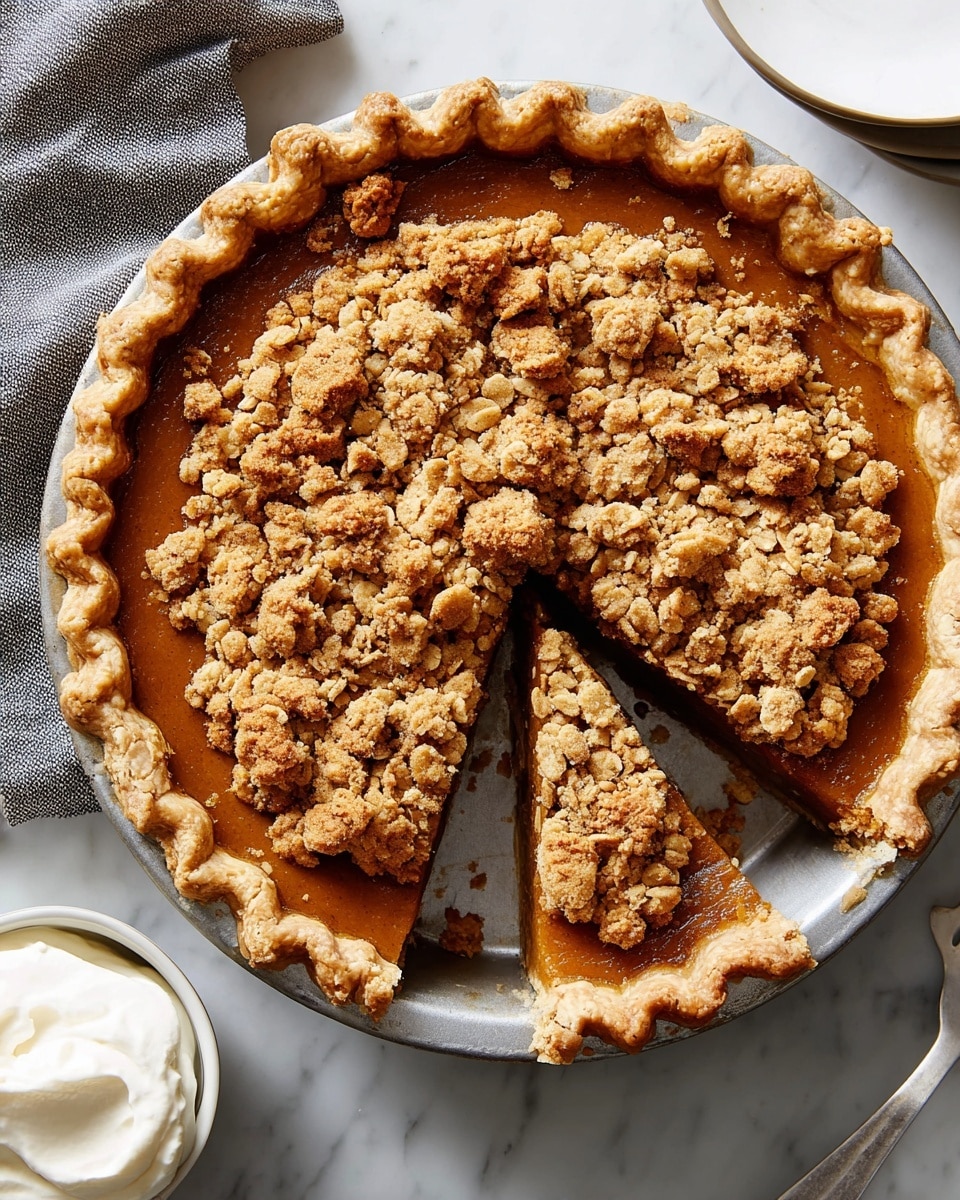
I’m so excited to share this Apple Butter Pie Recipe with you—it’s a cozy, fall-flavored dessert that instantly feels like home. What makes it truly special is how that rich, spiced apple butter filling blends with a buttery crust and a crunchy oat topping, creating layers of texture and flavor in every forkful.
You’ll find that this pie works perfectly for chilly evenings, holiday gatherings, or whenever you’re craving something sweet but not too heavy. I’ve made it countless times, and each bake fills the house with that warm, nostalgic aroma that just makes everyone stop and smile.
Why You’ll Love This Recipe
- Comforting Flavors: The apple butter filling combines spices and sweetness that taste like fall in every bite.
- Textural Delight: Crispy oat topping adds a wonderful contrast to the smooth filling and flaky crust.
- Make-Ahead Friendly: The crust benefits from resting time, and leftovers keep beautifully in the fridge.
- Family Favorite: My kids beg for this Apple Butter Pie Recipe every autumn—it’s that crowd-pleasing!
Ingredients You’ll Need
The ingredients for this Apple Butter Pie Recipe come together to balance richness, sweetness, and spice perfectly. I love that the crust is simple but flaky, while the filling is full of deep apple flavor from the apple butter—you’ll want to pick a good-quality one!
- All-purpose flour: Essential for the crust and topping—make sure to spoon it into your measuring cup for accuracy.
- Granulated sugar: Provides just the right amount of sweetness in the crust and topping.
- Kosher salt: Small detail that enhances all the flavors in the crust.
- Cold unsalted butter: Key for a flaky crust and the crumbly oat topping; keep it chilled until use.
- Cold water: Helps bind the crust without making it soggy—add it gradually.
- Apple cider vinegar: A little pinch for the crust to tenderize the gluten and add subtle tang.
- Old-fashioned oats: The star in the topping that adds crunch and heartiness.
- Light brown sugar: Brings a molassesy depth to the topping.
- Ground cinnamon, cloves, nutmeg: Warm spices that give the filling its cozy character.
- Apple butter: The star ingredient—choose a smooth, flavorful one that you love.
- Sweetened condensed milk: Adds creaminess and sweetness to the filling for that luscious texture.
- Large eggs: They bind the filling and add richness.
- Pure vanilla extract: Enhances the overall aroma and taste of the pie.
Variations
I love tweaking this Apple Butter Pie Recipe to suit the season or my mood—feel free to experiment and make it your own! Whether you want to swap nuts into the topping or try a gluten-free crust, this recipe is versatile.
- Nutty topping variation: I once added chopped pecans to the oat topping and it added delightful crunch and warmth.
- Gluten-free crust: Try using a gluten-free flour blend for the crust if you want to keep the pie accessible to more people.
- Less sweet option: Use unsweetened apple butter and reduce sugar in the topping for a lightly sweetened pie.
- Spice adjustment: You can play with the spices—adding more cinnamon or a pinch of ginger for extra warmth.
How to Make Apple Butter Pie Recipe
Step 1: Crafting the Perfect Crust
Start by whisking together the flour, sugar, and salt in a big mixing bowl. Then toss in the cold butter cubes. I like to use my fingertips to rub the butter into the flour until the chunks resemble walnut halves—this is your ticket to a flaky crust. Don’t rush this part! Once mixed, sprinkle in the water and apple cider vinegar, tossing gently and adding a splash more water if your dough feels too dry. Squeeze a handful together—it should hold but not be sticky. Form it into a smooth disc, wrap, and refrigerate at least two hours. I find this resting step vital for a tender crust that won’t shrink!
Step 2: Pre-baking the Crust
After chilling, let your dough sit for about 5-10 minutes to make rolling easier. On a floured surface, roll out to a 12-inch circle and carefully transfer to your 9-inch pie plate. Press the dough gently into the edges and refrigerate for 10 minutes to keep it cold and firm. Trim the edges with a one-inch overhang, then tuck and crimp for that classic pie look. Pop it back in the fridge for another 15 minutes before baking. When ready, preheat your oven to 400°F, line the crust with parchment, and weigh it down with pie weights or dried beans. Bake 12-15 minutes until the crust is lightly golden—this step ensures it won’t get soggy once the filling arrives.
Step 3: Mixing the Filling and Topping
Lower your oven temperature to 375°F. Whisk together the apple butter, sweetened condensed milk, eggs, vanilla extract, and spices until smooth and inviting. This filling is richly creamy and spiced just right—it’s really the heart of the Apple Butter Pie Recipe. For the topping, combine oats, both sugars, flour, and cinnamon, then rub in the cold butter until the mixture clumps together when squeezed. I love this step; it’s therapeutic and guarantees a crispy, buttery crumble topping!
Step 4: Assembling and Baking the Pie
Pour your luscious filling into the pre-baked crust and spread it evenly. Then crumble the oat topping over the surface, making sure to cover the filling well. Bake for 35-45 minutes until the topping turns a beautiful golden brown and the filling jiggles slightly in the center—that’s your cue it’s perfectly set but not overdone. It’s tempting to slice while warm but trust me, letting the pie cool to room temperature and then chilling it for at least two hours results in cleaner slices and the best flavor harmony.
Pro Tips for Making Apple Butter Pie Recipe
- Keep Ingredients Cold: Cold butter and water are critical for a flaky crust—avoid over-handling.
- Don’t Skip Pre-Baking: Blind baking the crust ensures it stays crisp under the moist filling.
- Watch the Bake Time: The filling should jiggle slightly when done; overbaking makes it dry.
- Chill Before Serving: Refrigerate for best slicing and a richer flavor meld—you’ll notice the difference!
How to Serve Apple Butter Pie Recipe
Garnishes
For garnishes, I like to keep it simple with a dollop of freshly whipped cream or a scoop of vanilla ice cream—the cold creaminess pairs perfectly with the warm spices. A light dusting of cinnamon on top adds a festive touch and elevates the aroma just before serving.
Side Dishes
This pie shines on its own but pairs beautifully with a warm cup of chai or coffee. If you’re serving a full dessert spread, I suggest light salads with tangy vinaigrette or some roasted nuts to balance the sweet richness.
Creative Ways to Present
One fun way I’ve served this apple butter pie recipe is by cutting it into mini hand pies—perfect for holiday parties or gifting. You can also drizzle a caramel sauce on top or sprinkle some toasted pecans for extra crunch when presenting to guests.
Make Ahead and Storage
Storing Leftovers
I always keep leftover Apple Butter Pie wrapped tightly in plastic wrap or stored in an airtight container in the refrigerator. It stays fresh for up to 4 days, and the flavors actually deepen overnight, making each bite better than the last.
Freezing
Freezing works great if you want to prepare ahead. I freeze it fully baked and cooled, wrapped first in plastic wrap and then a layer of foil. When you’re ready to eat, thaw overnight in the fridge and warm slightly in the oven for the best texture.
Reheating
To reheat leftovers, I pop slices in a 325°F oven for about 10-15 minutes until warmed through. This keeps the crust crisp and topping crunchy, unlike the microwave, which can sog them down.
FAQs
-
Can I use homemade apple butter for this pie?
Absolutely! Homemade apple butter works wonderfully and gives your pie an extra personal touch. Just ensure it’s smooth and not overly chunky so the filling bakes evenly.
-
Do I have to pre-bake the crust?
Yes, blind baking the crust helps prevent sogginess from the filling. It also creates a firmer base that holds up when slicing and serving.
-
Can I make this pie vegan?
You can try substituting butter with vegan butter and replacing eggs with flax eggs, but keep in mind the texture and flavor might differ slightly. Using coconut milk condensed milk alternatives can also help keep the filling creamy.
-
How long should I chill the pie before serving?
Cooling the pie at least two hours, ideally overnight, is best for the filling to set and flavors to develop fully. It also makes slicing neater.
-
What’s the difference between this Apple Butter Pie Recipe and a traditional apple pie?
This recipe uses apple butter instead of fresh apples, resulting in a smoother, richer filling with deeper spice notes and less moisture, plus the oat topping adds a unique crunchy texture that traditional apple pies usually don’t have.
Final Thoughts
This Apple Butter Pie Recipe has become one of my go-to desserts whenever I want to impress with minimal fuss. It’s a perfect blend of smooth, spicy, sweet, and crunchy that just makes people happy. I hope you’ll give it a try soon—you really can’t go wrong with this classic, heartwarming pie!
Print
Apple Butter Pie Recipe
- Prep Time: 20 mins
- Cook Time: 60 mins
- Total Time: 5 hrs 30 mins
- Yield: 8 servings 1x
- Category: Dessert
- Method: Baking
- Cuisine: American
Description
Apple Butter Pie is a luscious dessert featuring a flaky, buttery crust filled with a smooth apple butter custard and topped with a crunchy oat streusel. This pie blends warm spices like cinnamon, cloves, and nutmeg, creating a perfect balance of autumn flavors that are comforting and sweet. Ideal for fall gatherings or holiday celebrations, it serves eight and requires some chilling time to set perfectly.
Ingredients
Crust
- 1 1/2 cups (180 g) all-purpose flour, plus more for surface
- 1 Tbsp. granulated sugar
- 1/2 tsp. kosher salt
- 1/2 cup (1 stick) cold unsalted butter, cut into 1/2″ cubes
- 1/4 cup (or more) cold water
- 1 Tbsp. apple cider vinegar
Topping
- 1/2 cup (50 g) old-fashioned oats
- 1/3 cup (70 g) packed light brown sugar
- 1/3 cup (40 g) all-purpose flour
- 1/4 cup (50 g) granulated sugar
- 1/2 tsp. ground cinnamon
- 4 Tbsp. (1/2 stick) cold unsalted butter, cut into 1/2″ cubes
Filling
- 2 cups (480 g) apple butter
- 1 (14-oz.) can sweetened condensed milk
- 2 large eggs
- 1 tsp. pure vanilla extract
- 1 tsp. ground cinnamon
- 1/4 tsp. ground cloves
- 1/4 tsp. ground nutmeg
Instructions
- Make the Crust: In a large bowl, whisk together the flour, granulated sugar, and salt. Add the cold butter cubes and rub them into the dry ingredients using your hands until the butter pieces resemble walnut halves, ensuring the butter stays coated in flour. Add the cold water and apple cider vinegar and toss to combine. If needed, add more water 1 tablespoon at a time until the dough comes together when squeezed, feels moist, and holds together easily but isn’t sticky.
- Chill the Dough: Form the dough into a smooth disc, cover it tightly with plastic wrap, and refrigerate for at least 2 hours or up to 3 days. You can also freeze it for up to 1 month.
- Roll and Fit the Crust: Let the dough sit at room temperature for 5 to 10 minutes. On a lightly floured surface, roll the dough into a 12-inch round. Transfer and gently press it into a 9-inch pie plate, making sure it fits snugly. Refrigerate the crust until cold, about 10 minutes.
- Trim and Crimp Edges: Trim the edges, leaving about a 1-inch overhang. Tuck and fold the edges under themselves to make them flush with the pie plate rim, then crimp the edges for a decorative finish. Refrigerate again for another 15 minutes to chill.
- Prebake the Crust: Preheat the oven to 400°F (204°C). Line the crust with parchment paper and fill with pie weights or dried beans to prevent rising. Place the pie plate on a baking sheet and bake for 12 to 15 minutes until the crust is lightly golden. Remove the parchment and weights carefully.
- Prepare the Topping: In a large bowl, combine the oats, brown sugar, flour, granulated sugar, and cinnamon. Add the cold butter and rub it into the mixture using your hands until the butter pieces are pea-sized and the topping clumps together when squeezed.
- Make the Filling: Reduce the oven temperature to 375°F (190°C). In a large bowl, whisk together the apple butter, sweetened condensed milk, and eggs until smooth. Add the vanilla, cinnamon, ground cloves, and nutmeg and whisk until fully combined.
- Assemble the Pie: Pour the filling into the prebaked crust and smooth the top with a spatula. Evenly sprinkle the oat topping over the filling, covering it completely.
- Bake the Pie: Bake for 35 to 45 minutes until the filling is slightly jiggly in the center and the topping is golden brown.
- Cool and Chill: Allow the pie to cool to room temperature, then refrigerate for at least 2 hours or up to overnight before serving to allow the filling to fully set.
Notes
- Use cold butter and water to ensure a flaky crust.
- Pie weights or dried beans help prevent crust shrinking or bubbling during prebaking.
- Chilling the dough multiple times helps maintain the crust’s shape and texture.
- Do not overbake the filling; a little jiggle in the center indicates it’s done.
- Refrigerate the pie before slicing for cleaner, firmer slices.
Nutrition
- Serving Size: 1 slice (1/8 of pie)
- Calories: 380
- Sugar: 30g
- Sodium: 160mg
- Fat: 18g
- Saturated Fat: 11g
- Unsaturated Fat: 6g
- Trans Fat: 0.2g
- Carbohydrates: 52g
- Fiber: 3g
- Protein: 4g
- Cholesterol: 75mg


