
If you’re looking to add a little extra magic to your holiday baking this year, I’ve got just the thing for you. The Festive Christmas Brownie Shapes Recipe is one of my all-time favorites because it combines rich, chewy brownies with colorful, fun decorations that you and your family can customize together. Whether you’re hosting a Christmas party or just want a sweet treat to get you through the season, these brownies are sure to bring smiles around the kitchen and the table.
Why You’ll Love This Recipe
- Customizable Fun: You can create all sorts of festive shapes and colors that make these brownies perfect for holiday celebrations.
- Chewy & Moist: The base brownie is incredibly chewy and moist, which makes decorating even more satisfying.
- Kid-Friendly Activity: Decorating these brownies is a great way to get kids involved in the kitchen during the holidays.
- Make Ahead Friendly: You can prep the brownies and frostings in advance, saving you valuable time during busy holiday days.

Ingredients You’ll Need
For these festive brownies, the ingredients work together to create that perfect chewy texture and a buttery frosting that’s easy to tint and pipe. I love using gel food coloring because it doesn’t water down the frosting, giving me those vibrant hues I crave during Christmas.

- Best Ever Chewy Brownie Ingredients: These are the foundation, so choosing quality chocolate and real butter is key.
- Best Buttercream Frosting Ingredients: Simple ingredients that whip up creamy and smooth – perfect for decorating.
- Gel Food Coloring: Opt for gel-based colors—they won’t thin the buttercream and give you rich, bright shades.
- Sprinkles, Mini M&Ms, Mini Chocolate Chips: Basically, any fun, edible decoration you like to add extra festivity and texture.
Variations
I love how versatile the Festive Christmas Brownie Shapes Recipe is—you can easily switch up colors, decorations, or even flavors to make it truly your own. I’ve found that playing around with the frosting colors and festive additions turns the whole baking process into a creative party.
- Chocolate Peppermint Variation: I once swapped out mini M&Ms for crushed peppermint candies—my family went crazy over the minty twist!
- Gluten-Free Option: You can use a gluten-free brownie mix as a base if needed without losing that chewy texture.
- Nut-Free Version: Simply avoid nuts in your brownies and skip any nutty toppings to keep it safe for everyone.
- Seasonal Colors: I like to change the buttercream colors to match the theme—reds and greens for Christmas, or even blue and silver for winter celebrations.
How to Make Festive Christmas Brownie Shapes Recipe
Step 1: Bake Your Double Batch of Brownies
Start by making a double batch of my Best Chewy Brownies. Trust me, doubling the ingredients ensures you have plenty of brownie to play with when cutting shapes. I like to line a 9×13-inch metal pan with parchment paper or foil so the brownies come out cleanly. Bake them for the recommended time plus an extra 3-5 minutes since the batter is doubled. One of the tricks I discovered is chilling the brownies for a couple of hours or even overnight after they cool—this makes cutting out shapes so much easier, and the edges won’t crumble on you.
Step 2: Whip Up the Buttercream and Add Color
While the brownies bake or cool, get your buttercream ready. I use my Best Ever Buttercream Frosting recipe because it stays nice and fluffy but firm enough to pipe. Divide the frosting into different bowls and add gel food coloring to create a rainbow of festive shades. A tip I learned early on: use disposable piping bags fitted with your favorite tips—makes decorating less messy and more precise.
Step 3: Cut Out Your Festive Brownie Shapes
Here’s where the fun begins! Keep the brownies in the pan with the parchment or foil still underneath to make cutting easier. Use tall metal cookie cutters to stamp out your holiday shapes—trees, stars, snowflakes, you name it. Press the cutters close together to minimize waste. Use a thin offset spatula or a small knife to gently lift each shape out without breaking the edges. If the brownies feel too soft, pop the pan back into the fridge for 10-15 minutes to firm up. When I first tried this, using cold brownies really saved me from crumb disaster.
Step 4: Decorate with Frosting and Festive Toppings
Now for the icing on the (brownie) cake! Pipe the colored buttercream onto each shaped brownie just before decorating, since the frosting starts drying quickly. Then add your sprinkles, mini M&Ms, or whatever festive extras you love. It’s like your own edible winter wonderland. Decorating is the perfect moment to get the kids involved—they always have the best ideas for designs!
Pro Tips for Making Festive Christmas Brownie Shapes Recipe
- Chill for Clean Cuts: Always cool and chill your brownies before cutting for crisp, clean shapes without crumbling.
- Use Gel Colors: Gel food coloring keeps your buttercream vibrant without watering it down—this tip changed my decorating game.
- Work Quickly with Frosting: Pipe and decorate one batch at a time so the frosting stays soft and toppings stick perfectly.
- Store Airtight: Keep your brownies in airtight containers to prevent those chewy edges from drying out—trust me, it makes a difference.
How to Serve Festive Christmas Brownie Shapes Recipe

Garnishes
I usually keep the garnishes bright and simple—classic red and green sprinkles, mini M&Ms in holiday colors, and a sprinkle of edible glitter for a little sparkle. Sometimes I add delicate silver sugar pearls for a touch of elegance when I’m hosting a more formal gathering. It’s amazing how little touches can elevate the whole look and make these brownies feel extra special.
Side Dishes
These festive brownies go great alongside a cozy cup of hot cocoa or a rich peppermint mocha. If you’re aiming for a full dessert spread, I pair them with simple eggnog or spiced cider. For a party, a platter of fruit slices—like sharp green apples or juicy cranberries—balances the richness of the brownies perfectly.
Creative Ways to Present
Presentation makes all the difference, especially during the holidays. I love arranging my brownie shapes on a festive platter, layered with fresh pine sprigs or holly leaves (fake or fresh) for that winter vibe. Another favorite trick is placing each brownie shape in a small decorative cupcake liner or wrapping them in clear cellophane tied with ribbon to give as homemade gifts. Guests always comment on how charming and thoughtful that looks!
Make Ahead and Storage
Storing Leftovers
From my experience, brownies are best eaten fresh the day you make and decorate them. But if you have leftovers, store them in an airtight container at room temperature for up to 3 days. If you refrigerate, they’ll last about 5 days, although I’ve noticed the edges can dry out quickly if not sealed well. Wrapping them gently in plastic wrap between layers inside the container helps keep that fudgy texture intact.
Freezing
I like to freeze my brownies unfrosted, either as an entire slab or cut out shapes, wrapped tightly in plastic wrap and then sealed in a freezer bag. This method keeps them fresh for up to a month. When I’m ready to decorate, I thaw them overnight in the fridge or for a couple of hours on the counter. Decorating from a chilled brownie actually makes the process much easier.
Reheating
Leftover brownies can be gently warmed in the microwave for about 10-15 seconds to bring that soft, chewy texture back to life. Just be cautious not to overheat and melt your frosting! Another option is serving them cold, which some people actually prefer for the fudgy bite.
FAQs
-
Can I use regular food coloring instead of gel for the frosting?
You can, but I don’t recommend it for this recipe. Regular food coloring is liquid-based and can thin out the buttercream frosting, making it runnier and harder to pipe. Gel food coloring gives you much more vibrant colors without compromising the texture.
-
How do I prevent the brownie shapes from breaking when cutting?
Make sure your brownies are completely cooled and chilled before cutting. Using a sharp cookie cutter and pressing it straight down without twisting helps create clean edges. If the brownies feel soft, pop them in the fridge for 10-15 minutes before cutting again.
-
Can I prepare the buttercream frosting ahead of time?
Yes! You can make the buttercream a day ahead and keep it tightly covered in the fridge. When ready to use, bring it to room temperature and re-whip it briefly to restore its fluffy texture before coloring and piping.
-
What shapes work best for this recipe?
Taller metal cookie cutters with simple holiday shapes like trees, stars, and snowflakes work best. They create sturdy, recognizable shapes without too many thin edges that might break. Avoid very intricate cutters unless your brownies are well chilled and firm.
-
How should I store leftover decorated brownies?
Store them in an airtight container at room temperature for up to 3 days or in the fridge up to 5 days. Keep them separated with parchment paper if stacking to avoid frosting smudging. Avoid storing in the fridge if you want to keep them super soft at the edges.
Final Thoughts
I absolutely love how this Festive Christmas Brownie Shapes Recipe adds so much joy to holiday baking. There’s something about walking into a kitchen filled with the scent of brownies and seeing colorful, fun shapes lined up that just warms your soul. Since I started making these, my family and friends look forward to them every year, and it’s become our little tradition to decorate them together. Honestly, give this a try—you’ll find it’s not just a recipe, but a way to make memories during the most wonderful time of the year.
Print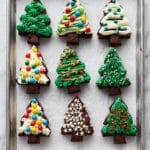
Festive Christmas Brownie Shapes Recipe
- Prep Time: 30 minutes
- Cook Time: 35 minutes
- Total Time: 3 hours 5 minutes
- Yield: 10 decorated brownie shapes 1x
- Category: Dessert
- Method: Baking
- Cuisine: American
Description
Celebrate the holidays with festive Christmas Brownies featuring a double batch of chewy brownies shaped into holiday designs, topped with colorful buttercream frosting and decorated with sprinkles, mini M&Ms, and other edible decorations. Perfect for parties and gift-giving, these brownies combine rich chocolatey goodness with playful holiday cheer.
Ingredients
Brownies
- Double batch of Best Ever Chewy Brownies (all ingredients doubled from original recipe)
- 9 by 13-inch metal baking pan lined with parchment paper or aluminum foil
Buttercream Frosting
- 1 batch of Best Ever Buttercream Frosting
- Gel food coloring (various colors as desired)
Decorations
- Sprinkles
- Mini M&Ms
- Mini chocolate chips
- Other edible decorations of choice
Instructions
- Make the Brownies: Prepare a double batch of the Best Ever Chewy Brownies by doubling all ingredients. Pour the batter into a 9 by 13-inch metal baking pan lined with parchment paper or aluminum foil. Bake for the time recommended in the original recipe plus an additional 3-5 minutes. Once baked, allow the brownies to cool completely. For best results, chill for a few hours or overnight to firm up.
- Make the Buttercream: Prepare one batch of Best Ever Buttercream Frosting. Divide the frosting into separate bowls depending on how many colors you want. Add gel food coloring to each bowl and mix thoroughly to create vibrant colors. Transfer each colored frosting into disposable piping bags fitted with your choice of piping tips.
- Cut Out the Brownies: Lift the entire slab of cooled brownies out of the baking pan using the parchment paper or foil as support. Use a tall metal cookie cutter to stamp out holiday shapes, placing the cookie cutter pieces as close together as possible. Carefully use an offset spatula or a paring knife to loosen each brownie shape from the parchment or foil. Gently push the brownie from the cutter, ideally while cold, so they keep their shape.
- Decorate the Christmas Brownies: Pipe the colored buttercream frosting onto each brownie shape as desired. Add festive toppings like sprinkles, mini M&Ms, or mini chocolate chips while the frosting is still wet to ensure they stick. Serve immediately or store the decorated brownies in an airtight container to prevent drying.
Notes
- How to Store Christmas Tree Brownies: Best enjoyed the day they are baked and decorated. Store in an airtight container at room temperature for up to 3 days or refrigerate for up to 5 days. The edges may dry out quickly once cut if not stored properly.
- Can You Freeze Christmas Brownies?: Freeze unfrosted brownies either as a whole slab or cut shapes wrapped tightly in plastic wrap and stored in a freezer bag or airtight container for up to one month. Thaw in the fridge overnight or at room temperature for a few hours before frosting and decorating.
Nutrition
- Serving Size: 1 decorated brownie
- Calories: 350
- Sugar: 25g
- Sodium: 150mg
- Fat: 18g
- Saturated Fat: 10g
- Unsaturated Fat: 7g
- Trans Fat: 0g
- Carbohydrates: 44g
- Fiber: 2g
- Protein: 3g
- Cholesterol: 55mg

