
If you’re looking for a festive treat that’s as fun to make as it is to eat, you’re going to adore this Colorful Christmas Fudge Recipe. I absolutely love how bright and cheerful it looks with those swirls of red, green, and white—and trust me, once you try it, you’ll see why this fudge has become my go-to holiday dessert. It’s creamy, rich, and has just the right amount of sweetness that makes it impossible to stop at one piece!
Why You’ll Love This Recipe
- Vibrant Holiday Colors: The red and green swirled into creamy white fudge add festive cheer that’s perfect for Christmas gifting or parties.
- Simple Ingredients: You just need a handful of pantry staples, making this an approachable recipe for any home cook.
- No Candy Thermometer Needed: I love that it’s foolproof—no special tools or temperature guessing required.
- Quick and Easy Prep: It takes under 15 minutes to make, so you can whip it up even on a busy holiday afternoon.

Ingredients You’ll Need
The beauty of this Colorful Christmas Fudge Recipe lies in its straightforward ingredients—all of which combine perfectly to give you that luscious creamy texture and stunning colors. When I shop for the ingredients, I always opt for high-quality white chocolate chips, which really make a difference in smoothness and taste.

- White chocolate chips: Choose high-quality chips like Ghirardelli for the best melt and richest flavor.
- Sweetened condensed milk: This acts as the perfect sweetener and adds amazing creaminess without extra fuss.
- Unsalted butter: Using cold, cubed butter helps create a smooth texture when melted in the mix.
- Red gel food coloring: I recommend starting with a little and adding more to get that festive, vibrant hue without overpowering flavor.
- Green gel food coloring: Same as red—gel colors work best for vivid shades without thinning the fudge.
Variations
While the classic red, green, and white combo is what makes this fudge so perfect for Christmas, I’ve found it’s easy to mix things up and add a personal touch depending on what you’re in the mood for or who you’re making it for.
- White chocolate and peppermint swirl: I like adding a drop of peppermint extract to the base fudge for a refreshing twist that screams holiday spirit.
- Nutty version: For a bit of crunch, fold in chopped pecans or walnuts after you’ve swirled the fudge—it adds a delightful texture contrast.
- Vegan adaptation: I’ve experimented using dairy-free white chocolate and coconut condensed milk substitutes; results vary, but it still tastes festive and tasty!
How to Make Colorful Christmas Fudge Recipe
Step 1: Prep Your Pan and Ingredients
Start by lining an 8×8-inch baking pan with parchment paper, making sure there’s enough parchment hanging off the sides so you can lift the fudge out easily once it’s set. I always do this first so I’m not scrambling later. It saves so much hassle when cutting neat squares!
Step 2: Melt the Fudge Base
In a medium saucepan, combine the white chocolate chips, sweetened condensed milk, and cold cubes of unsalted butter. Keep the heat on medium-low and stir constantly for about 4-6 minutes. You want everything melted into a smooth, glossy mixture—no lumps. This part requires your full attention, so don’t wander off! Removing the pan from heat as soon as it’s smooth helps prevent any burning or seizing.
Step 3: Divide and Color the Fudge
Pour about one-third of the melted fudge into a small bowl, then add red gel food coloring. Start with ¼ teaspoon, mix well until you get an even shade without streaks, and add more if needed. Repeat the process with another third of the fudge and green gel food coloring in a second bowl. The remaining third stays white for that beautiful contrast.
Step 4: Swirl to Create Colorful Patterns
Time for the fun part! Dollop spoonfuls of the white, red, and green fudge randomly into the prepared pan. Then, grab a wooden skewer or butter knife and gently swirl the colors together to create a festive marble pattern. Don’t overdo it—you want to see distinct colors mingling, not blending into brown.
Step 5: Smooth and Chill
Press a small piece of parchment gently on top of the fudge to smooth out the surface without disturbing the swirls. This little trick really makes your fudge look professionally done! Pop it into the refrigerator for 2-3 hours until it’s completely set and firm to the touch.
Step 6: Slice and Enjoy
Once chilled, lift the fudge out using the parchment overhang, set it on a cutting board, and slice into one-inch squares—or smaller if you want bite-sized pieces. Serving this at a holiday party never fails to draw compliments and requests for the recipe!
Pro Tips for Making Colorful Christmas Fudge Recipe
- Use a Good-Quality White Chocolate: I’ve noticed cheaper brands sometimes don’t melt as smoothly, which can affect your fudge texture.
- Don’t Rush the Melting Process: Stir constantly on medium-low heat to prevent scorching and to ensure a silky finish.
- Less is More with Gel Coloring: Start small—you can always add more color, but too much gel can alter the fudge’s consistency.
- Swirling Technique Matters: Gentle, slow movements keep the colors bright and prevent muddy mixes that can happen with over-stirring.
How to Serve Colorful Christmas Fudge Recipe

Garnishes
When I serve this fudge, I like to sprinkle a few festive touches on top before chilling—like crushed candy canes or edible gold glitter. It adds just a little sparkle and extra holiday magic that delights kids and adults alike.
Side Dishes
This fudge pairs beautifully with a hot cup of spiced cocoa or peppermint tea. When we have holiday gatherings, I also love serving it alongside a cheese platter for a sweet and savory contrast.
Creative Ways to Present
For gifting, I wrap small squares in wax paper and tie bundles with festive twine or ribbon. You could also arrange the fudge on a decorative plate with holly sprigs or cinnamon sticks for an elegant dessert display. Trust me, your guests will be impressed!
Make Ahead and Storage
Storing Leftovers
I store leftover fudge in an airtight container in the fridge, where it keeps perfectly for up to one week. Keeping it chilled ensures that it stays firm and fresh but remember to bring it to room temperature before serving for the best texture.
Freezing
Freezing fudge is actually a great option! I pop mine into a sealed container and freeze for up to two months. When ready to enjoy, move it to the fridge to thaw overnight—this helps preserve the creamy texture without condensation mishaps.
Reheating
Since fudge is best enjoyed chilled or at room temperature, reheating isn’t usually necessary. But if you want softer fudge for spreading or dipping, let it sit at room temperature for about 15 minutes. I avoid microwaving to prevent melting or graininess.
FAQs
-
Can I use regular food coloring instead of gel for this fudge?
You can, but I recommend gel food coloring because it provides more vibrant colors without thinning the fudge mixture. Regular liquid food coloring may make the fudge too runny, impacting texture and set time.
-
How do I prevent the fudge from becoming grainy?
Stir constantly over low heat and avoid overheating the mixture. Using good-quality white chocolate chips and not rushing the melting process helps keep the fudge silky and smooth. Removing from heat at the right time is key.
-
Can I add nuts or other mix-ins to the Colorful Christmas Fudge Recipe?
Absolutely! After swirling the fudge in the pan, gently fold in chopped nuts, dried fruit, or even crushed candy canes for added texture and flavor. Just be careful not to overmix and ruin the visual swirl effect.
-
How thick should I make the fudge layer in the pan?
An 8×8-inch pan is perfect to get about 1-inch thick fudge pieces when sliced. Thicker layers might need longer chilling time and will result in bigger chunks. Thinner layers will set faster but make smaller, more delicate pieces.
Final Thoughts
Honestly, this Colorful Christmas Fudge Recipe has become a holiday staple in my kitchen for good reason. Its festive look always brightens up dessert tables, and the taste brings everyone together with sweet smiles and warm memories. Whether you’re making it with family or prepping gifts for friends, you’ll enjoy how simple yet impressive this fudge is. Give it a try—I’ll be cheering for you from my kitchen!
Print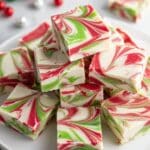
Colorful Christmas Fudge Recipe
- Prep Time: 15 minutes
- Cook Time: 6 minutes
- Total Time: 2 hours 21 minutes
- Yield: 64 pieces 1x
- Category: Dessert
- Method: Stovetop
- Cuisine: American
Description
This festive Christmas Fudge recipe features creamy white chocolate blended with rich sweetened condensed milk and swirled with vibrant red and green colors to create a visually stunning and delicious holiday treat. Perfect for gifting or serving at holiday parties, this smooth and creamy fudge sets in the refrigerator and slices easily into bite-sized pieces.
Ingredients
Fudge Base
- 22 oz (2 11-oz. bags) white chocolate chips (Ghirardelli recommended)
- 14 oz can sweetened condensed milk
- 4 tablespoons unsalted butter, cold and cut into small cubes
Coloring
- ¼–½ teaspoon red gel food coloring (Americolor brand suggested)
- ¼–½ teaspoon green gel food coloring (Americolor brand suggested)
Instructions
- Prepare the Pan: Line an 8×8 inch straight-sided baking pan with parchment paper, ensuring enough overhang on the sides for easy removal of the fudge once set.
- Melt Ingredients: In a medium saucepan over medium-low heat, combine white chocolate chips, sweetened condensed milk, and cold unsalted butter cubes. Stir constantly for 4 to 6 minutes until all chocolate chips are completely melted and the mixture is smooth. Remove from heat.
- Color Red Portion: Transfer one-third of the melted white chocolate mixture into a small bowl. Add ¼ teaspoon red gel food coloring, stirring completely until the color is uniform with no white streaks. Add more coloring if needed to reach desired shade.
- Color Green Portion: Transfer another one-third of the melted white chocolate mixture into a different small bowl. Add ¼ teaspoon green gel food coloring and stir thoroughly until evenly colored without streaks. Add more if necessary.
- Layer the Fudge: Spoon dollops of the remaining uncolored white chocolate mixture, red mixture, and green mixture randomly into the prepared pan, alternating to create a multiswirled effect.
- Swirl Colors: Using a wooden skewer or butter knife, gently swirl the three colors together to form a decorative festive pattern on the surface.
- Smooth the Surface: Place a small piece of parchment paper on top of the soft fudge and gently press down to create a smooth finish, taking care not to disturb the swirl design.
- Chill to Set: Refrigerate the fudge for 2 to 3 hours or until completely firm and set.
- Cut and Serve: Remove fudge from refrigerator, lift out using parchment paper overhang, and place on a cutting board. Slice into sixty-four 1-inch square pieces and serve.
Notes
- Storage: Store fudge in an airtight container in the refrigerator for up to 1 week.
- Freezing: Freeze fudge for up to 2 months; thaw completely in the refrigerator before serving.
- Coloring Tips: Start with small amounts of gel coloring and gradually add more to avoid overly intense coloring.
- Pan Preparation: Using parchment with overhang ensures easy removal and clean slicing.
- Swirling: Be gentle when swirling to maintain distinct color zones while creating a pretty marble effect.
Nutrition
- Serving Size: 1 piece (1×1 inch)
- Calories: 90
- Sugar: 14g
- Sodium: 20mg
- Fat: 4.5g
- Saturated Fat: 3g
- Unsaturated Fat: 1g
- Trans Fat: 0g
- Carbohydrates: 12g
- Fiber: 0.1g
- Protein: 1g
- Cholesterol: 10mg


