
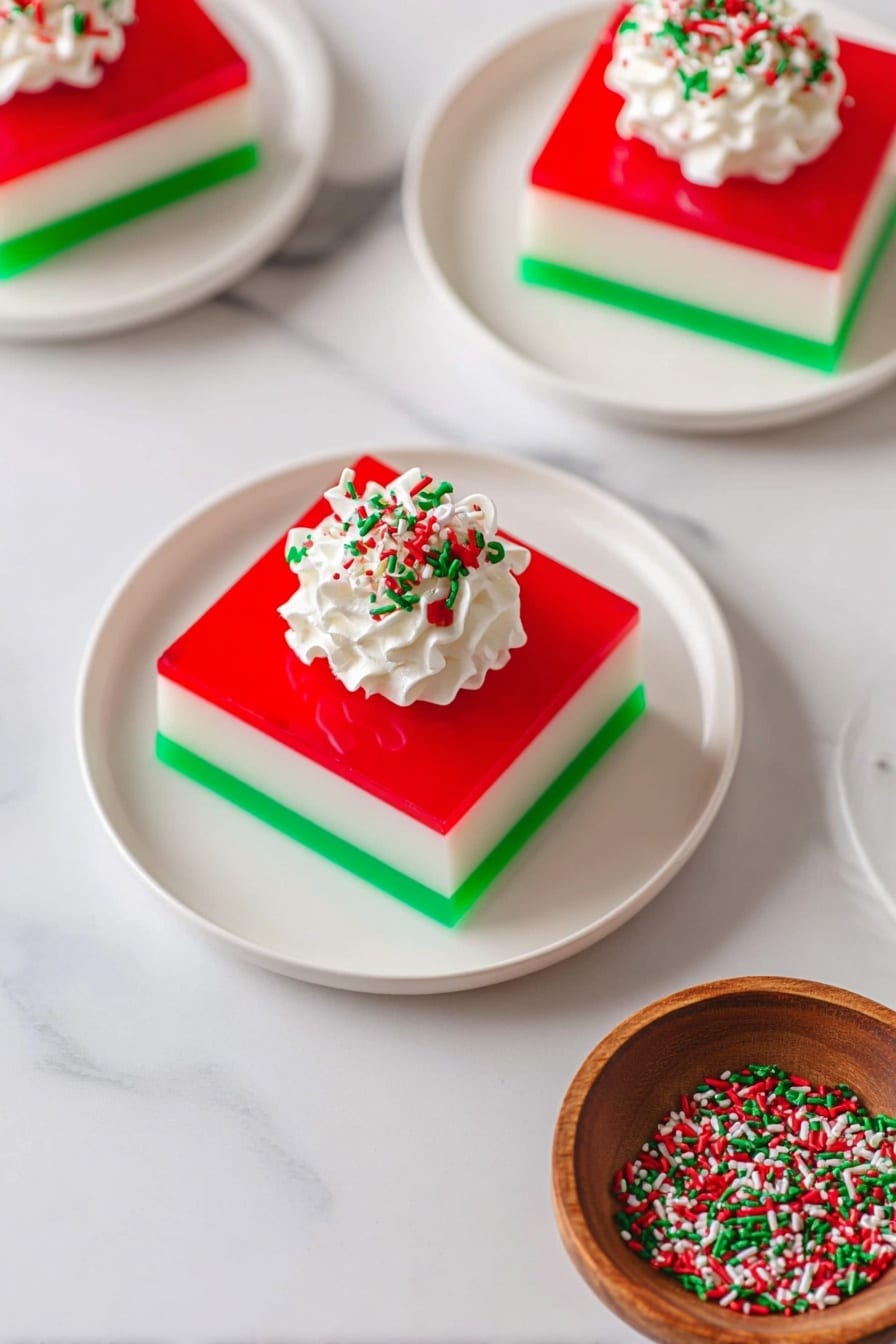
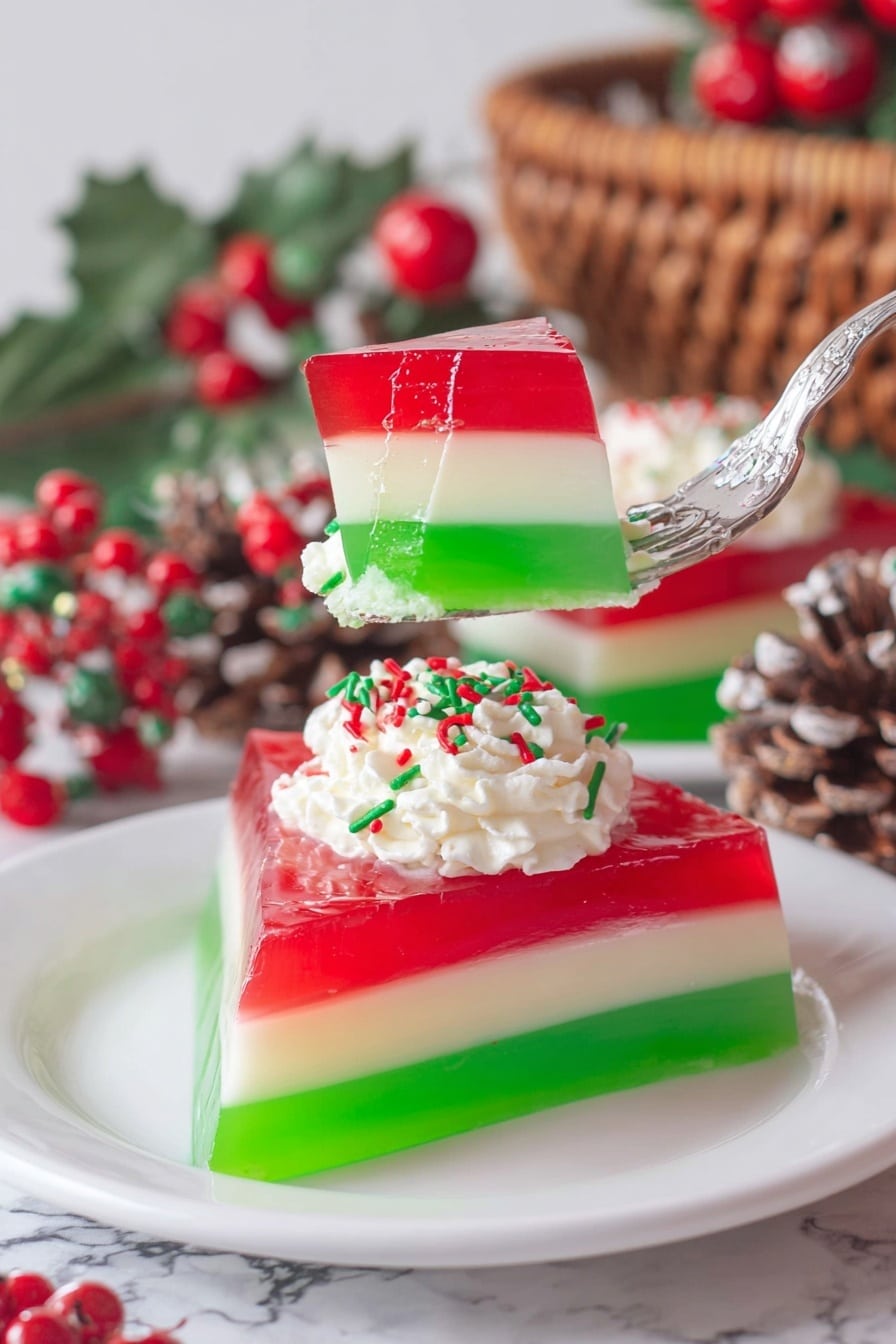
If you’re searching for a show-stopping, nostalgic holiday side dish, you have to try this Christmas Ribbon Salad Recipe. It’s one of those colorful, layered Jell-O salads that looks as festive as it tastes delightful — tangy, creamy, and just the right mix of sweet and fruity. I absolutely love how this turns out every time, and I can’t wait to share all my tips so you can nail it too!
Why You’ll Love This Recipe
- Vibrant Layers: Each colorful ribbon stands out beautifully, making it a festive centerpiece on your holiday table.
- Unique Texture: The creamy middle with marshmallows creates this luscious contrast you’ll crave every Christmas.
- Make-Ahead Friendly: Prepare it a day in advance to let those layers set perfectly with minimal day-of stress.
- Family Favorite: This salad always brings smiles and requests for seconds — it’s comfort food in a festive dress.
Ingredients You’ll Need
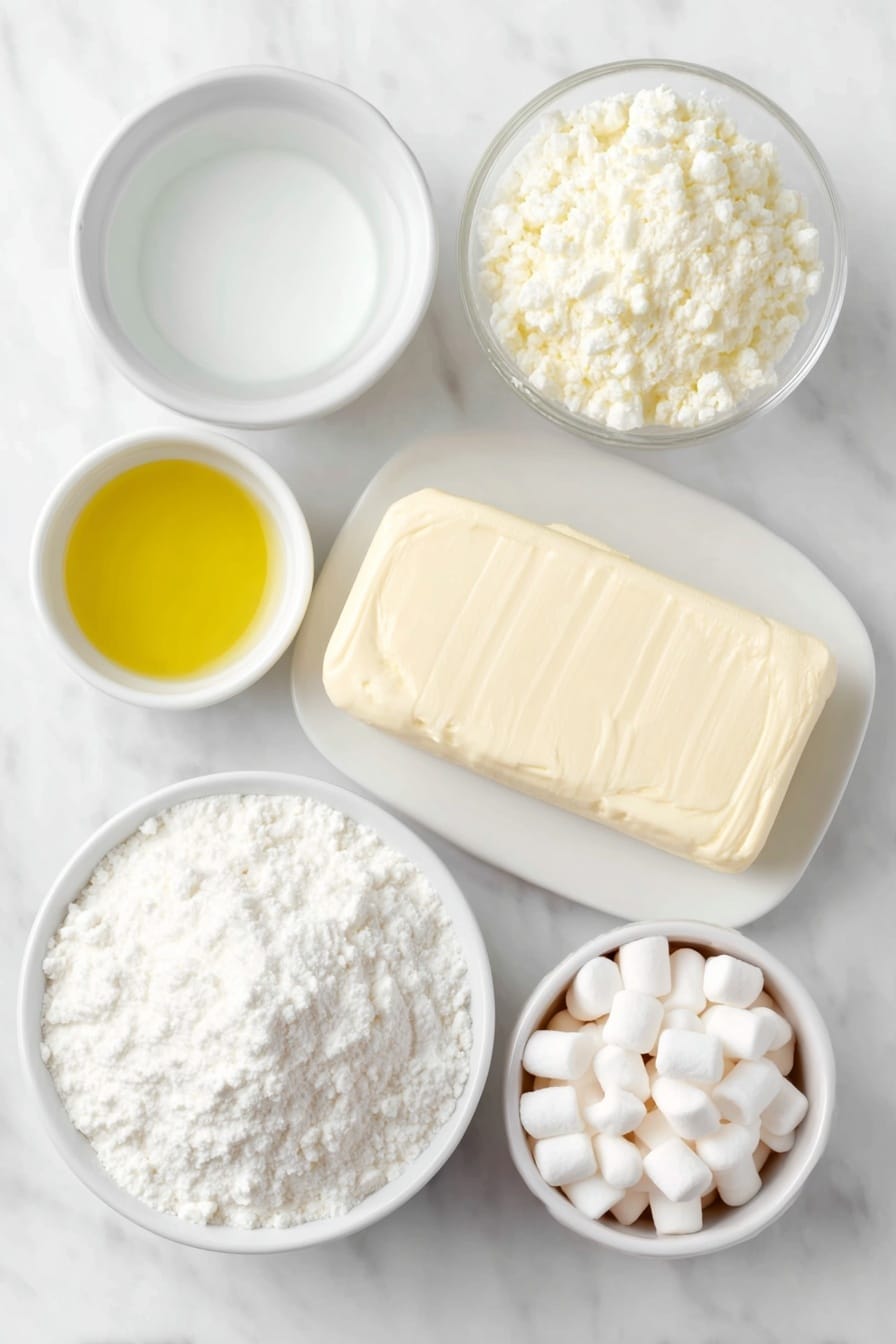
The magic of this Christmas Ribbon Salad Recipe comes from layering Jell-O in different flavors and mixing in a creamy, marshmallow-filled layer. Each ingredient plays a role to deliver that perfect balance of flavors and texture, so make sure to pick your Jell-O packets carefully and use fresh cream cheese for the best results.
- Lime Jell-O: This green-hued gelatin adds a tart, refreshing start for the base layer.
- Hot water: Use hot but not boiling water to dissolve gelatin evenly without weakening its setting power.
- Cream cheese (room temperature): Soften it well for a smooth, fluffy second layer that binds beautifully with marshmallows.
- Mini marshmallows: They melt into the pineapple juice to give a sweet, silky texture—don’t skip the miniature size!
- Pineapple juice: Adds a tropical twist and helps soften the marshmallows.
- Lemon Jell-O: Gives a subtle citrus pop and vibrant yellow ribbon.
- Cherry Jell-O: The bright red top layer that really makes this salad stand out on your Christmas table.
Variations
I love giving this Christmas Ribbon Salad Recipe a little twist now and then, depending on what my family is craving or what’s in the pantry. It’s flexible enough that you can really make it your own!
- Flavor Swaps: Once, I swapped out the cherry Jell-O with raspberry for a berry twist — it was delicious and gave a slightly different festive vibe.
- Diet-Friendly: Use sugar-free Jell-O and lighter cream cheese if you want a lower-calorie version that still feels indulgent.
- Texture Mix: Sprinkling chopped nuts or shredded coconut on top adds crunch that contrasts nicely with the smooth layers.
- Extra Fruity: Stir in crushed pineapple bits or mandarin orange segments into the creamy layer for bursts of fruity freshness.
How to Make Christmas Ribbon Salad Recipe
Step 1: Prepare the First Layer
Start by dissolving the lime Jell-O powder in 2¼ cups of hot water (not boiling!). Stir gently but thoroughly until the powder is fully dissolved — you don’t want any grainy spots messing up your smooth base. Pour it into a 9×13 baking dish, then pop it in the fridge for about an hour. You’ll want this layer fully set before moving on, so it should jiggle but not wobble.
Step 2: Whip Up the Creamy Middle Layer
Using a stand mixer, beat your room-temperature cream cheese until it’s light and fluffy — this is key for an airy texture. Meanwhile, melt the mini marshmallows with pineapple juice over medium heat, stirring constantly until smooth. Let that cool just a bit. Then, dissolve the lemon Jell-O in 1½ cups of hot water, stirring well. Once both mixtures are ready, combine them with the whipped cream cheese, mixing thoroughly to a smooth consistency.
Patience is your friend here — let this mixture cool for around 30-40 minutes. When it’s thickened but still pourable, gently spoon it over your chilled lime layer. I’ve learned that pouring too fast or direct from a bowl can create ugly holes, so taking it slow is the trick.
Step 3: Finish with the Cherry Top Layer
Dissolve the cherry Jell-O package in 2 cups of hot water, stirring well. Allow this mixture to cool completely to room temperature before carefully spooning it over the creamy layer — again, gently is the name of the game to keep your salad’s layers neat and distinct. Once done, refrigerate the whole dish overnight for best results. The next day, you’ll have a stunning ribboned salad that slices neatly and tastes like every holiday dream rolled into one.
Pro Tips for Making Christmas Ribbon Salad Recipe
- Cool Each Layer Properly: Waiting for each layer to fully set before adding the next is crucial for crisp ribbons — rushing this will blend your colors.
- Use Hot Water, Not Boiling: Boiling water can loosen gelatin’s set, so hot water is gentler and dissolves the powder evenly.
- Spoon Gently: Pouring layers directly can create holes; using a large spoon to ‘float’ the mixture preserves your layers’ beauty.
- Whip Cream Cheese Thoroughly: I once skipped this and ended with lumps — beating it well guarantees a smooth, silky second layer.
How to Serve Christmas Ribbon Salad Recipe
Garnishes
I like to keep garnishes simple so the salad’s ribbon colors take center stage — a sprinkle of shredded coconut or a few fresh mint leaves on top adds just the right touch of texture and color without overpowering. Sometimes, tossing a few pomegranate seeds brings a ruby sparkle that dazzles on the plate.
Side Dishes
This salad pairs beautifully with traditional holiday mains like glazed ham or roast turkey. It’s also a refreshing contrast alongside creamy mashed potatoes or sweet candied yams — the tartness cuts through the richness perfectly.
Creative Ways to Present
For festive flair, I like to serve this salad in a clear glass trifle bowl so the layers glow through the sides — it always draws compliments. Another fun idea is making individual servings in clear glass cups or mason jars for easy portioning and pretty presentation at parties.
Make Ahead and Storage
Storing Leftovers
Once your Christmas Ribbon Salad Recipe is made, keep it tightly covered in the refrigerator; it stays fresh and tasty for 3 to 5 days. I usually cover mine with plastic wrap directly on the surface to avoid drying out that creamy layer.
Freezing
I don’t recommend freezing this salad because gelatin-based dishes tend to get watery and lose their firm texture once thawed — trust me, I tried, and it just wasn’t the same.
Reheating
No reheating needed here — just serve it chilled! The freshness and texture are best enjoyed cold straight from the fridge.
FAQs
-
Can I use different Jell-O flavors for this salad?
Absolutely! The Christmas Ribbon Salad Recipe is versatile, so feel free to swap in flavors you like. Just keep the layers distinct in color and taste to maintain the signature ribbon effect.
-
How do I prevent the layers from mixing?
Make sure each layer has fully set before adding the next. Also, cool the Jell-O mixtures to room temperature before pouring on top, and spoon them gently rather than pouring directly.
-
Can I prepare this salad in advance?
Yes! In fact, making it 24 hours ahead is ideal so all layers have plenty of time to chill and set firmly.
-
Why is my middle layer lumpy?
This usually happens when the cream cheese isn’t whipped enough or the marshmallow mixture is too hot when combined. Ensure the cream cheese is soft and fluffy and mix in cooled marshmallow and Jell-O mixtures gently.
Final Thoughts
This Christmas Ribbon Salad Recipe holds a special place in my holiday traditions — it’s always a crowd-pleaser and a fun way to add color and cheer to the table. I love how it brings together simple ingredients into something magical that everyone looks forward to. I hope you give it a try this season and enjoy every festive, creamy bite just like I do!
Print
Christmas Ribbon Salad Recipe
- Prep Time: 20 minutes
- Cook Time: 0 minutes
- Total Time: 1 hour 20 minutes (includes chilling time)
- Yield: 16 servings 1x
- Category: Dessert
- Method: No-Cook
- Cuisine: American
- Diet: Vegetarian
Description
Christmas Ribbon Salad is a festive, colorful layered gelatin dessert featuring three distinct layers: lime gelatin, a creamy marshmallow and cream cheese mixture with lemon gelatin, and a cherry gelatin topping. This no-bake salad combines sweet, tangy, and creamy textures, making it a perfect, eye-catching dish for holiday gatherings.
Ingredients
First Layer
- 6 ounces lime Jell-O package
- 2¼ cups hot water (not boiling)
Second Layer
- 8 ounces (1 block) cream cheese, room temperature
- 2½ cups mini marshmallows
- ½ cup pineapple juice
- 3 ounces (1 package) lemon Jell-O
- 1½ cups hot water (not boiling)
Third Layer
- 6 ounces cherry Jell-O package
- 2 cups hot water (not boiling)
Instructions
- Prepare First Layer: Pour the lime Jell-O powder into 2¼ cups of hot water and stir until completely dissolved. Pour this mixture into a 9×13 inch baking dish and refrigerate until set, approximately 1 hour.
- Prepare Cream Cheese Mixture: Using a stand mixer, beat the room-temperature cream cheese until fluffy and smooth. Set aside.
- Melt Marshmallows: In a saucepan over medium-high heat, combine mini marshmallows and pineapple juice. Stir continuously until the marshmallows melt and blend with the juice. Remove from heat and allow to cool for a few minutes.
- Dissolve Lemon Jell-O: Dissolve the lemon Jell-O powder in 1½ cups of hot water and set aside to cool slightly.
- Combine Creamy Layer: Pour the melted marshmallow mixture and the lemon Jell-O mixture into the bowl with whipped cream cheese. Mix thoroughly until all ingredients are well combined. Let this mixture cool for 30-40 minutes to prevent melting the first layer.
- Add Second Layer: Gently spoon the creamy mixture over the set first layer in the baking dish. Use a large spoon to gently spread it evenly without breaking the first layer. Refrigerate until this layer is fully set.
- Prepare Third Layer: Dissolve cherry Jell-O powder in 2 cups of hot water. Allow the mixture to cool to room temperature before proceeding.
- Add Third Layer: Slowly and gently pour or spoon the cooled cherry Jell-O over the second layer to maintain distinct layers without making holes. Return the dish to the refrigerator and chill overnight or until fully set.
- Serve: Once the salad is fully chilled and set, slice into portions and serve chilled for a festive and refreshing holiday treat.
Notes
- Storage: Keep the salad covered in the refrigerator for 3 to 5 days.
- Reheat: This dessert is served cold; reheating is not recommended.
- Freeze: Freezing is not advised as gelatin becomes watery and separates after thawing.
- Make Ahead: This salad is ideal to prepare up to 24 hours in advance to allow layers ample time to chill and set.
- Tips:
- Ensure each layer is completely set before adding the next to maintain clean and distinct stripes.
- Use hot water (not boiling) to dissolve gelatin evenly and prevent clumping.
- Allow gelatin mixtures to cool to room temperature before pouring to avoid mixing or melting layers.
- Spoon layers gently to avoid creating holes or breaking the set layers beneath.
- Whip cream cheese thoroughly for a smooth middle layer without lumps.
- If the creamy layer appears lumpy, use an immersion blender for a smoother texture.
Nutrition
- Serving Size: 1 slice (1/16 of recipe)
- Calories: 180
- Sugar: 26g
- Sodium: 120mg
- Fat: 7g
- Saturated Fat: 4g
- Unsaturated Fat: 2g
- Trans Fat: 0g
- Carbohydrates: 30g
- Fiber: 0.5g
- Protein: 2g
- Cholesterol: 20mg


