
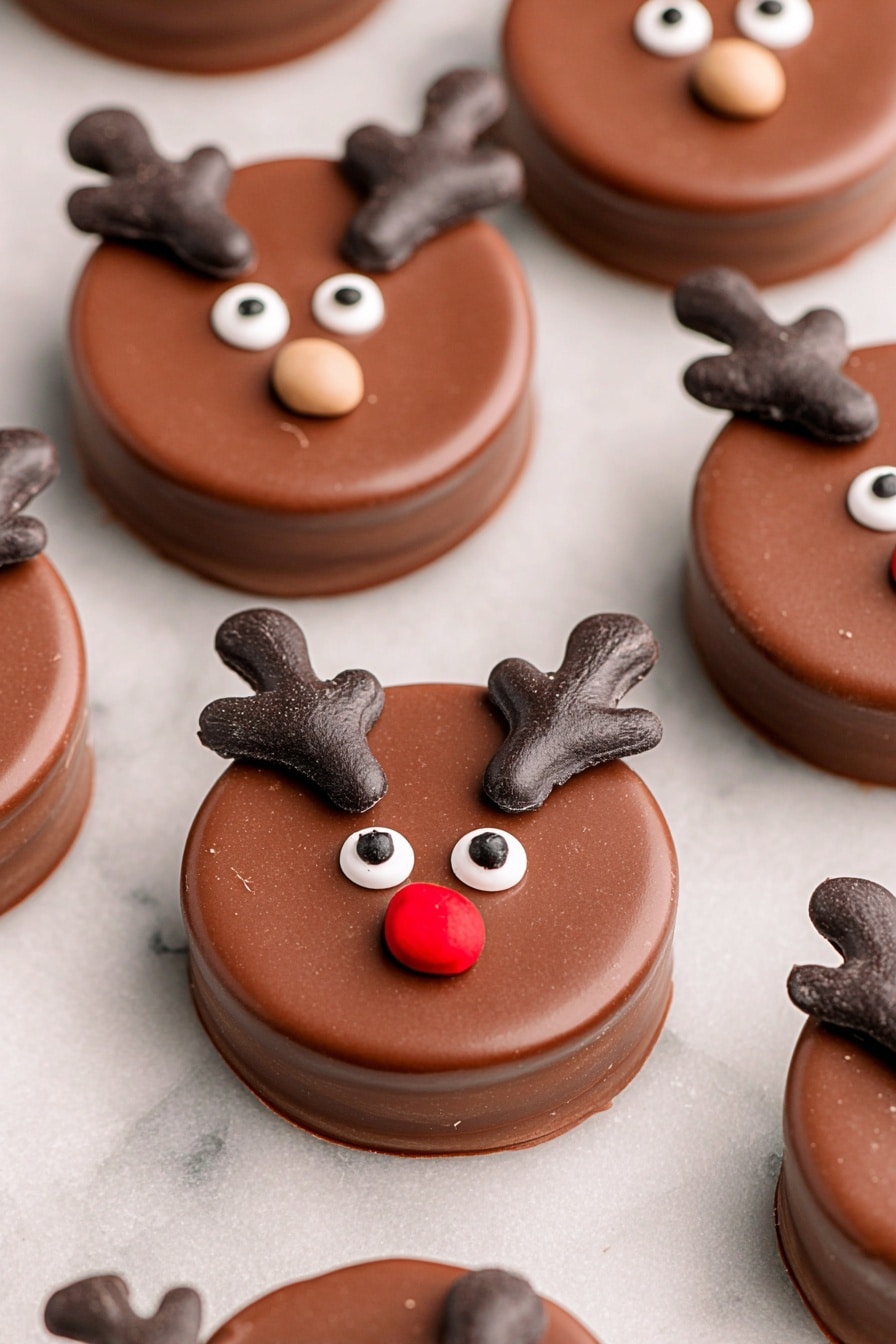
If you’re looking to wow your friends and family this holiday season with a treat that’s as cute as it is delicious, you absolutely have to try this Reindeer Oreo Cookies Recipe. I stumbled upon this fun dessert last year, and it quickly became a festive favorite in my house. The combination of rich dark chocolate, the classic Oreo crunch, and adorable reindeer decorations makes these cookies impossible to resist. Trust me, once you make these, you’ll be the go-to cookie maker for every holiday party!
Why You’ll Love This Recipe
- Easy and Quick: You’ll love how this recipe comes together in under an hour, perfect for last-minute holiday baking.
- Festively Fun: The reindeer decorations always get a laugh and smiles, especially from the kids.
- Deliciously Chocolatey: Combining rich dark chocolate and creamy Oreos gives every bite a perfect balance of flavors and textures.
- Customizable: You can switch up the candy accents or colors to fit your holiday theme.
Ingredients You’ll Need
Each ingredient in this Reindeer Oreo Cookies Recipe lends itself to simple yet charming results. I’ve found that sticking with high-quality chocolate melts makes all the difference in both taste and appearance, plus the candy eyes and colored M&Ms add instant personality to each cookie.

- Double Stuffed Oreos or chocolate sandwich cookies: The classic Oreo cream centers give you that perfect sweetness and softness in each bite.
- Ghirardelli dark chocolate melting wafers: I prefer these because they melt smoothly and harden shiny, creating that luxe chocolate coating.
- Black candy melts: These are your key to drawing the antlers, so pick a quality brand for easy piping and vibrant color.
- Small round sprinkles or candy eyes: I like to alternate between plain sprinkles and candy eyes for fun, depending on the crowd.
- Brown and red M&Ms candies: They make fantastic noses and add a pop of print-perfect reindeer color.
Variations
I’m all about personalization, especially when it comes to festive treats. You can easily tweak this Reindeer Oreo Cookies Recipe to suit different tastes or dietary needs. Plus, changing up decorations keeps the cookies fresh each year!
- Chocolate Type Swap: I once tried white chocolate melting wafers instead of dark chocolate, and the cookies had a whole new light, creamy vibe that was just as delightful.
- Nut-Free Friendly: If anyone has allergies, you can opt for allergy-safe candy eyes and check Oreos for your specific requirements.
- Holiday Colors: Swap out the red and brown M&Ms for green or gold ones to match your holiday décor or party theme.
- Gluten-Free Version: Look for gluten-free sandwich cookies to keep this treat accessible to all guests.
How to Make Reindeer Oreo Cookies Recipe
Step 1: Prep Your Workspace and Antlers
Start by lining two baking sheets with parchment paper or silicone mats – this will make cleanup a breeze and prevent your cookies from sticking. Then, melt your black candy melts gently in the microwave, heating at half power in 30-second bursts and stirring frequently until smooth. To get perfectly shaped antlers, load your candy melts into a piping bag (or a plastic bag with the tiniest corner snipped) and draw small antlers about 1 to 1¼ inches long by piping two ‘V’s and connecting them with a line inside. Pop these little antlers in the fridge for 10 minutes so they firm up nicely.
Step 2: Melt and Dip Your Oreos
Next, melt the dark chocolate melting wafers with the same gentle heat method – microwave at half power and stir every 30 seconds until silky smooth. Using a fork, dip each Oreo one at a time into the chocolate, tapping off the excess so it’s not drippy. Place each dipped Oreo back on a baking sheet ready for decoration. A little trick I learned? Use a butter knife to nudge the cookie off the fork so you don’t ruin the chocolate coating.
Step 3: Decorate Like a Pro
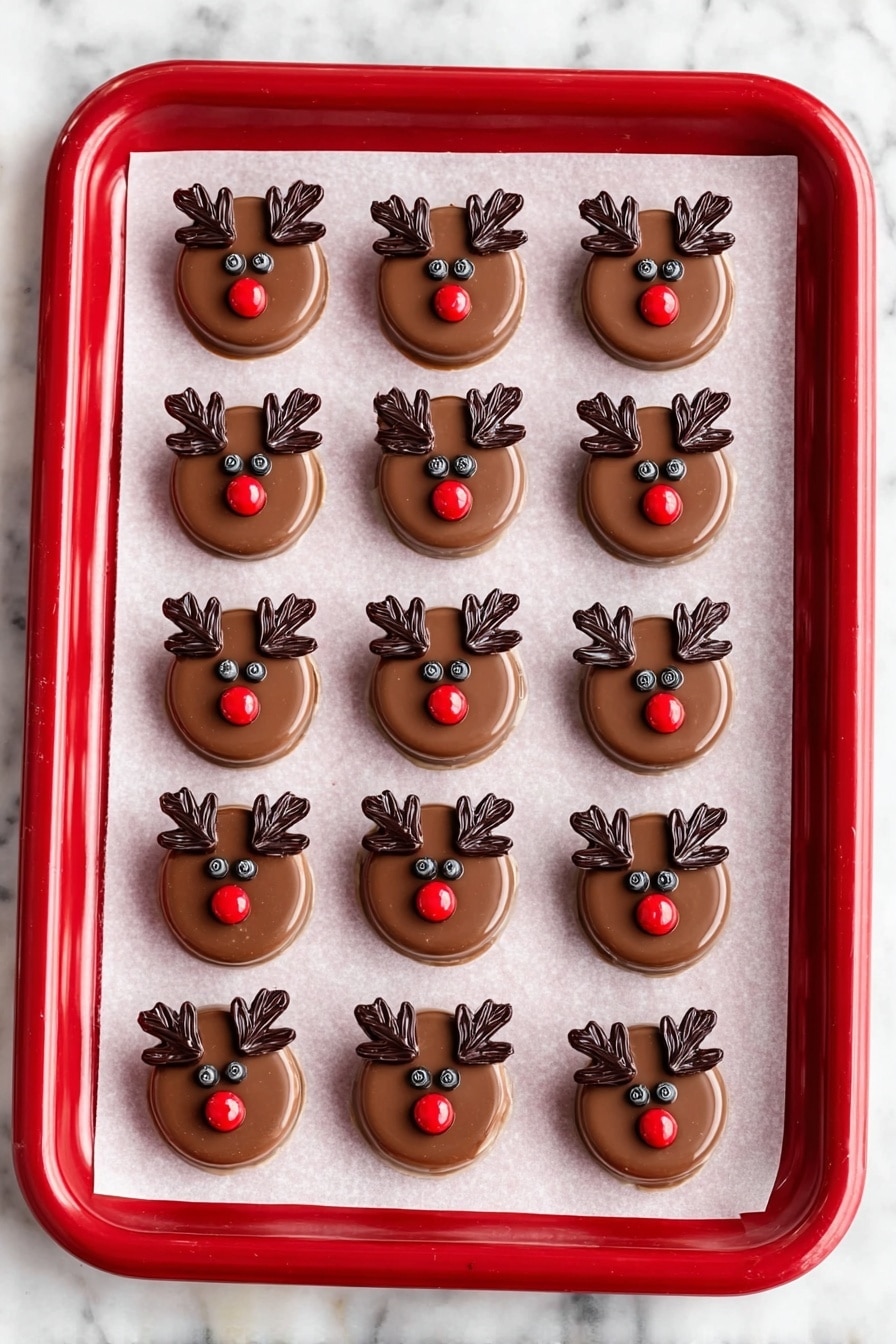
Right after dipping a few Oreos, it’s time to quickly add your candy eyes, noses, and chilled antlers. The chocolate needs to be cool enough for the decorations to stick well, so if things feel sticky or sliding off, pop the cookies in the fridge for a few minutes and try again. For extra security, I use a dab of melted chocolate on a toothpick to “glue” each detail where I want it. Once decorated, refrigerate all the cookies for about 15 minutes until everything sets solid. And voilà — holiday magic on a tray!
Pro Tips for Making Reindeer Oreo Cookies Recipe
- Cool Your Tools: I always chill my piping tip and spoons in the fridge to keep chocolate from warming too fast and making a mess.
- Work in Small Batches: Melting chocolate can be tricky if it cools or gets too hot, so I only dip a few Oreos at a time to maintain smooth coating.
- Use Quality Chocolate: Cheap melts can be grainy or dull—investing in premium wafers makes a difference in both flavor and shine.
- Don’t Rush Decorating: Let the chocolate set slightly before adding faces and antlers to avoid sliding and smudging your design.
How to Serve Reindeer Oreo Cookies Recipe
Garnishes
I love adding a sprinkle of edible glitter or powdered sugar “snow” just before serving—it makes these cookies look even more magical and festive. Sometimes I scatter a few extra candy eyes or red M&M noses on the platter for guests to decorate their own reindeer cookies.
Side Dishes
These cookies pair perfectly with a classic cup of hot cocoa or warmed spiced cider. For a grown-up twist, I serve them alongside peppermint-spiked coffee or creamy eggnog — such a cozy holiday combo!
Creative Ways to Present
For parties, I like to arrange the reindeer cookies on a festive wooden board surrounded by evergreen sprigs and mini pinecones. Another fun idea is placing each cookie in a clear cellophane bag tied with a red ribbon—perfect for gifting neighbors, teachers, or coworkers.
Make Ahead and Storage
Storing Leftovers
I store leftover Reindeer Oreo Cookies in an airtight container in the fridge. They stay fresh and crisp for about a week, but honestly, they rarely last that long in my home! The refrigeration keeps the chocolate coating shiny without getting sticky.
Freezing
Freezing is absolutely possible and works well for saving extras. Just place the decorated cookies in a single layer on a baking sheet until frozen solid, then transfer to a sealed freezer container or bag. When you’re ready to enjoy, thaw them in the fridge to keep the chocolate from sweating.
Reheating
Since these cookies are best served cool with crisp chocolate, I usually don’t warm them. But if you want to take the chill off, just let them sit at room temperature for about 20 minutes before serving. Avoid microwaving, or you risk melting all your hard work!
FAQs
-
Can I use regular Oreo cookies for this Reindeer Oreo Cookies Recipe?
Absolutely! Double Stuffed Oreos are my favorite because of their extra creamy filling, but regular Oreos work fine. Just keep in mind that less filling means a slightly less soft bite, but they’ll still be delicious and festive.
-
What if my melted chocolate is too thick or grainy?
That happens sometimes if chocolate is overheated. To fix it, gently stir in a teaspoon of vegetable oil or shortening to smooth out the consistency. Also, always melt slowly at low power to avoid burning.
-
How do I pipe the antlers neatly without a piping bag?
A handy trick I discovered is using a small resealable freezer bag. Fill it with melted candy, then snip the tiniest corner off so you get thin lines. Just make sure the chocolate cools slightly so it doesn’t run too fast.
-
Can I prepare the antlers ahead of time?
Yes, you can! Pipe and chill the antlers a day in advance. Keep them refrigerated in an airtight container until you’re ready to assemble your cookies to save time on baking day.
Final Thoughts
This Reindeer Oreo Cookies Recipe holds a special spot in my holiday baking tradition because it’s easy to make, brings out everyone’s playful side, and tastes so indulgently rich that no one believes it started with a simple Oreo cookie. Whether you’re baking with kids or just want a quirky dessert to impress guests, these reindeer cookies are pure joy on a plate. I can’t wait for you to try them and hear how your holidays get even sweeter with this little festive treat!
Print
Reindeer Oreo Cookies Recipe
- Prep Time: 35 minutes
- Cook Time: 4 minutes
- Total Time: 55 minutes
- Yield: 20 decorated Reindeer Oreos 1x
- Category: Dessert
- Method: Dipping
- Cuisine: American
Description
Create festive Reindeer Oreos by dipping Double Stuffed Oreos in rich dark chocolate and decorating them with black candy melt antlers, candy eyes, and colorful M&M noses. This fun and easy holiday treat combines smooth chocolate coating with adorable reindeer faces, perfect for holiday parties and gifting.
Ingredients
Oreos
- 20 Double Stuffed Oreos or other chocolate sandwich cookies
Chocolate Coating
- 15 ounces Ghirardelli dark chocolate melting wafers
- ¾ cup black candy melts
Decorations
- 40 small round sprinkles or candy eyes
- 20 M&M candies (brown and red for noses)
Instructions
- Prepare Baking Sheets: Line two baking sheets with parchment paper or silicone baking mats and set aside to have a clean surface for chocolate work.
- Melt Black Candy Melts: Place black candy melts in a heatproof bowl and microwave at half power for 1 minute, then stir. Continue microwaving in 30-second increments, stirring each time, until smooth and molten.
- Fill Piping Bag: Using a small piping bag fitted with a Wilton #3 tip, or a freezer zip-top plastic bag with a small corner cut, fill with warm black candy melts. Let it cool 2-3 minutes so the chocolate thickens slightly to control flow for detailed piping.
- Pipe Antlers: Pipe small antlers about 1 to 1¼ inches long on the lined baking sheet. Form each by making two small letter ‘V’s in a row and connecting them with a line down the center. Refrigerate the tray for 10 minutes to set the antlers.
- Melt Dark Chocolate: In a clean heatproof bowl, microwave the dark chocolate melting wafers at half power for 1 minute, stirring. Repeat in 30-second increments until smooth and fully melted.
- Dip Oreos: Using a fork, dip each Oreo one at a time into the melted dark chocolate, tapping the fork gently against the bowl’s edge to remove excess. Place the dipped Oreo on the prepared baking tray.
- Decorate Cookies: After dipping 2-3 Oreos, quickly add the noses (M&Ms), eyes (sprinkles or candy eyes), and refrigerated antlers onto each cookie. Continue dipping and decorating in batches until all Oreos are complete.
- Set the Chocolate: Refrigerate the decorated Oreos for 15 minutes or until the chocolate coating is fully set and firm. Then serve and enjoy these delightful holiday treats!
Notes
- Use a fork to dip Oreos by pressing gently into the cream filling to avoid touching the top or bottom surfaces, then release with a butter knife.
- If chocolate decorations won’t stick well, ensure the chocolate isn’t too warm—cool the Oreos in the refrigerator briefly and try again.
- Attach candy eyes, noses, and antlers firmly using a small dab of melted chocolate and a toothpick after the outer chocolate is set.
- Work patiently in small batches for best results and to maintain chocolate temperature and consistency.
Nutrition
- Serving Size: 1 cookie
- Calories: 180
- Sugar: 16g
- Sodium: 110mg
- Fat: 10g
- Saturated Fat: 6g
- Unsaturated Fat: 3g
- Trans Fat: 0g
- Carbohydrates: 22g
- Fiber: 1g
- Protein: 1g
- Cholesterol: 5mg


