
If you’re looking for a truly delightful and charming holiday treat, you’re going to adore this Festive Cake Ball Ornaments Recipe. These adorable cake balls don’t just taste incredible—they also double as cute edible ornaments that’ll sparkle up your holiday parties. I remember the first time I made these; everyone was so surprised and kept asking if they could keep them on the tree! Stick with me, and I’ll guide you through every step so your cake balls come out perfectly festive and delicious.
Why You’ll Love This Recipe
- Festive and Fun: You get to enjoy cake and decorate at the same time, turning dessert into a holiday craft session.
- Simple Ingredients: Uses classic red velvet cake mix and basic frosting components—no complicated baking skills needed.
- Customizable Looks: You can switch up the colors or decorations easily for a personalized flair every year.
- Perfect for Gifting: These cake ball ornaments make charming edible gifts that friends and family will rave about.
Ingredients You’ll Need
Every ingredient here plays a role in building that smooth, creamy texture and the festive look that makes these cake balls extra special. I always find it helpful to pick a red velvet mix with moisture-rich ingredients for that perfect crumb and then balance it with a rich, creamy filling.

- Cooking spray: To ensure your cake doesn’t stick to the pan, making cleanup effortless.
- Red velvet cake mix: Provides the vibrant color and classic flavor that just screams holiday cheer.
- Cream cheese: Use softened cream cheese for a rich, tangy frosting base that pairs beautifully with red velvet.
- Unsalted butter: Softened butter adds creaminess without extra saltiness messing up the balance.
- Confectioners’ sugar: For smooth sweetness—it dissolves easily into the frosting, no grainy texture here.
- Pure vanilla extract: Just a splash to round out and mellow the flavors.
- Kosher salt: A pinch to enhance everything without overpowering.
- Frosted Cheerios: These are a clever, crunchy way to create the ornament hooks—something you might not expect but trust me, they work amazingly!
- Green, red, and white candy melts: These candy coatings give you that festive sheen and help the cake balls hold their shape once dipped.
- Sanding sugar: For that extra sparkle that adds a holiday pop and texture on the white candy melts.
Variations
What I really love about this Festive Cake Ball Ornaments Recipe is how easy it is to tweak based on what you have at home or your favorite flavors. I often switch up the candy melt colors or add a bit of peppermint extract for a minty twist during the holidays.
- Flavor twist: Try using a chocolate cake mix or even spice cake instead of red velvet, giving you a whole new vibe.
- Dietary-friendly: You can swap regular cake mix for a gluten-free version without compromising texture.
- Decoration upgrades: Use edible glitter or crushed peppermint candy instead of sanding sugar for a different kind of sparkle and crunch.
- Mini balls: If you want bite-sized treats, make smaller cake balls; they’re fantastic for party trays or as stocking stuffers.
How to Make Festive Cake Ball Ornaments Recipe
Step 1: Bake Your Red Velvet Base
First up, preheat your oven to 350°F and grease a 13″ x 9″ pan with cooking spray. Prepare that gorgeous red velvet batter following the package directions—you’ll want a moist, tender crumb to make perfect cake balls. Bake it for about 25 to 30 minutes, and test with a toothpick until it comes out clean. Let the cake cool completely; if it’s even a little warm, shaping the balls will get tricky and messy.
Step 2: Whip Up the Creamy Frosting
While the cake is cooling, grab a large bowl and beat together softened cream cheese and butter until fluffy—about 2 to 3 minutes on medium-high speed. Then gradually add powdered sugar and keep beating until everything’s well blended. Stir in vanilla extract and a pinch of kosher salt to keep that frosting from tasting flat. This luscious mixture is what ties your cake crumbs into those smooth, rich cake balls.
Step 3: Crumble, Mix, and Chill
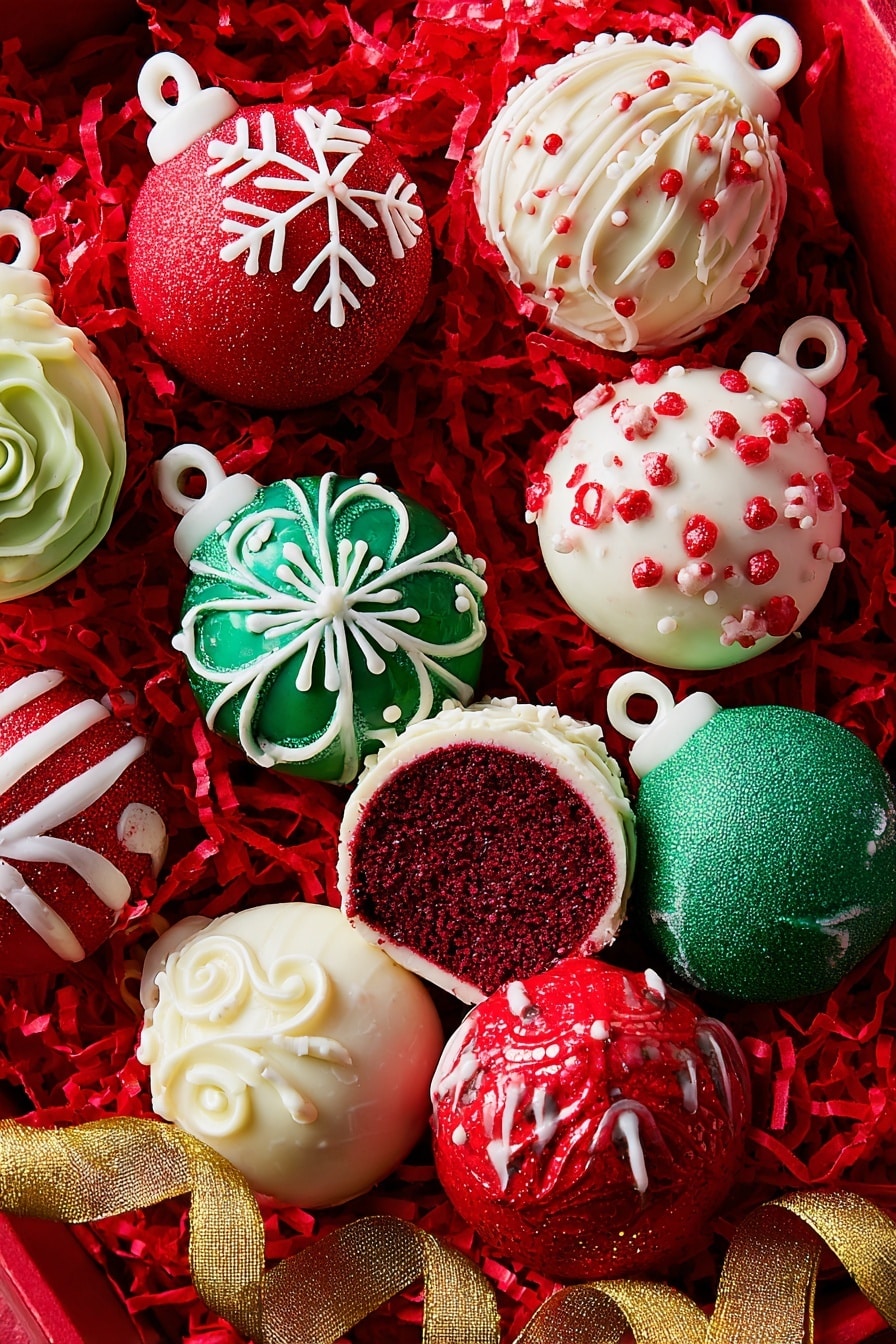
Now crumble the cooled cake right into the frosting bowl. Use your hands or a sturdy spoon to mix until combined and moldable. If it feels too wet, add a little more powdered sugar; too dry, a spoonful of milk can help. Roll the mixture into 1½-inch balls (you should get about 34), place them on a baking sheet, and pop them into the fridge for about an hour to firm up. Chilling helps them hold their shape when you dip them later.
Step 4: Craft Your Edible Ornament Hooks
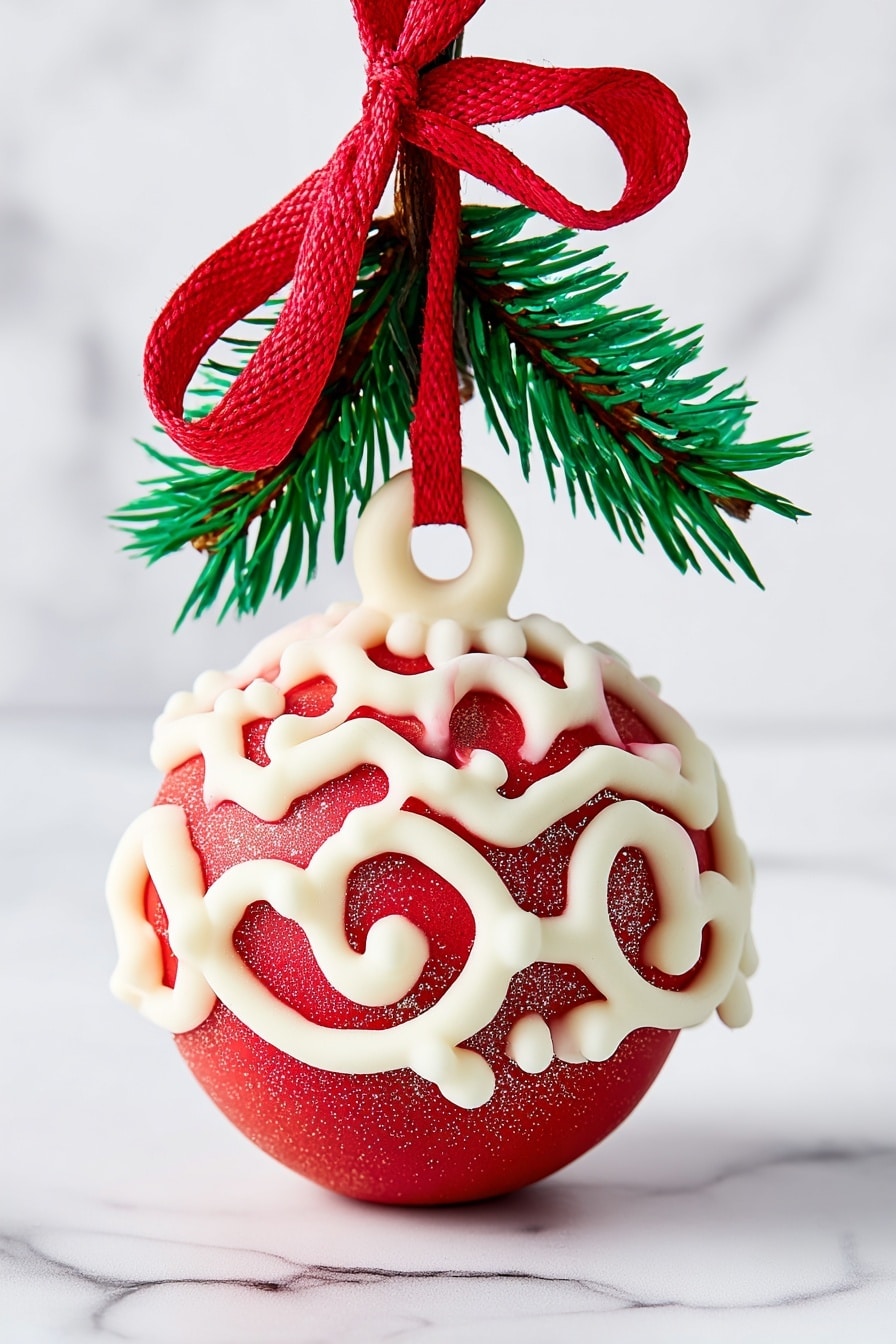
This part is super fun and sets these cake balls apart! Lay 34 frosted Cheerios flat on another baking sheet—these become the base of your ornament hooks. Take the remaining Cheerio pieces, dip the bottom into white melted candy, then attach it standing up onto the center of a flat Cheerio. Repeat this until you’ve made all your hooks. Once dry, these will let you “hang” your cake balls, making them look just like ornaments!
Step 5: Dip and Decorate Your Cake Balls
Divide your chilled cake balls into thirds. Dip one-third into green candy melts, one-third into red, and the last third into white. Gently tap off excess candy back into the bowl for a smooth coating. While the candy is still wet, sprinkle some with sanding sugar to add sparkle. Return to the baking sheet and let them set for 15 to 20 minutes. Once dry, scoop three-quarters of your remaining white candy melts into a zip-top bag, snip a tiny corner, and pipe festive designs onto the cake balls—swirls, dots, or stripes all work beautifully. Before the candy dries, sprinkle a little sanding sugar on top for extra shine.
Step 6: Attach Your Hooks and Final Touches
Dip the bottom of each Cheerio hook into the leftover melted white candy to act as edible glue, then carefully attach to the top of each cake ball. Hold for a moment until secure, and let everything fully harden before moving. Once set, your festive cake ball ornaments are ready for display or indulging—either way, prepare for compliments!
Pro Tips for Making Festive Cake Ball Ornaments Recipe
- Chill Thoroughly: Don’t rush the chilling step before dipping—it really helps your balls stay firm and keep their shape.
- Use a Toothpick for Dipping: For better control during candy coating, you can insert a toothpick into each ball before dipping.
- Smooth Candy Melts: Microwave candy melts in 30-second bursts, stirring well between to avoid lumps or burning.
- Avoid Overhandling: Handle cake balls gently when dipping to prevent cracks or uneven coating.
How to Serve Festive Cake Ball Ornaments Recipe
Garnishes
I love topping the white candy-coated balls with sanding sugar sprinkled fresh from the shaker—that sparkle looks like freshly fallen snow! Sometimes I even toss on tiny edible silver beads for a classy holiday vibe. These finishing touches really elevate the overall look and make each cake ball pop on your dessert plate or tree.
Side Dishes
While these Festive Cake Ball Ornaments shine as standalone treats, they’re fantastic alongside a warm cup of hot cocoa or mulled cider. Pairing them with simple sugar cookies also makes a sweet holiday combo that your guests will adore.
Creative Ways to Present
Once I mastered this recipe, I started hanging these cake balls on my Christmas tree using festive ribbon looped through the Cheerio hooks. They instantly become conversation starters! You can also present them on tiered dessert stands or packaged individually in clear boxes tied with ribbons to give as cute edible gifts.
Make Ahead and Storage
Storing Leftovers
Store any leftover cake ball ornaments in an airtight container in the fridge. They’ll stay fresh and soft for up to 5 days, though I usually find they disappear faster! Just be sure to keep them out of direct moisture to preserve the candy coating’s crispness.
Freezing
If you want to prep ahead or save some for later, these cake balls freeze beautifully. Place them in a single layer on a baking sheet first to freeze solid, then transfer to a freezer-safe bag or container. They maintain their shape and flavor for up to 3 months. Thaw overnight in the fridge before serving.
Reheating
Reheating isn’t usually necessary, but if you want to bring them to room temp, just set them out for 15-20 minutes. Avoid microwaving since the candy coating can melt or become sticky. Room temperature is perfect for the best texture and taste.
FAQs
-
Can I use homemade red velvet cake instead of a box mix?
Absolutely! Homemade red velvet works beautifully here and can add an extra personal touch. Just be sure your cake is fully cooled and has a similar moist crumb texture so the cake balls hold together well.
-
How do I prevent cracks in my cake balls when dipping?
Chill the cake balls thoroughly before dipping to help them firm up. Also, don’t handle them too much while dipping, and avoid tapping off excess candy too forcefully—it’s all about gentle care.
-
Can I use a different type of cereal for the ornament hooks?
Frosted Cheerios are perfect because of their size and shape, but you can experiment with similar-sized round cereals. Just make sure they’re sturdy enough to support the hook structure.
-
What if I don’t have candy melts?
You can substitute with tinted white chocolate, but candy melts are easier to work with since they’re designed to melt smoothly and harden quickly without tempering.
-
How long will these cake ball ornaments keep on display?
They’re best eaten within a couple of days for maximum freshness, but if kept in a cool, dry spot, they can stay decorative and tasty for up to a week.
Final Thoughts
I absolutely love how this Festive Cake Ball Ornaments Recipe turns out every single year. It’s one of those recipes that delights guests and brings out my creative side with decorating. Plus, knowing you can turn a simple cake mix into something so special is incredibly satisfying. If you’re looking to make a memorable holiday treat that’s as fun to make as it is to eat, give this a try—you’ll be so glad you did!
Print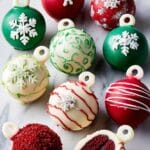
Festive Cake Ball Ornaments Recipe
- Prep Time: 30 minutes
- Cook Time: 30 minutes
- Total Time: 3 hours 30 minutes
- Yield: 34 cake ball ornaments 1x
- Category: Dessert
- Method: Baking
- Cuisine: American
Description
These festive Cake Ball Ornaments combine moist red velvet cake with a creamy cream cheese frosting center, all coated in colorful candy melts to create delightful holiday decorations. Perfect for gift-giving or holiday parties, these cake balls are decorated with cereal hooks and sanding sugar for an ornamental look that’s both delicious and adorable.
Ingredients
Cake Base
- Cooking spray
- 1 (15.25-oz.) box red velvet cake mix, plus ingredients called for on box (usually eggs, oil, water)
Frosting Mixture
- 4 oz. cream cheese, softened
- 4 tbsp. unsalted butter, softened
- 1 1/2 cup (170 g) confectioners’ sugar
- 1/2 tsp. pure vanilla extract
- Pinch of kosher salt
Decorations
- 1/4 cup Frosted Cheerios (about 70 pieces)
- 1 (12-oz.) bag green candy melts, melted
- 1 (12-oz.) bag red candy melts, melted
- 2 (12-oz.) bags white candy melts, melted
- Sanding sugar, for decorating
Instructions
- Prepare the Cake: Preheat your oven to 350°F (175°C). Grease a 13″ x 9″ baking pan with cooking spray. In a large bowl, mix the red velvet cake mix according to the package instructions. Pour the batter into the prepared pan and bake for 25 to 30 minutes or until a tester inserted into the center comes out clean. Allow the cake to cool completely.
- Make the Frosting Mixture: In a large bowl, use a handheld mixer on medium-high speed to beat the softened cream cheese and butter until the mixture is light and fluffy, about 2 to 3 minutes. Gradually add confectioners’ sugar and beat until well combined. Mix in vanilla extract and a pinch of kosher salt.
- Form Cake Balls: Crumble the cooled cake into the frosting mixture and stir to combine fully. Shape the mixture into 1 1/2-inch balls, yielding about 34 cake balls. Place them on a baking sheet and refrigerate until firm, about 1 hour.
- Make Hooks: On another baking sheet, lay out 34 Frosted Cheerios. Take one remaining Frosted Cheerio, dip its bottom into melted white candy melts, and attach it upright to the center of a flat cereal piece on the sheet to form hooks. Repeat with remaining pieces and allow to set.
- Dip Cake Balls: Divide the cake balls into three groups (about one-third each). Dip one-third of the cake balls into melted green candy melts, another third into melted red candy melts, and the last third into melted white candy melts. Tap off excess coating. Before the candy hardens, sprinkle some cake balls with sanding sugar. Return the dipped cake balls to the baking sheet and let them set for 15 to 20 minutes.
- Decorate and Attach Hooks: Place about three-quarters of the remaining white candy melts into a resealable plastic bag and cut a tiny corner for piping. Pipe decorative designs onto the white-coated cake balls and sprinkle with sanding sugar before the candy hardens. Dip the bottom of each hook into the remaining white candy melts (reheat if needed) and attach on top of the cake balls. Allow decorations to set completely before handling.
Notes
- You can substitute the Frosted Cheerios with a similar shaped cereal if unavailable.
- Ensure the cake is fully cooled before crumbling to avoid a too-moist mixture.
- Use a toothpick or fork to help dip cake balls for a smoother coating.
- Store the finished cake ball ornaments in an airtight container in the refrigerator for up to 3 days.
- Make sure the candy melts are melted gently over low heat to avoid burning.
Nutrition
- Serving Size: 1 cake ball
- Calories: 150
- Sugar: 18g
- Sodium: 120mg
- Fat: 7g
- Saturated Fat: 4g
- Unsaturated Fat: 2g
- Trans Fat: 0g
- Carbohydrates: 22g
- Fiber: 1g
- Protein: 2g
- Cholesterol: 20mg


