
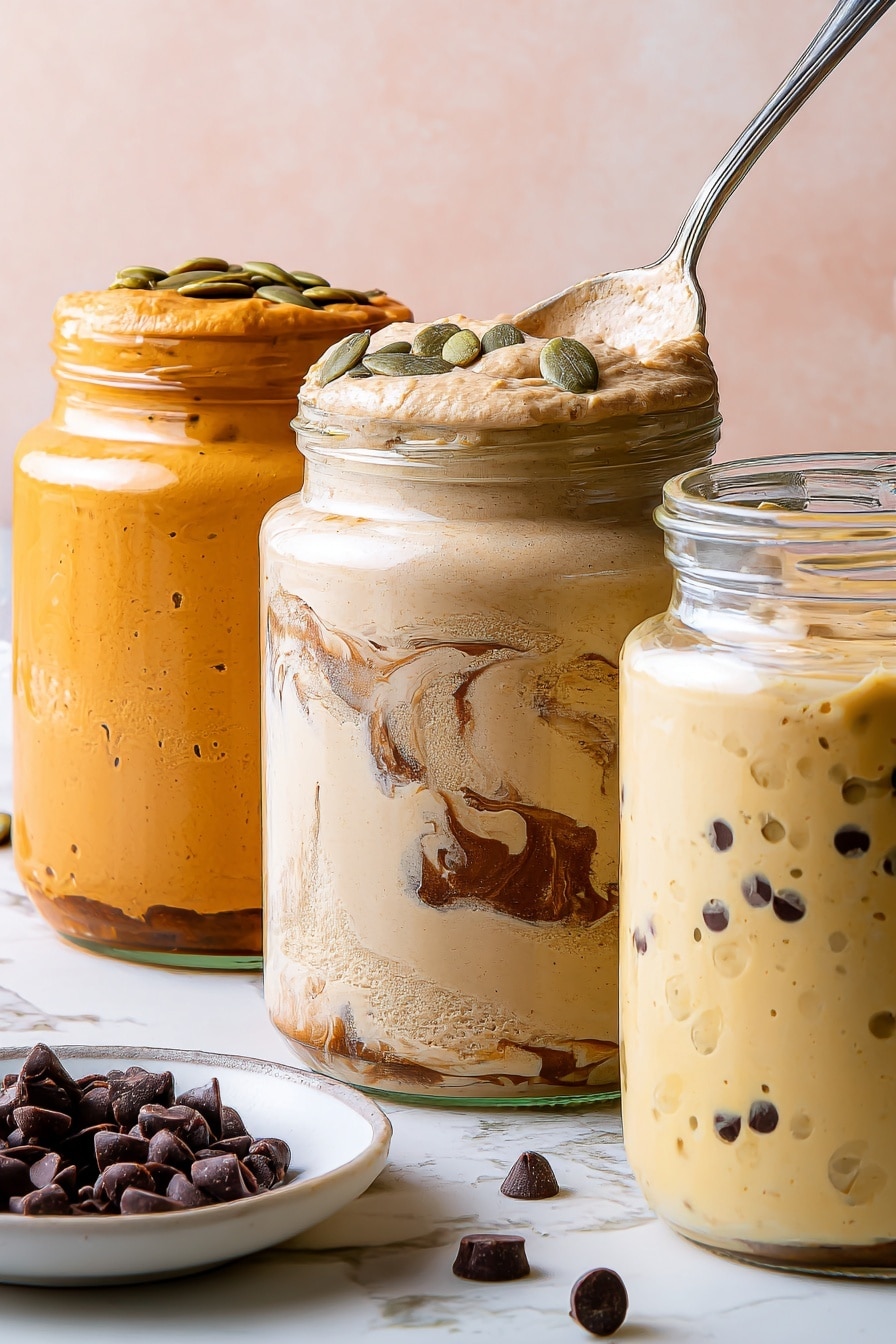
If you’re craving something sweet but also want to keep your protein intake on point, this High-Protein Ice Cream Recipe is an absolute game changer. I’m excited to share this with you because it’s creamy, satisfying, and perfect for when you want a treat without the guilt. Plus, it’s so easy to make right at home with just a few ingredients you might already have – and trust me, once you try it, you’ll want to make it over and over!
Why You’ll Love This Recipe
- Protein-Packed Satisfaction: Combining protein powder with creamy ingredients means you enjoy dessert that feeds your muscles as well as your sweet tooth.
- Super Easy Preparation: No fancy ice cream machine needed — just a jar and a bit of shaking!
- Customizable Flavors: Whether you love vanilla, chocolate, or espresso, this recipe adapts beautifully to your mood and pantry.
- Guilt-Free Indulgence: Made with real, wholesome ingredients — it’s a treat you won’t feel bad about enjoying.
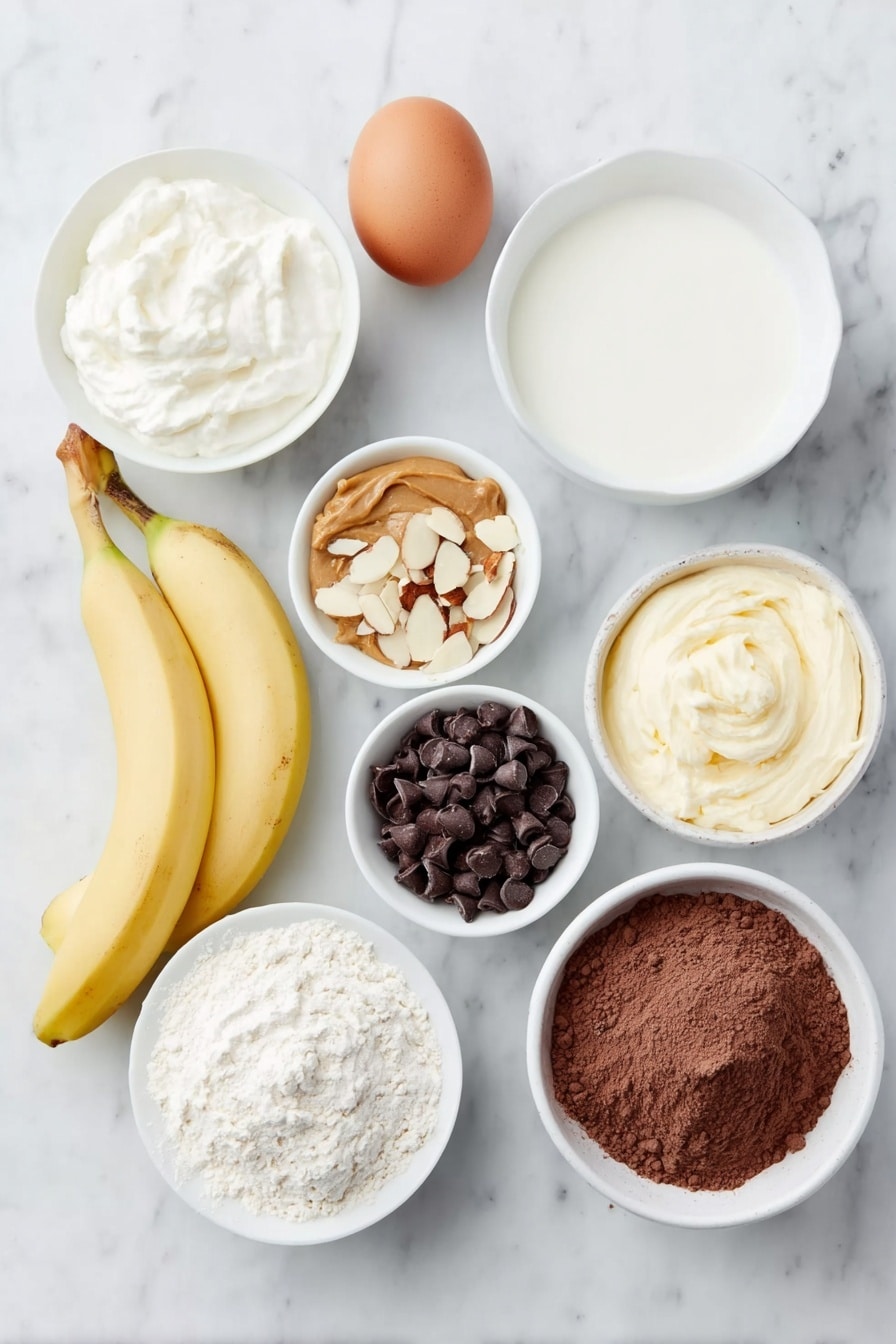
Ingredients You’ll Need
Each ingredient in this High-Protein Ice Cream Recipe plays a role in giving you that perfect creamy texture with a healthy boost of protein, plus a little natural sweetness and crunch. When I shop for these, I aim for quality protein powders and fresh almond butter to really bring out those flavors.
- Cold heavy cream: This gives richness and creaminess but keeps the ice cream smooth and not icy.
- Whole milk: Just a splash to balance the thickness, helps with texture.
- Sweetened condensed milk: Adds sweetness and helps with creaminess—it’s my secret to no ice crystals.
- Vanilla protein powder: Use a quality brand; vanilla works well as a neutral base.
- Kosher salt: Just a pinch to enhance flavor without tasting salty.
- Banana: Mashed banana lends natural sweetness and creaminess while giving a healthy energy boost.
- Almond butter: Adds nuttiness and healthy fats, which smooth out this treat even more.
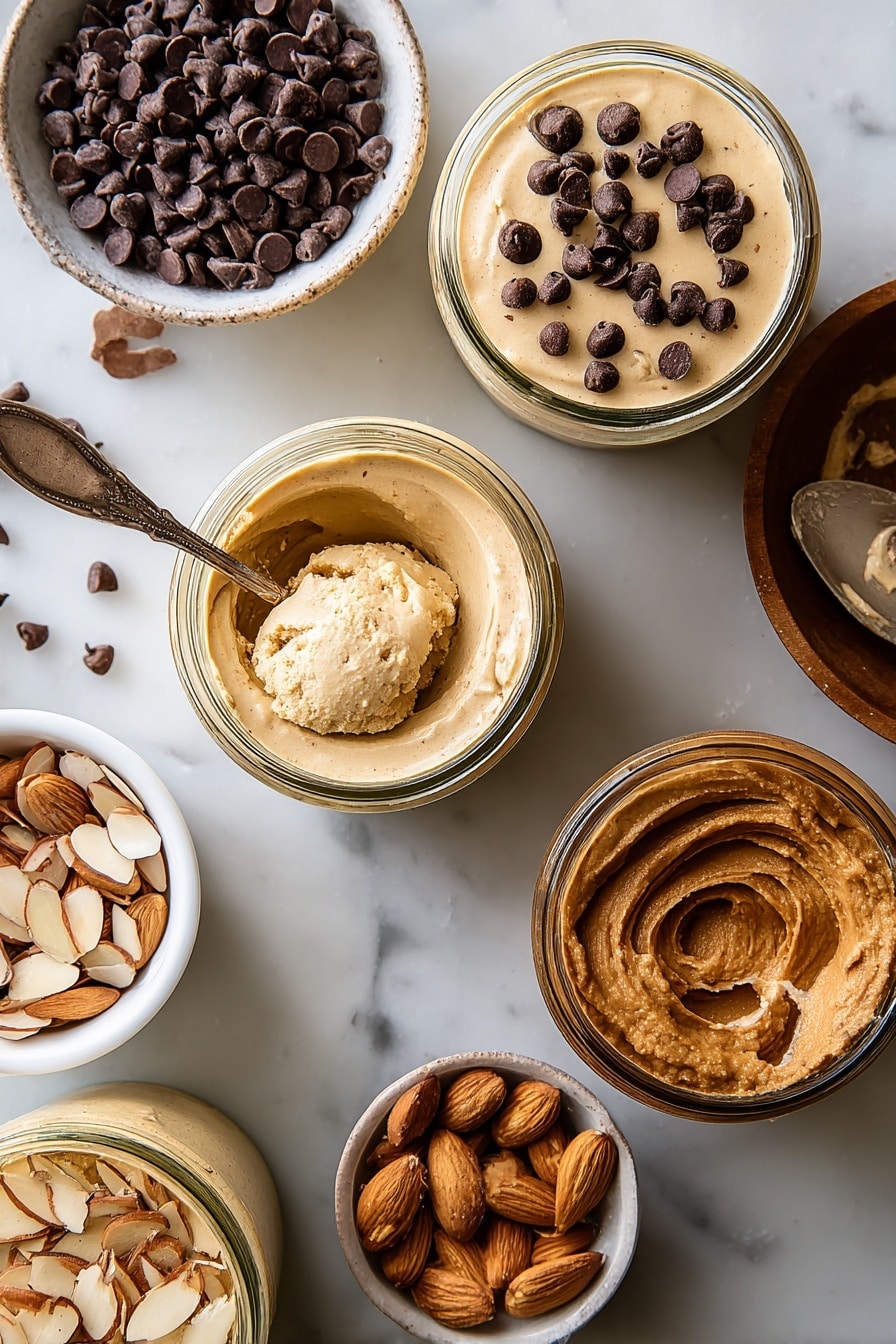
- Sliced almonds (optional): For a little crunch—because texture is everything!
- Mini chocolate chips: Chocolate + protein ice cream? Yes, please.
- Espresso powder: A hint of coffee flavor for those days when you want a little caffeine kick and depth.
- Chocolate protein powder: Boosts chocolate flavor and protein content—go with your favorite brand.
Variations
I love mixing things up to keep this High-Protein Ice Cream Recipe fresh and exciting. You should feel free to experiment with flavors and ingredients too — this recipe is super versatile!
- Fruit Swaps: I sometimes replace banana with mashed berries for a tart twist that still complements the creamy base beautifully.
- Nut Butter Variations: Hazelnut or peanut butter work wonderfully if you want to switch up the nutty flavor profile.
- Protein Powder Choices: Vanilla and chocolate are staples for me, but you can try other flavors like strawberry or caramel depending on what you have on hand.
- Dairy-Free Option: Try substituting coconut cream for the heavy cream and almond milk for whole milk to make this vegan-friendly while still high in protein.
How to Make High-Protein Ice Cream Recipe
Step 1: Combine and Shake to Create Creamy Base
Start by grabbing a small cold mason or jam jar—that cold glass helps your mixture thicken nicely. Add your heavy cream, whole milk, sweetened condensed milk, protein powder (vanilla or chocolate depending on the flavor you’re making), kosher salt, mashed banana, almond butter, espresso powder if using, and a handful of mini chocolate chips or sliced almonds for texture. Then, seal it up tight and shake vigorously for about 4 to 5 minutes. You’ll notice the mixture thickening, and the texture shifts to something like soft whipped cream—that’s your green light to freeze.
Step 2: Freeze and Shake Again for Perfect Ice Cream Texture
Pop your jar into the freezer for 2 hours initially. Then take it out, scrape down the sides with a spatula, and shake again vigorously for 1 minute. This step is essential to keep it creamy and avoid ice crystals. Put it back in the freezer and freeze an additional 1 to 2 hours until it’s the consistency of classic ice cream. If you happen to freeze it overnight (because who can wait?), just let it sit at room temperature for 15 to 20 minutes before scooping—it softens beautifully.
Pro Tips for Making High-Protein Ice Cream Recipe
- Use Cold Ingredients: Starting with chilled cream and milk helps your ice cream thicken quicker and yields a smoother texture.
- Don’t Skip the Shaking: Shaking between freezes breaks up ice crystals and creates a creamier result—trust me, it’s worth the effort.
- Sweetness Adjustment: Taste your mixture before freezing; depending on the protein powder and sweetened condensed milk you use, you might want to adjust sweetness gently.
- Let It Soften Before Serving: This makes scooping easier and brings out the flavors better—10-20 minutes at room temp works perfectly.
How to Serve High-Protein Ice Cream Recipe
Garnishes
I love garnishing mine with a sprinkle of sliced almonds or extra mini chocolate chips for crunch and a little texture contrast. Sometimes, I drizzle a bit of honey or almond butter on top for extra richness. Fresh berries also brighten the whole experience and add a nice pop of color.
Side Dishes
If I’m serving this for a special snack or dessert, I like pairing it with a handful of whole grain crackers or a piece of dark chocolate on the side — it’s a nice balance of creamy, crunchy, and rich flavors that keep things interesting.
Creative Ways to Present
For birthdays or get-togethers, I’ve served this High-Protein Ice Cream Recipe in clear mason jars layered with fresh fruit or crushed nuts. It’s fun, visually appealing, and feels a little fancy without the fuss. You could even add a sprig of mint or edible flowers for a beautiful touch.
Make Ahead and Storage
Storing Leftovers
Store any leftovers in an airtight container in the freezer. I like using small jars or freezer-safe containers that close tightly to prevent freezer burn or absorbing other odors. When I’m ready to enjoy more, it tastes just as delicious after reheating properly.
Freezing
Freezing this High-Protein Ice Cream Recipe is straightforward. Keep it in your freezer for up to a week for the best flavor and texture. Just remember that homemade ice cream without stabilizers can get a bit icy if left too long, so I recommend enjoying it sooner rather than later.
Reheating
When you want to enjoy leftover ice cream, just let it sit out at room temperature for 10-20 minutes before scooping. This softens it naturally without losing its creamy texture. Avoid microwaving as the heat can mess with the protein structure and change the flavor.
FAQs
-
Can I use any flavor protein powder in this High-Protein Ice Cream Recipe?
Yes! While vanilla and chocolate are the classics, you can experiment with different flavors like strawberry, caramel, or even mocha. Just keep in mind some powders can be sweeter or have additional ingredients that may affect texture.
-
Is this recipe suitable for someone who is lactose intolerant?
You can adapt it by swapping heavy cream with coconut cream and whole milk with almond or oat milk. Also, consider lactose-free or plant-based protein powders. These substitutions will make it dairy-free and still delicious.
-
How long should I shake the mixture to get the best texture?
Shake vigorously for about 4 to 5 minutes until the mixture thickens to a soft whipped cream consistency. This step is essential to get the creamy foundation before freezing.
-
Can I make this recipe without bananas?
Absolutely! Banana adds natural sweetness and creaminess, but you can omit it or replace it with mashed avocado or sweetened yogurt to maintain texture and flavor balance.
-
What’s the best way to store leftovers to avoid freezer burn?
Store leftovers in airtight containers or freezer-safe jars with minimal air. Make sure the container seals tightly and keep the ice cream away from foods with strong odors. Also, consuming within a week keeps quality high.
Final Thoughts
I absolutely love how this High-Protein Ice Cream Recipe combines indulgence and nutrition in one creamy bite. When I first tried making it, I was surprised by how satisfying and easy it was to pull off without fancy tools. Whether you’re looking to treat yourself after a workout or just want a healthier dessert option, this recipe will quickly become your go-to. So, grab your ingredients and give it a whirl — your taste buds (and muscles!) will thank you.
Print
High-Protein Ice Cream Recipe
- Prep Time: 10 minutes
- Cook Time: 0 minutes
- Total Time: 4 hours
- Yield: 1 serving 1x
- Category: Dessert
- Method: No-Cook
- Cuisine: American
- Diet: Low Fat
Description
This High-Protein Ice Cream recipe is a quick and delicious way to enjoy a creamy frozen treat packed with protein. Perfect for a post-workout snack or a healthy dessert, it combines protein powders with rich cream, banana, and espresso powder to create a satisfying flavor and texture without the need for an ice cream maker.
Ingredients
Base Ingredients
- 1/2 cup cold heavy cream
- 2 tablespoons whole milk
- 1 tablespoon sweetened condensed milk
- Pinch of kosher salt
Protein Powders
- 1 scoop vanilla protein powder
- 1 scoop chocolate protein powder
Flavors and Add-ins
- 1 small banana, mashed
- 1 tablespoon almond butter
- 1 tablespoon sliced almonds (optional)
- 2 tablespoons mini chocolate chips
- 1 1/2 tablespoons espresso powder
Instructions
- Combine Ingredients: In a cold small mason or jam jar, add all the ingredients for your desired flavor. Seal the jar tightly and shake vigorously for 4 to 5 minutes until the mixture thickens and reaches the consistency of soft whipped cream.
- Freeze and Shake: Freeze the jar for 2 hours. After this time, scrape down the sides, shake the mixture for 1 minute, then continue freezing until it reaches the consistency of ice cream, about 1 to 2 hours more.
- Soften Before Serving: If you freeze the ice cream overnight, allow it to sit at room temperature for 15 to 20 minutes to soften before serving for the best texture and flavor.
Notes
- Using a cold jar helps the mixture thicken more effectively when shaking.
- If you prefer a dairy-free version, substitute heavy cream and milk with coconut cream and almond milk; however, protein powder flavor and texture may vary.
- Sliced almonds are optional but add a nice crunchy texture.
- Adjust the amount of espresso powder according to your taste preference for coffee flavor.
- This recipe serves one but can be scaled up for more servings by increasing ingredient quantities accordingly.
Nutrition
- Serving Size: 1 serving
- Calories: 350
- Sugar: 15g
- Sodium: 85mg
- Fat: 22g
- Saturated Fat: 12g
- Unsaturated Fat: 8g
- Trans Fat: 0g
- Carbohydrates: 20g
- Fiber: 3g
- Protein: 25g
- Cholesterol: 80mg


