
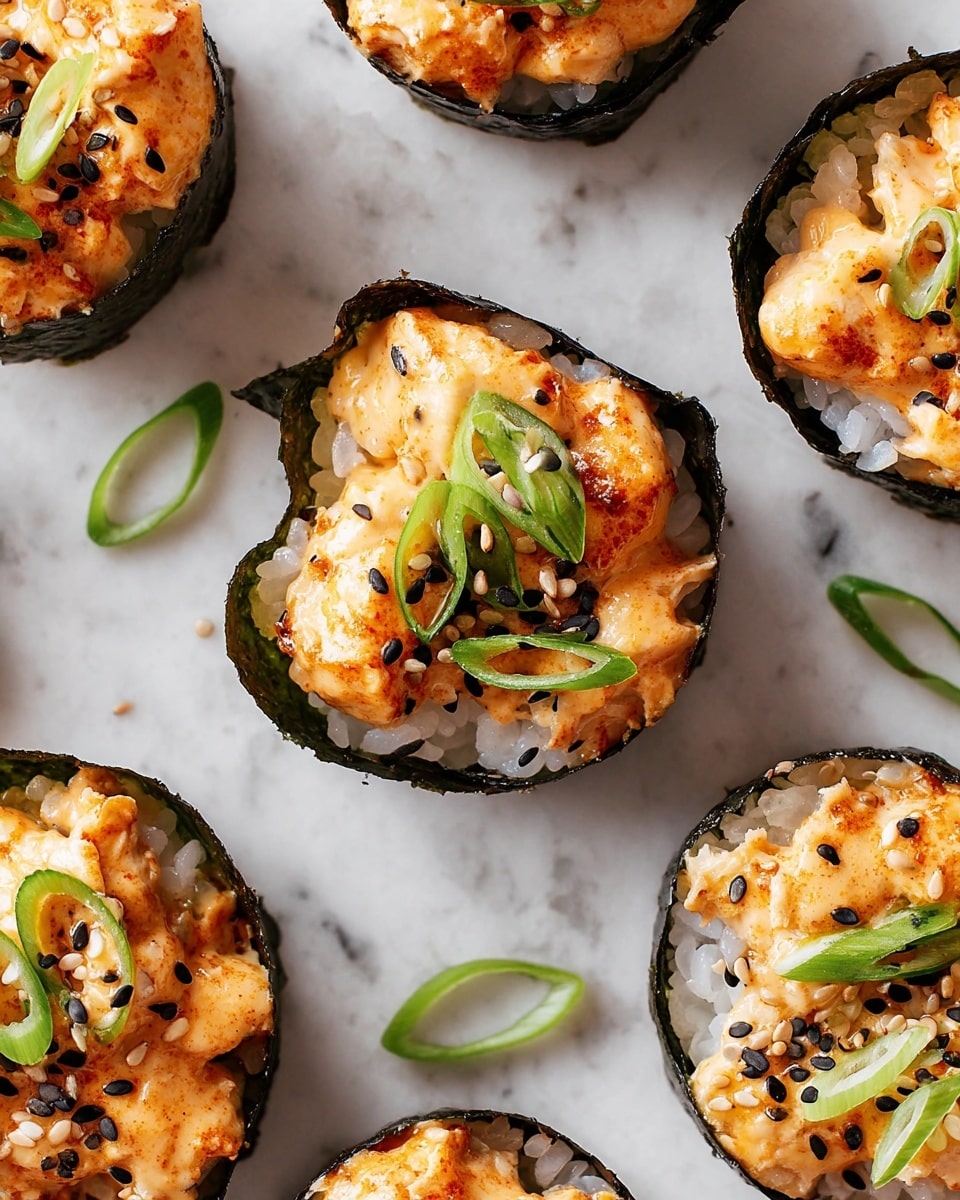
I absolutely love this Baked Salmon Sushi Cups Recipe because it brings the fun of sushi into a simple, baked dish that anyone can make at home. When I first tried it, I was amazed at how the salmon stays tender and juicy inside the crunchy nori cups—with every bite bursting with flavor. It’s like sushi got a cozy, comforting upgrade that’s perfect for casual dinners or even entertaining guests without any fuss.
You’ll find that these sushi cups work wonderfully as a light lunch, appetizer, or party snack, especially when you want something that feels fancy but doesn’t require complicated rolling techniques. Plus, since the salmon is baked right in the muffin tin, cleanup is a breeze, and the whole family goes crazy for how delicious and unique these little bites are. Trust me, this Baked Salmon Sushi Cups Recipe is a game-changer you’ll want to keep in your recipe box!
Why You’ll Love This Recipe
- Effortless Sushi Experience: No rolling mats or tricky techniques—just simple baking.
- Flavor-packed & Customizable: You can easily adjust the spice and mayo levels to your liking.
- Perfect Portion Control: Each cup is a neat, bite-sized piece—great for snacking or serving a crowd.
- Quick and Kid-friendly: Even picky eaters enjoy these sushi cups because they’re approachable and fun.
Ingredients You’ll Need
All the ingredients combine classic sushi staples with a flavorful twist that works so well for baked bites. When shopping, fresh salmon and good-quality Japanese mayo are worth seeking out to get the best results.
- Cooking spray: To keep those sushi cups from sticking in the muffin tin—makes cleanup easier too.
- Cooked sushi rice: The sticky rice base that holds the cups together; freshly cooked rice is key for the best texture.
- Nori sheets: The seaweed that forms the crispy outer cup; quartered for manageable sizes.
- Skinless salmon fillet: Fresh and cut into small cubes, it bakes beautifully in the cups.
- Scallions: Add freshness and a touch of crunch, with extra for garnish.
- Toasted sesame oil: Provides a nutty depth that complements the salmon perfectly.
- Japanese mayonnaise: Creamy with a subtle sweetness; Kewpie brand is usually my go-to.
- Sriracha: For just the right amount of heat; adjust according to your spice preference.
- Kosher salt: To season and enhance all the flavors.
- Black and white sesame seeds: A crunchy topping that also makes these sushi cups look stunning.
Variations
I love to play around with this Baked Salmon Sushi Cups Recipe depending on what I have on hand or the occasion. Feel free to experiment with different fillings or adjust the heat level—you’ll find it’s very forgiving.
- Variation: I sometimes swap salmon for cooked shrimp or crab to mix things up for seafood lovers in the family—it’s equally delicious!
- Spicy Level: If you prefer a milder taste, cut back on the sriracha or skip it altogether for a creamy, mellow flavor.
- Vegetarian Option: Try marinated tofu or avocado cubes instead of salmon for a fresh, plant-based twist.
- Add Crunch: Sprinkle tempura flakes or toasted nuts on top to add exciting textures.
How to Make Baked Salmon Sushi Cups Recipe
Step 1: Prep your oven and muffin tin
Start by arranging your oven rack in the upper third and preheat to 400°F. This placement helps the salmon cook evenly without drying out. Give a standard 12-cup muffin tin a light spray of cooking spray to prevent sticking—trust me, this little step saves a lot of frustration later on!
Step 2: Build the sushi base
Scoop a heaping tablespoon of sushi rice right into the center of each quartered nori piece. Transfer them carefully to the muffin tin with rice sides up. Use a spoon to gently press the rice flat, making an even layer at the bottom—don’t pack it too tightly, or it’ll lose that perfect sushi texture.
Step 3: Toss the salmon filling
In a large bowl, mix cubed salmon with sliced scallions, toasted sesame oil, half the Japanese mayo, half the sriracha, and a pinch of kosher salt. I like to toss everything gently so the salmon pieces stay intact but soak up all the flavors. Divide the mixture evenly among the muffin cups, spooning it right on top of the rice.
Step 4: Bake the sushi cups
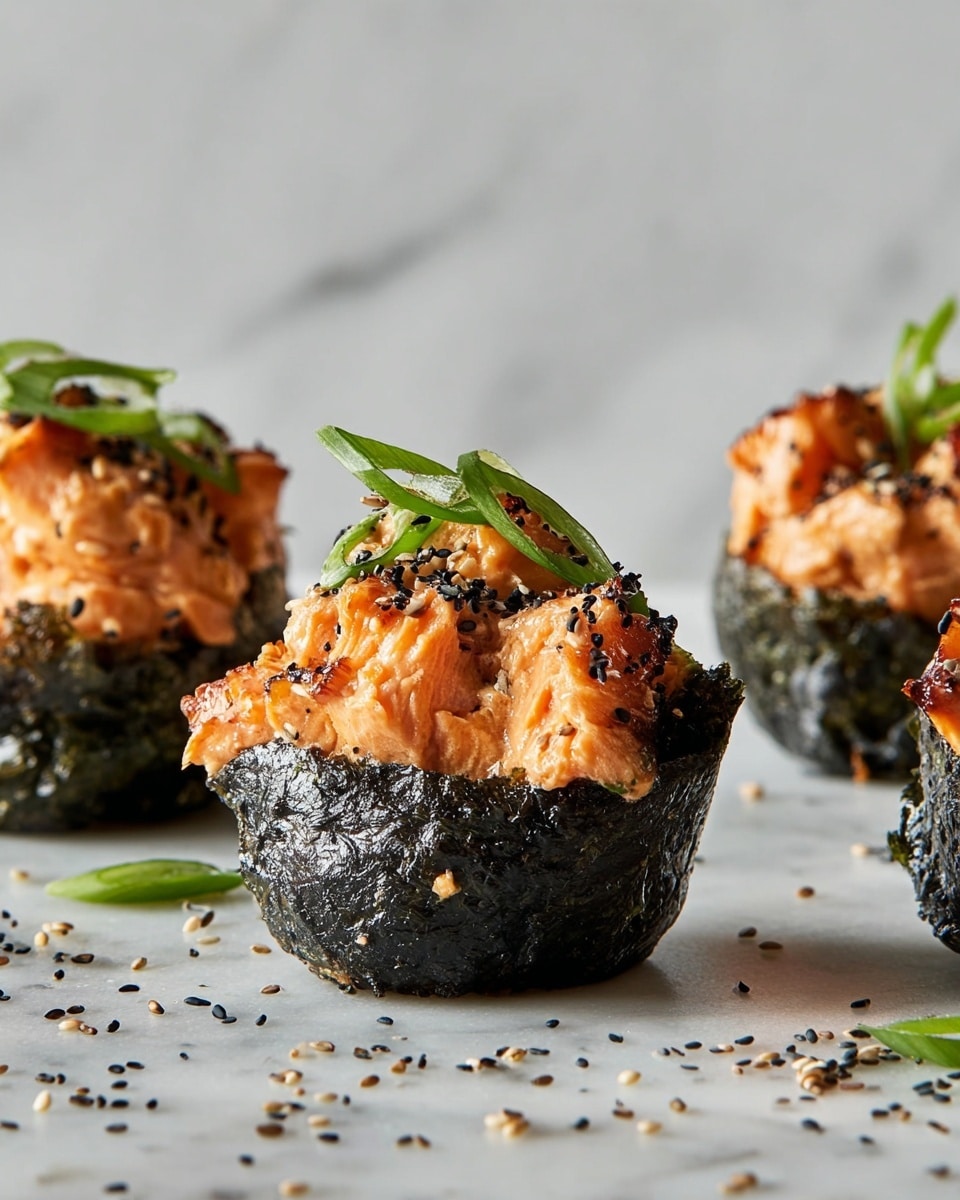
Bake the cups for about 11 minutes until the salmon is just about cooked through. This timing ensures the fish remains tender and juicy inside the crispy nori shell.
Step 5: Broil for that perfect char
Switch on the broiler and watch carefully as the tops of the salmon char slightly—this takes anywhere from 2 to 4 minutes. The charred spots really add that irresistible smoky flavor and texture that make these cups pop. Let them cool for 5 minutes once out of the oven.
Step 6: Make the spicy mayo drizzle
While the cups cool, mix the remaining Japanese mayo with the rest of the sriracha in a small bowl. This creamy, spicy drizzle is the finishing touch that brings all the flavors together.
Step 7: Serve and garnish
Arrange your sushi cups on a platter, then drizzle with the spicy mayo mixture. Sprinkle a scattering of black and white sesame seeds and extra scallions over the top for a beautiful and tasty garnish. Serve immediately and watch everyone’s faces light up!
Pro Tips for Making Baked Salmon Sushi Cups Recipe
- Don’t Overpack the Rice: Press it gently to maintain sushi’s light texture and avoid dense cups.
- Watch the Broiler Closely: The charred topping happens fast, so stay nearby to avoid burning.
- Use Fresh Salmon: The fresher your fish, the better the taste and texture will be.
- Customize the Spice: Adjust sriracha to fit your family’s heat preference—start low, add more after tasting.
How to Serve Baked Salmon Sushi Cups Recipe
Garnishes
I usually garnish these sushi cups with extra sliced scallions and a sprinkle of black and white sesame seeds—the contrast not only looks gorgeous but also gives a lovely crunch. Sometimes, I add tiny dots of wasabi mayo on the side for an extra kick that’s easy to customize per guest’s taste.
Side Dishes
Pair these cups with a fresh seaweed salad or pickled ginger for that classic sushi vibe at home. A crisp cucumber salad or edamame also balances out the rich flavors nicely, making it a well-rounded and satisfying meal.
Creative Ways to Present
For parties, I love serving these in a lined bamboo steamer or on a slate board decorated with fresh shiso leaves and edible flowers—it immediately elevates the look and gets people excited before they even take a bite! Also, offering small dipping bowls of soy sauce or ponzu adds a fun interactive element.
Make Ahead and Storage
Storing Leftovers
If you have leftovers, store them in an airtight container in the fridge for up to 2 days. I recommend keeping the spicy mayo drizzle separate and adding it just before serving—this keeps the cups from getting soggy while stored.
Freezing
Freezing baked salmon sushi cups is not my favorite because the rice and nori can lose their texture, but if you want to save some, freeze them in a single layer wrapped well in plastic wrap and foil for up to one month. Thaw overnight in the fridge and use a toaster oven to re-crisp the nori.
Reheating
I usually reheat them gently in a toaster oven at 325°F for about 5-7 minutes to keep the salmon moist and the nori crispy. Avoid microwaving as it makes the seaweed soggy and chewy.
FAQs
-
Can I use other types of fish for the Baked Salmon Sushi Cups Recipe?
Absolutely! While salmon works beautifully because of its texture and flavor, you can substitute shrimp, tuna, or crab meat. Just keep in mind cooking times may vary depending on the protein you choose.
-
Is it necessary to use Japanese mayonnaise in this recipe?
Japanese mayonnaise, like Kewpie, has a richer flavor and smoother consistency that lifts the dish. If you can’t find it, regular mayo mixed with a little rice vinegar and a pinch of sugar can work as a substitute.
-
How spicy is this Baked Salmon Sushi Cups Recipe?
The sriracha adds a subtle heat that you can control. The recipe balances spicy with creamy mayo, so it’s never overwhelming. If you’re sensitive to spice, use less or omit the sriracha altogether.
-
Can I prepare the sushi cups ahead of time?
You can assemble the cups a few hours ahead and refrigerate them before baking, but I recommend baking just before serving to keep the nori crisp and salmon perfectly cooked.
Final Thoughts
This Baked Salmon Sushi Cups Recipe holds a special place in my kitchen because it effortlessly brings the elegance of sushi without the stress. Whenever I make it, it sparks delight around the table, and I love how accessible yet impressive it feels. You’ll enjoy the ease and flavor combo so much, I’m confident this will become one of your go-to recipes for celebrating seafood in a fresh, fun way.
Print
Baked Salmon Sushi Cups Recipe
- Prep Time: 15 mins
- Cook Time: 25 mins
- Total Time: 40 mins
- Yield: 12 servings 1x
- Category: Appetizer
- Method: Baking
- Cuisine: Japanese
Description
Delicious and visually appealing baked salmon sushi cups feature a crispy nori and sushi rice base topped with a flavorful mixture of cubed salmon, scallions, and spicy mayo. Baked and broiled to perfection, these sushi cups are perfect as a unique appetizer or light meal.
Ingredients
Base
- Cooking spray
- 2 cups cooked sushi rice
- 3 nori sheets, quartered
Salmon Topping
- 1 (1 1/2-lb.) skinless salmon fillet, cut into 1/2” cubes
- 2 scallions, thinly sliced, plus more for serving
- 1 tsp. toasted sesame oil
- 4 Tbsp. Japanese mayonnaise (such as Kewpie), divided
- 2 1/4 tsp. sriracha, divided
- Kosher salt
- 2 tsp. black and white sesame seeds
Instructions
- Prepare Oven and Muffin Tin: Arrange a rack in the upper third of the oven and preheat to 400°F. Lightly coat a standard 12-cup muffin tin with cooking spray to prevent sticking.
- Form Nori and Rice Cups: Place 1 heaping tablespoon of cooked sushi rice into the center of each quartered nori sheet. Transfer each nori piece rice side up into the prepared muffin tin. Using a spoon, gently press the rice evenly into the bottom of each muffin cup to form a base.
- Mix Salmon Topping: In a large bowl, combine the cubed salmon, sliced scallions, toasted sesame oil, 2 tablespoons Japanese mayonnaise, 2 teaspoons sriracha, and 1/4 teaspoon kosher salt. Toss everything together gently until evenly mixed.
- Assemble Sushi Cups: Divide the salmon mixture evenly among the muffin cups, spooning about 1/4 cup of the mixture on top of the rice in each cup.
- Bake the Sushi Cups: Place the muffin tin in the oven and bake for approximately 11 minutes until the salmon is nearly cooked through.
- Broil for Char: Switch the oven to broil and carefully broil the sushi cups for 2 to 4 minutes, watching closely to prevent burning. The tops should be charred in places and the salmon fully cooked.
- Prepare Spicy Mayo Drizzle: While the sushi cups cool for 5 minutes, whisk together the remaining 2 tablespoons Japanese mayonnaise with 1/4 teaspoon sriracha in a small bowl.
- Serve: Arrange the baked salmon sushi cups on a platter. Drizzle each cup with the spicy mayonnaise mixture and sprinkle with black and white sesame seeds and additional sliced scallions for garnish.
Notes
- Ensure sushi rice is properly cooked and slightly cooled before forming cups to avoid sogginess.
- You can adjust the amount of sriracha in the salmon mixture and drizzle according to desired spice level.
- Keep a close eye while broiling to prevent over-charring the salmon topping.
- For gluten-free version, verify that the mayonnaise and sriracha used do not contain gluten ingredients.
- Use fresh, sushi-grade salmon for best taste and safety.
Nutrition
- Serving Size: 1 sushi cup
- Calories: 150
- Sugar: 1g
- Sodium: 230mg
- Fat: 7g
- Saturated Fat: 1.5g
- Unsaturated Fat: 4g
- Trans Fat: 0g
- Carbohydrates: 14g
- Fiber: 1g
- Protein: 9g
- Cholesterol: 35mg


