
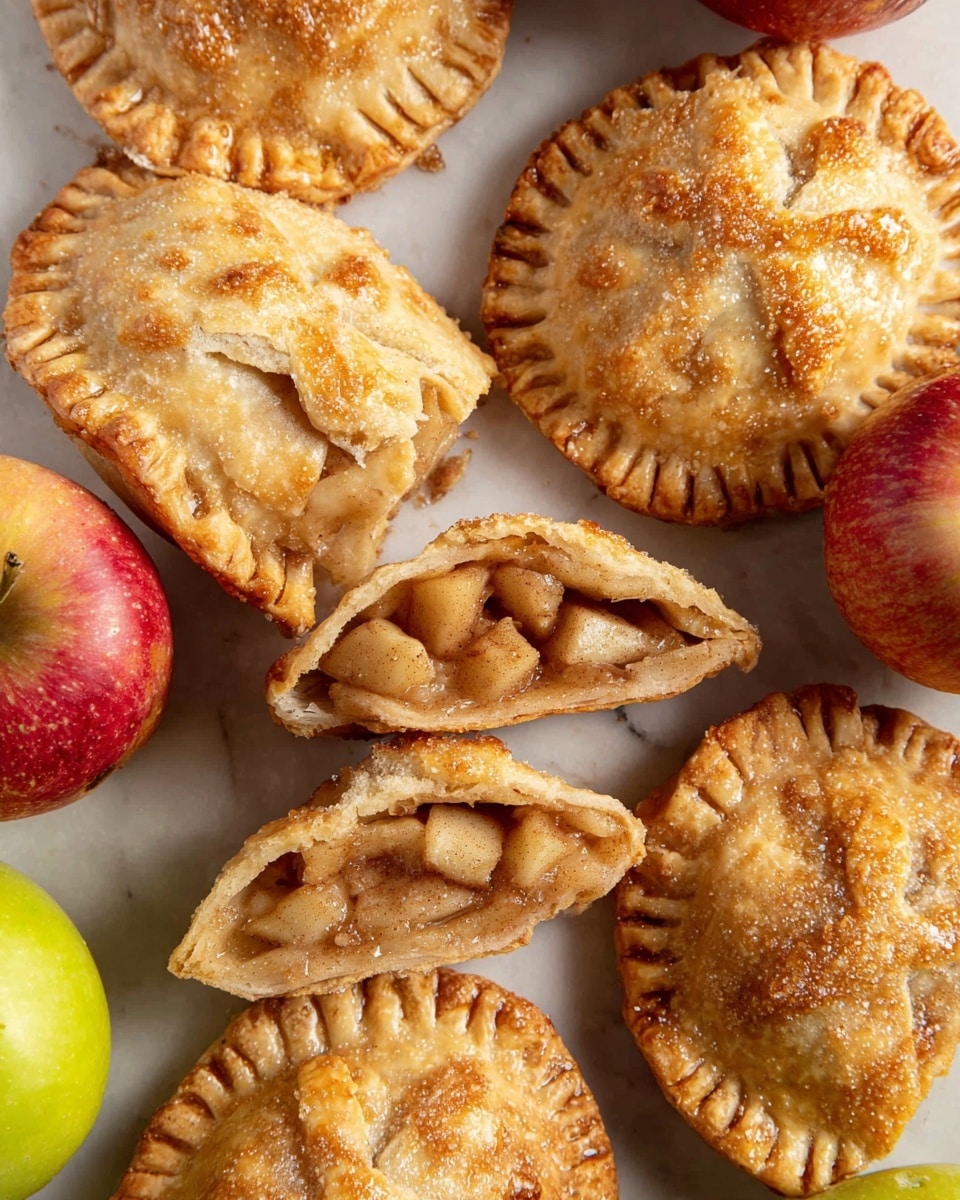
There’s something so charming about a warm, flaky hand pie that’s bursting with sweet apple filling—like a little package of cozy autumn vibes you can hold right in your hand. This Apple Hand Pies Recipe has become one of my absolute favorites because it’s both classic and comforting, yet surprisingly easy to whip up. Whether you’re hosting a casual gathering or just craving a portable treat, these hand pies have got you covered with their golden crusts and that perfect balance of cinnamon-spiced apple sweetness.
I remember the first time I made this Apple Hand Pies Recipe; I was amazed at how much flavor you could pack into these small pies without a ton of fuss. Plus, they bake up beautifully without twisting your schedule, making them perfect for when you want a homemade dessert that feels special but doesn’t require hours. You’ll find that once you try them, these hand pies will quickly become your go-to for fall, holidays, or really any time you want a little apple indulgence on the fly.
Why You’ll Love This Recipe
- No-Fuss Delight: Uses simple ingredients that come together quickly for a homemade feel without the stress.
- Perfectly Portable: These hand pies are great for on-the-go snacking or elegant enough for dessert plates.
- Customizable Flavors: You can easily adjust spices or add mix-ins to suit your taste and season.
- Consistently Delicious: Crunchy crust and tender, juicy apple filling — a winning combo every time.
Ingredients You’ll Need
These ingredients play together beautifully to create that classic apple hand pie flavor and flaky texture. Whether you use store-bought pie crust or homemade, and fresh apples at peak season, the filling turns out tender and just the right amount of sweet-spiced.
- Pie crusts: Store-bought crusts are a time-saver, but homemade adds extra warmth and flakiness.
- Chopped apples: I prefer tart apples like Granny Smith for bright, balanced flavor.
- Granulated sugar: Sweetens the filling just right without overpowering.
- All-purpose flour: Helps thicken the filling so it’s not runny.
- Pure vanilla extract: Adds depth and warmth to the filling.
- Ground cinnamon: The signature spice that brings those cozy flavors forward.
- Ground nutmeg: Just a pinch adds a subtle nutty warmth.
- Large egg: Used for the egg wash that gives the crust a lovely golden shine.
- Milk: Mixed with the egg wash for smooth brushing.
- Butter (optional): Small cubes sprinkled on the filling create pockets of richness.
- Coarse sugar (optional): Sprinkled on top for a pretty crunch and sparkle.
Variations
I love how flexible this Apple Hand Pies Recipe is—you can mix in your favorite flavors or tweak the fillings to fit the season. When I want something extra, I swap out the classic spices or add dried fruits and nuts for texture and flavor bursts.
- Spice it up: I sometimes add ground ginger or cardamom to mix up the cinnamon and nutmeg base for a warming twist.
- Swap fruit: Try pears or cranberries (or both!) for a seasonal upgrade.
- Make it vegan: Use a plant-based butter and substitute the egg wash for almond milk or coconut milk for the glossy crust.
- Sweetener swap: Use brown sugar or maple syrup in place of granulated sugar for a deeper flavor.
How to Make Apple Hand Pies Recipe
Step 1: Prep Your Oven and Dough
Start by preheating your oven to 400°F (204°C) and lining baking sheets with parchment paper—it really helps with cleanup and keeps the pies from sticking. Roll your pie crusts out on a lightly floured surface to about 1/8-inch thickness, then cut out 3.5-inch circles. I like using a cookie cutter, but a cup works just as well if you don’t have one. Pop these circles onto your prepared pans and chill them in the fridge while you mix the filling. Chilling the dough prevents it from getting too soft, which helps the pies hold their shape during baking.
Step 2: Toss the Apple Filling Together
In a bowl, combine your chopped apples with sugar, flour, vanilla, cinnamon, and nutmeg. I like to make sure every piece is evenly coated—this prevents the filling from being dry or too runny once baked. This step is where all those cozy flavors come to life, so give it a good mix!
Step 3: Assemble Your Hand Pies
Pull the crust circles from the fridge and spoon the apple mixture onto half of them, leaving room around the edges to seal. I like to place small cubes of butter on top of the filling—it melts as it bakes, adding lovely richness. Dab the edges with a bit of the egg wash to help seal the pies, then place the remaining circles on top. Press the edges with a fork to crimp them shut; this not only looks pretty but keeps the filling from oozing out.
Step 4: Brush and Bake to Golden Perfection
Brush the tops with the egg and milk mixture to get that gorgeous golden color and sprinkle with coarse sugar if you want a little crunchy sparkle. Don’t forget to cut 2-3 small slits in each pie to let steam escape—this keeps your crust crisp, not soggy. Bake them for about 18 to 22 minutes until golden and bubbling. Let them cool a bit before you dig in; I promise, the aroma alone makes the wait worthwhile!
Pro Tips for Making Apple Hand Pies Recipe
- Choose the Right Apples: Using firm, tart apples like Granny Smith keeps the filling fresh and balances the sweetness perfectly.
- Chill Dough Twice: Don’t skip chilling the crust before assembly and after cutting; it helps keep the flaky texture intact.
- Don’t Overfill: Leaving room at the edges is key to sealing well and avoiding messy leaks in the oven.
- Vent Your Pies: Cutting slits on top lets steam escape, preventing soggy crust and ensuring a crispy finish.
How to Serve Apple Hand Pies Recipe

Garnishes
I like to keep garnishes simple—sometimes just a light dusting of powdered sugar after they’ve cooled adds a pretty touch without overpowering the flavor. For a decadent twist, a small dollop of whipped cream or a scoop of vanilla ice cream on the side is pure magic.
Side Dishes
These hand pies shine best on their own or paired with a warm drink like chai tea, coffee, or apple cider. They also make a lovely treat after a light lunch or brunch, especially when served alongside a simple green salad or cheddar cheese slices to contrast the sweetness.
Creative Ways to Present
For special occasions, I sometimes serve these apple hand pies on a tiered dessert stand or wrapped individually in parchment paper tied with twine—makes them perfect party favors or a charming gift. You could also use festive cookie cutters for the crust for seasonal shapes like leaves or hearts.
Make Ahead and Storage
Storing Leftovers
I usually keep any leftover Apple Hand Pies in an airtight container at room temperature for up to two days, but honestly, they rarely last that long in my house. If you want to store them longer, the fridge is your friend, though the crust can soften a bit.
Freezing
I’ve found freezing these hand pies before baking works best. Just assemble, freeze them on a tray until firm, then transfer to a freezer-safe bag. When you’re ready, bake straight from frozen—adding a few extra minutes to the baking time—and they come out wonderfully fresh.
Reheating
To reheat, I pop the pies in a 350°F oven for 8-10 minutes until warmed through and crispy again. Avoid microwaving if you can—it tends to make the crust chewy instead of flaky.
FAQs
-
Can I use homemade pie crust for the Apple Hand Pies Recipe?
Absolutely! Homemade pie crust adds a lovely flaky texture and buttery flavor to your hand pies. Just make sure to chill it well before rolling and cutting to keep the dough easy to work with.
-
What type of apples work best for this recipe?
Firm, tart apples like Granny Smith or Honeycrisp are ideal because they hold their shape and balance the sweetness of the filling nicely. Softer apples might become mushy during baking.
-
Can I make these hand pies ahead of time?
Yes! You can assemble the pies and freeze them before baking. Then, bake them straight from the freezer when you’re ready. This is a great way to prep for holidays or busy days.
-
How do I prevent the pies from leaking during baking?
Make sure not to overfill your pies and to leave enough space at the edges to seal tightly. Using egg wash or a bit of water to moisten the crust edges before crimping helps create a strong seal, and cutting slits on top lets steam escape.
-
Can I add other fillings or mix-ins to this Apple Hand Pies Recipe?
Definitely! You can add dried cranberries, chopped nuts, or switch some of the apple for pear to customize your hand pies. Just adjust the sugar and spices to balance the flavors.
Final Thoughts
This Apple Hand Pies Recipe holds a special place in my heart because it combines comfort and elegance in such an accessible way. Every time I share them, friends and family light up with that warm “wow” moment which makes all the prep so worth it. I really encourage you to try these yourself—once you experience that flaky crust and perfectly spiced apple filling, you’ll understand why they’re a kitchen staple for me. Trust me, these hand pies are a joy to make and an even bigger joy to eat.
Print
Apple Hand Pies Recipe
- Prep Time: 45 minutes
- Cook Time: 20 minutes
- Total Time: 1 hour 5 minutes
- Yield: 10 pies 1x
- Category: Dessert
- Method: Baking
- Cuisine: American
Description
Delight in these homemade Apple Hand Pies featuring a flaky pie crust filled with a luscious cinnamon-spiced apple mixture. Perfectly portioned as individual treats, these hand pies are baked to golden perfection and make an ideal snack or dessert for any occasion.
Ingredients
Pie Crust
- 2 pie crusts (homemade or store-bought)
Apple Filling
- 2 cups chopped apples (240 grams)
- 1/4 cup granulated sugar (50 grams)
- 2 tablespoons all-purpose flour (15 grams)
- 1/2 teaspoon pure vanilla extract
- 1/2 to 1 teaspoon ground cinnamon (adjust to your personal preference)
- 1/8 teaspoon ground nutmeg
Egg Wash and Toppings
- 1 large egg lightly beaten
- 1 tablespoon milk (15 ml)
- 1 tablespoon butter (15 grams), cubed into small pieces (optional)
- Coarse sugar for sprinkling on top (optional)
Instructions
- Preheat and Prepare Baking Sheet: Preheat your oven to 400°F (204°C). Line one or two large baking sheets with parchment paper or silicone baking mats to prevent sticking and set aside.
- Roll and Cut Pie Crust: On a lightly floured surface, roll out the pie crusts to about 1/8-inch thickness. Using a 3.5-inch cookie cutter or a cup, cut out approximately 18 to 20 circles. Reroll scraps as needed. Place the circles on the prepared baking sheets and refrigerate to chill while preparing the filling.
- Make Apple Filling: In a mixing bowl, combine the chopped apples, granulated sugar, all-purpose flour, vanilla extract, ground cinnamon, and ground nutmeg. Stir until all apple pieces are evenly coated with the mixture.
- Prepare Egg Wash: In a separate small bowl, whisk together the egg and milk until fully combined; this will be used to seal the pies and give them a golden glaze.
- Assemble Hand Pies: Remove the pie crust circles from the refrigerator. Spoon the apple filling evenly onto half of the circles, leaving space at the edges for sealing. Optionally, place 1 to 2 small cubes of butter on top of the filling for added richness.
- Seal and Shape Hand Pies: Place the remaining pie crust circles over the filling. Moisten the edges with water or some egg wash if necessary, then press the edges together and crimp with a fork to seal completely.
- Apply Egg Wash and Cut Vents: Brush the tops of the hand pies with the prepared egg wash. Sprinkle with coarse sugar if desired for a sweet, crunchy topping. Using a knife, cut 2 to 3 small slits in the top of each pie to allow steam to escape during baking.
- Bake: Bake in the preheated oven for 18 to 22 minutes or until the pies are golden brown and the filling is bubbly.
- Cool and Serve: Remove the pies from the oven and allow them to cool slightly on the baking sheet before serving to let the filling set a bit.
Notes
- You can substitute different apple varieties such as Granny Smith or Honeycrisp depending on your preferred tartness and sweetness.
- Butter cubes on the filling are optional but add a nice richness and help create a creamier filling.
- Chilling the pie crust before baking helps maintain its flaky texture and prevents shrinking.
- Store leftover hand pies in an airtight container at room temperature for up to two days or refrigerate for up to a week.
- To reheat, warm in a 350°F oven for 10 minutes or until heated through.
Nutrition
- Serving Size: 1 pie
- Calories: 280
- Sugar: 15g
- Sodium: 150mg
- Fat: 14g
- Saturated Fat: 7g
- Unsaturated Fat: 6g
- Trans Fat: 0g
- Carbohydrates: 36g
- Fiber: 3g
- Protein: 3g
- Cholesterol: 40mg


