
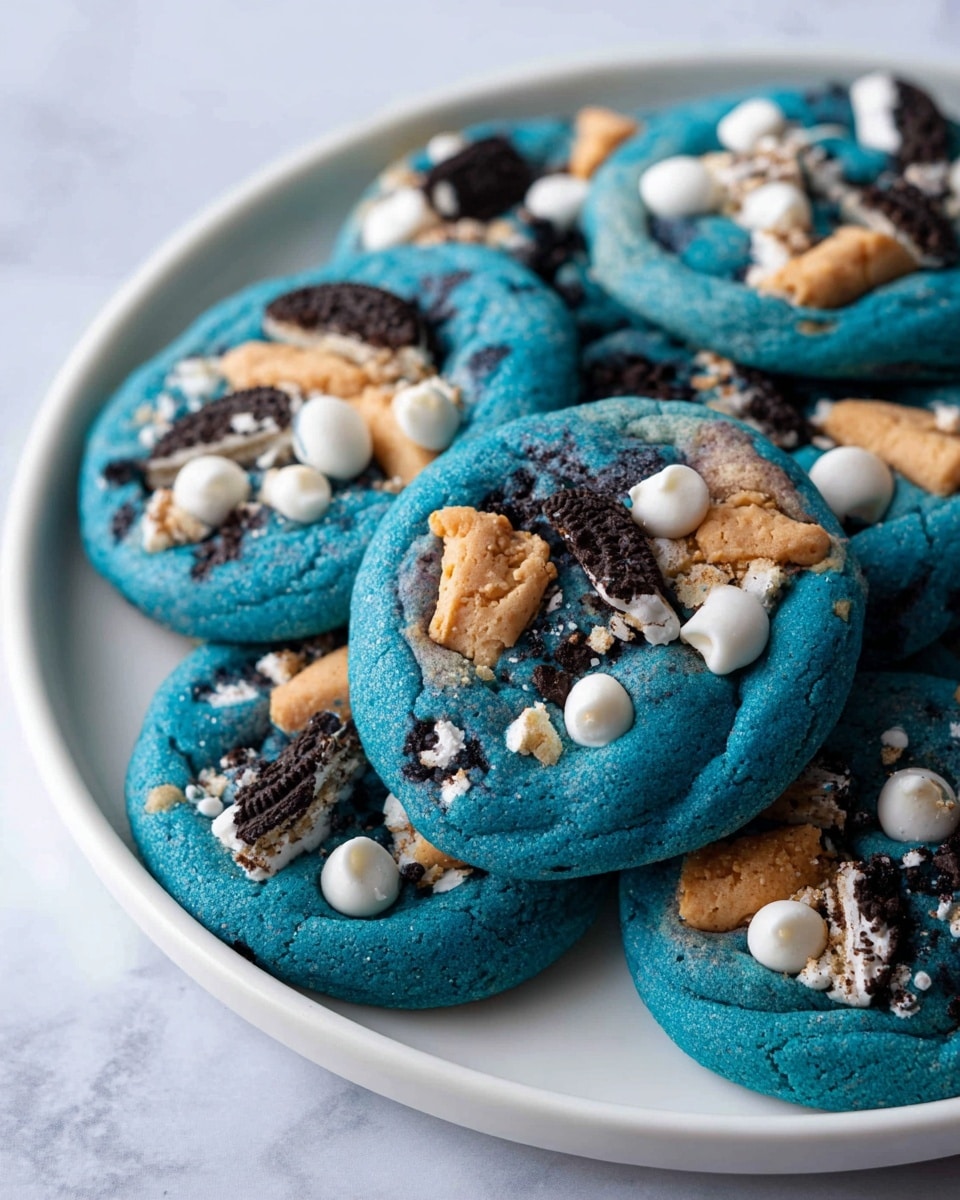
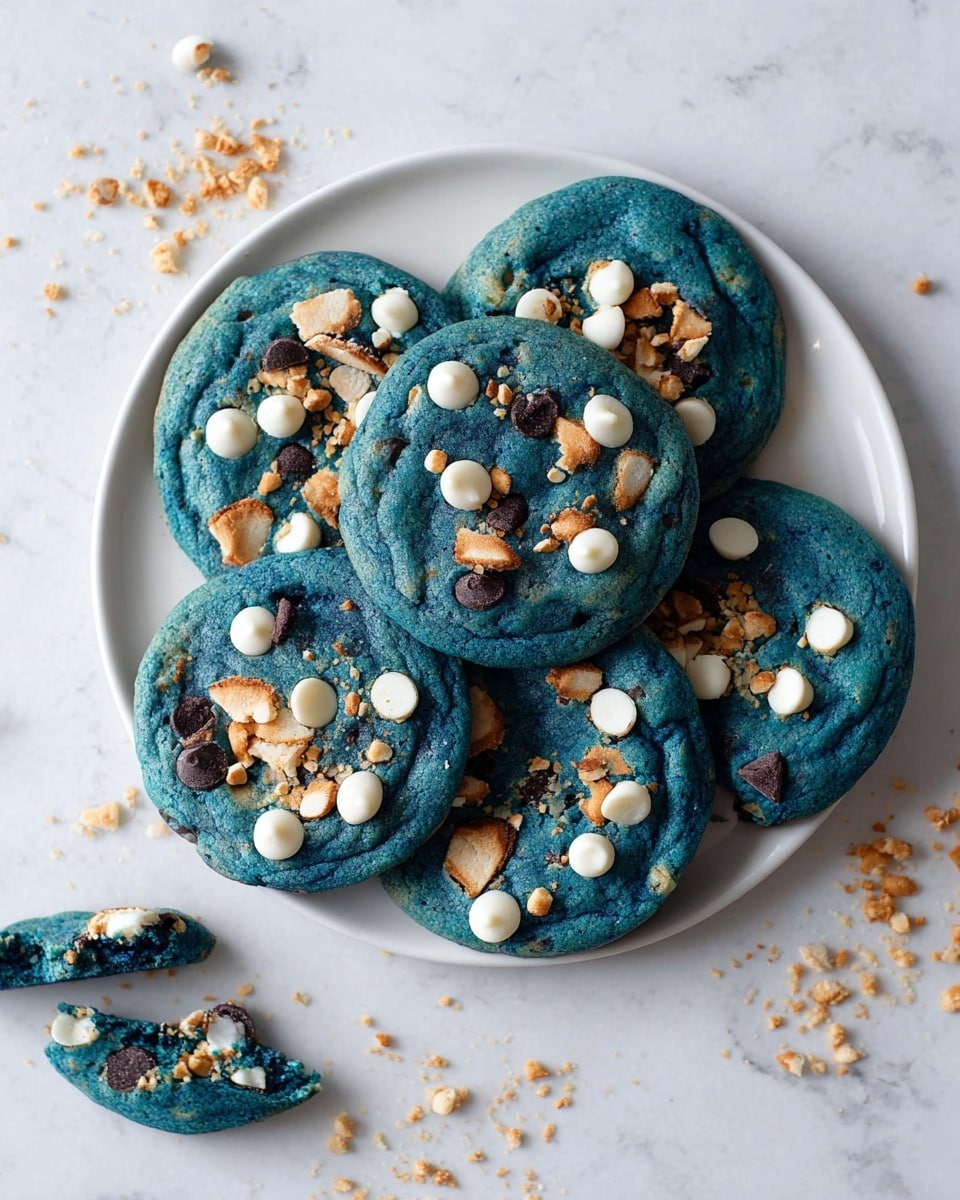
If you’re anything like me and a fan of over-the-top, fun cookies, then the Cookie Monster Cookie Recipe is going to be your new best friend. I absolutely love how these cookies not only look vibrant with all those beautiful blue hues but also pack a serious punch of flavor with chunks of Chips Ahoy, Oreos, and melty white chocolate chips. Whether you’re baking for a special occasion, a kids’ party, or just need a delicious pick-me-up, this recipe always hits the spot.
When I first tried this Cookie Monster Cookie Recipe, I was hooked by how the dough turns out thick, rich, and perfectly juicy, ensuring each bite is lifetime-worthy. You’ll find that once you get the hang of mixing in the colors and cookie crumbs, it’s a breeze to pull together and even fun to customize. Trust me—these cookies make a bold, playful statement, and everyone I’ve shared them with goes crazy for that unique blue twist.
Why You’ll Love This Recipe
- Bursting with Flavor: The combo of Oreos, Chips Ahoy, and white chocolate chips creates an irresistible cookie experience.
- Vibrant & Fun: The royal, electric, and violet blues make these cookies a showstopper every time you pull them out of the oven.
- Perfect Texture: Crisp edges with a soft, chewy center — exactly how a cookie should be.
- Simple & Approachable: Even if you’re new to baking cookies, the recipe walks you through every step so you can ace it.
Ingredients You’ll Need
The balance of basic baking staples and cookie mix-ins in this Cookie Monster Cookie Recipe really comes together beautifully. I highly recommend using good-quality butter and fresh eggs—they make a big difference in cookie texture and flavor.
- All purpose flour: Provides the structure you want for a perfectly chewy cookie.
- Cornstarch: Helps keep the cookies tender and soft in the center.
- Baking soda: Gives just the right amount of lift and browning.
- Salt: Balances the sweetness and enhances the cookie flavors.
- Unsalted butter: Use room temperature for easy creaming and richer taste.
- Brown sugar: Adds moisture and that classic chewy cookie texture.
- Granulated sugar: Provides crispness on the edges.
- Eggs: Room temperature eggs help bind ingredients and add richness.
- Vanilla extract: A must for that warm, comforting aroma.
- Gel food coloring (royal blue, electric blue, violet): These vibrant colors combine for the iconic Cookie Monster blue.
- White chocolate chips: Adds creamy sweetness and contrast.
- Chopped Chips Ahoy cookies: A fun mix-in that adds crunch and nostalgia.
- Chopped Oreos: For that beloved chocolaty cookie flavor boosted with cream filling pieces.
Variations
One of the best parts about making the Cookie Monster Cookie Recipe is how easy it is to swap out ingredients and make it your own. I’ve played around with different cookie chunks and even switched the white chocolate chips for milk chocolate to mix up flavors — you’ll find it’s super forgiving.
- Gluten-Free Version: Use a gluten-free all purpose blend and double-check your cookie mix-ins for gluten content — still delicious and just as fun.
- Mix-in Swaps: Try substituting the Chips Ahoy or Oreos with your favorite cookies or even candy pieces for a fun twist.
- Color Play: I’ve played with ombre blues or added a splash of purple for a galaxy effect — colorful and whimsical for kids’ parties.
- Vegan Adaptation: Replace butter with vegan butter and eggs with flax eggs; texture shifts slightly but still a treat.
How to Make Cookie Monster Cookie Recipe
Step 1: Mix Dry Ingredients Together
Start by whisking together the all purpose flour, cornstarch, baking soda, and salt in a bowl. I like to set this aside while I work on the wet ingredients — it keeps the workflow smooth and helps avoid overmixing the dough later on.
Step 2: Cream the Butter and Sugars
Using a stand mixer or hand mixer, beat the softened butter, brown sugar, and granulated sugar on medium speed for about 2 minutes. You want the mixture fluffy and pale — this is key for light, tender cookies that don’t turn out dense.
Step 3: Add Eggs and Vanilla
Beat in the eggs and vanilla extract until well combined, about 30 seconds. I always scrape down the bowl once or twice here to make sure everything is evenly mixed.
Step 4: Incorporate Dry Ingredients and Food Coloring
Slowly mix in your dry ingredients on low speed. Just before finishing, add in the gel food colorings — you’ll want a generous amount to get that deep, iconic blue. From my experience, mixing the colors evenly into the thick dough can take a minute, but be patient. The dough should be thick and vibrant.
Step 5: Fold in Cookie Chunks and White Chocolate Chips
Gently fold in one-third of the white chocolate chips, chopped Chips Ahoy, and chopped Oreos by hand. This helps keep those chunks intact and evenly distributed so every bite is loaded with goodies.
Step 6: Form Cookie Balls and Add Toppings
Use a cookie scoop to portion out about 2 tablespoons of dough each. Roll them into smooth balls between your palms, then press the remaining white chocolate chips and cookie pieces onto the outside of each ball. It not only boosts the flavor but gives an enticing rustic look.
Step 7: Bake and Cool
Place about 8 cookie dough balls on a lined baking sheet and bake at 350ºF for 10-12 minutes. I always recommend baking one tray at a time to make sure the heat distributes evenly. Pull them out when edges look set but not browned for that perfect soft center. Let cookies cool on the tray for 15 minutes before transferring to a wire rack to finish cooling.
Pro Tips for Making Cookie Monster Cookie Recipe
- Get Real With Food Color: Gel food coloring is a must for intense hues without watering down the dough — I use a mix of royal, electric, and violet until I get that signature blue.
- Chill for Control: If your dough feels too soft to handle, pop it in the fridge for 20 minutes — makes it easier to roll into neat balls.
- One Sheet at a Time: Baking one tray at a time ensures even heat distribution so your cookies bake perfectly every time.
- Watch Your Bake Time: Stop baking before the edges brown — this keeps the insides soft and melty, which is the magic of these cookies.
How to Serve Cookie Monster Cookie Recipe
Garnishes
I like to keep garnishes simple for these cookies — a light dusting of powdered sugar can bring a nice contrast to the bold blue without overwhelming the eye or palate. Sometimes, I also sprinkle a few extra cookie crumbs on the plate for that charming, homemade vibe.
Side Dishes
Pair these with a cold glass of milk or a scoop of vanilla ice cream for a classic combo my family goes nuts over. If it’s a party, iced coffee or hot chocolate work wonderfully too to balance the rich cookie flavors.
Creative Ways to Present
For birthdays or themed events, I’ve arranged these cookies on a platter surrounded by blue and white sprinkles to amplify the Cookie Monster vibe. Another trick is stacking and tying them with a fun ribbon for delightful party favors that guests adore.
Make Ahead and Storage
Storing Leftovers
I store any extra Cookie Monster Cookies in an airtight container at room temperature and they stay soft and flavorful for up to 5 days. Placing a slice of bread in the container helps keep them moister — I discovered this classic trick early on and never look back.
Freezing
These cookies freeze beautifully. I freeze unbaked dough balls on a tray first, then transfer them to a freezer bag. When I’m ready, I bake them straight from frozen, adding a couple of extra minutes to the bake time — always a lifesaver for busy days.
Reheating
To warm up leftovers, I pop a cookie in the microwave for about 10-15 seconds, which refreshes that soft center and melty chips without drying them out. You can also reheat in a 300ºF oven for 5 minutes if you want a freshly baked feel.
FAQs
-
Can I use regular liquid food coloring instead of gel?
You can, but regular liquid food coloring will thin out your dough, making it looser and possibly changing the texture. Gel food coloring is concentrated and doesn’t add moisture, so I definitely recommend gels for the Cookie Monster Cookie Recipe.
-
What if I don’t have Chips Ahoy or Oreos on hand?
No worries! You can substitute any crunchy, chocolatey cookies or even mix in chocolate chips and nuts. The key is having some mix-ins that add both texture and flavor contrast to the blue dough.
-
Why are there three different blue colors used?
Mixing royal blue, electric blue, and violet gels creates that rich, vibrant, multidimensional Cookie Monster blue. Using just one shade often looks flat, so blending colors gives a more natural and eye-catching hue.
-
Can I make the dough ahead of time?
Absolutely! Making the dough a day ahead and refrigerating it helps flavors meld and makes the dough easier to handle when forming the cookies. Just let it come to room temp for a few minutes before scooping.
-
How do I keep my Cookie Monster Cookies soft?
Don’t overbake — pull them from the oven when edges are set but not browned. Also, storing cookies in an airtight container with a slice of fresh bread helps lock in moisture and softness.
Final Thoughts
I can’t recommend the Cookie Monster Cookie Recipe enough — it’s become one of my go-to recipes when I want to impress with minimal fuss. These cookies bring together nostalgia, color, and incredible flavor in a way that feels both playful and satisfying. So next time you’re craving something special and fun, give this recipe a try. Trust me, whether you’re baking for friends, family, or just yourself, these cookies will quickly become a beloved classic in your kitchen too.
Print
Cookie Monster Cookie Recipe
- Prep Time: 10 minutes
- Cook Time: 12 minutes
- Total Time: 22 minutes
- Yield: 24 cookies 1x
- Category: Dessert
- Method: Baking
- Cuisine: American
Description
These vibrant Cookie Monster Cookies are a fun twist on classic chocolate chip cookies, featuring a colorful blue dough and a delicious mix of white chocolate chips, Chips Ahoy, and Oreo cookie pieces. Perfectly soft with a slight crisp on the edges, these cookies bring a playful pop of color and rich texture to your baking repertoire.
Ingredients
Dry Ingredients
- 3 cups (360g) all-purpose flour
- 2 tsp cornstarch
- 1 tsp baking soda
- 1/4 tsp salt
Wet Ingredients
- 1 cup (226g) unsalted butter, 2 sticks, room temperature
- 1 1/4 cups (267g) brown sugar
- 1/4 cup (50g) granulated sugar
- 2 large eggs, room temperature
- 1 tsp vanilla extract
Additional Ingredients
- Royal blue, electric blue, and violet gel food coloring (enough for deep, true blue color)
- 2/3 cup (113g) white chocolate chips, divided
- 2/3 cup chopped Chips Ahoy cookies (mini cookies recommended)
- 2/3 cup chopped Oreos
Instructions
- Preheat and Prepare: Preheat your oven to 350ºF (175ºC). Line a cookie sheet with a silicone baking mat or parchment paper to prevent sticking and ensure even baking.
- Combine Dry Ingredients: In a mixing bowl, whisk together the all-purpose flour, cornstarch, baking soda, and salt until evenly distributed. Set this mixture aside.
- Cream Butter and Sugars: In a larger bowl, beat the room temperature butter, brown sugar, and granulated sugar on medium speed for 2 minutes. Beat until the mixture is fluffy and pale in color to create the perfect base for your cookies.
- Add Eggs and Vanilla: Add the eggs and vanilla extract to the creamed butter mixture and beat for 30 seconds until fully incorporated.
- Mix Dry Ingredients and Add Color: Gradually add the dry ingredient mixture to the wet ingredients, mixing on low speed. Before fully mixing, add the royal blue, electric blue, and violet gel food coloring. Use enough food coloring to achieve a deep and true blue shade. Continue mixing until the dough is thick and evenly colored.
- Incorporate Cookie Pieces and White Chocolate Chips: Add ⅓ cup of white chocolate chips, chopped Chips Ahoy, and chopped Oreos to the dough. Fold these in by hand until just combined to maintain chunks of cookie throughout.
- Shape Cookies: Using a cookie scoop, portion out 2-tablespoon sized dough balls. Roll each into a smooth ball between your hands. Press the remaining white chocolate chips, Chips Ahoy pieces, and Oreo pieces onto the outside of each ball for a visually appealing finish.
- Bake Cookies: Place about 8 cookies per cookie sheet lined with silicone mat or parchment. Bake for 10-12 minutes, ideally removing cookies before edges start to brown to keep them soft inside with slightly crisp edges. Bake only one sheet at a time for even cooking.
- Cool: Allow the cookies to cool on the baking sheet for 15 minutes before transferring to a wire rack or serving to let them set properly.
Notes
- For best results, ensure your butter and eggs are at room temperature before starting.
- Use gel food coloring for the best vibrant blue color without altering dough texture.
- Do not overbake the cookies; pulling them out a little early keeps them soft and chewy.
- Pressing cookie pieces on the outside adds extra crunch and aesthetic appeal.
- Chilling the dough is not necessary but can help with shaping if dough feels too soft.
- Store cookies in an airtight container at room temperature for up to 5 days.
Nutrition
- Serving Size: 1 cookie
- Calories: 180
- Sugar: 14g
- Sodium: 100mg
- Fat: 9g
- Saturated Fat: 5g
- Unsaturated Fat: 3g
- Trans Fat: 0g
- Carbohydrates: 24g
- Fiber: 1g
- Protein: 2g
- Cholesterol: 30mg

