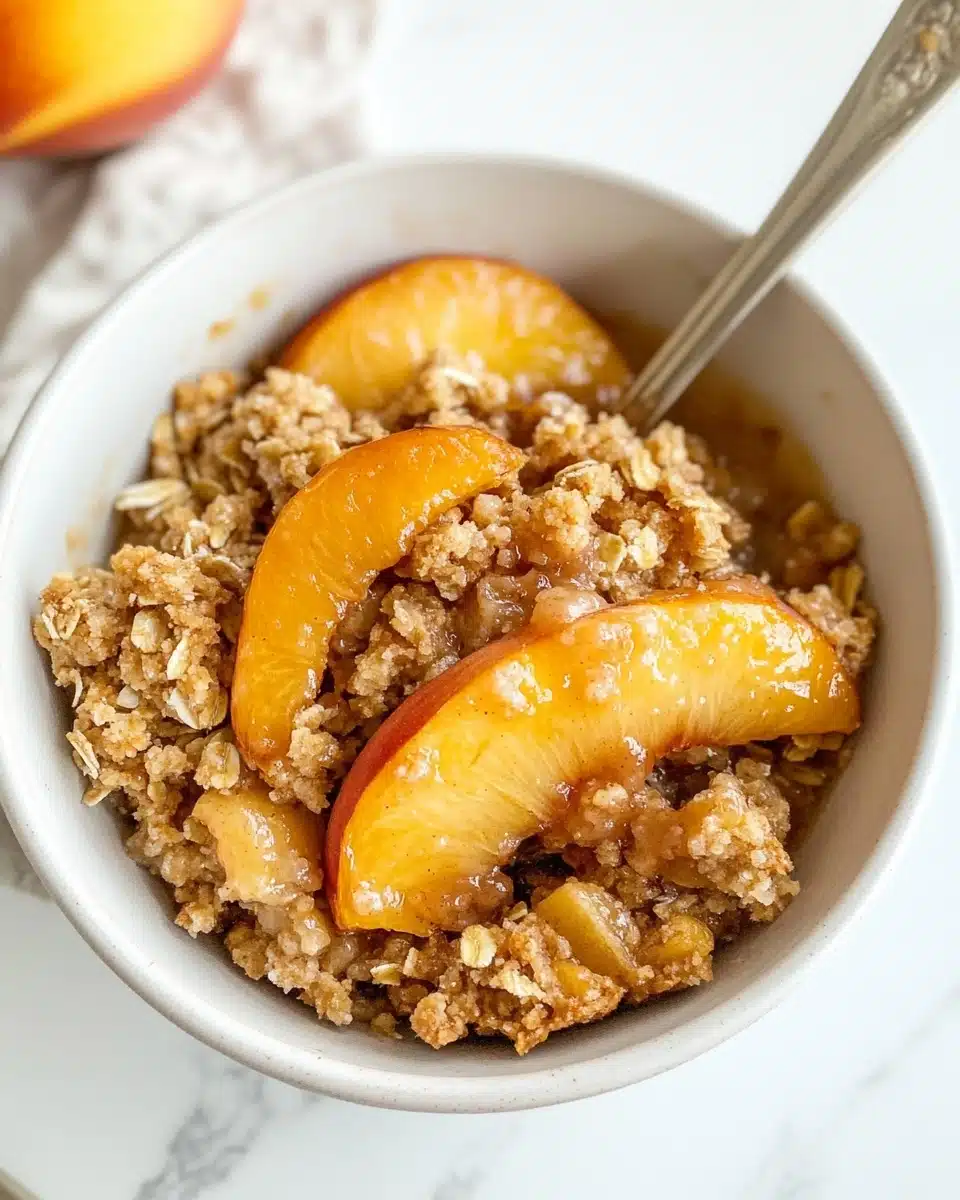
If you’re craving a taste of summer in dessert form, nothing beats Peach Crisp. With sun-ripened peaches bubbling away under a golden, cinnamon-scented oat topping, it’s comfort food at its best—flavorful, easy, and unfussy. Every bite is the perfect combination of juicy, caramelized fruit and that irresistible crunchy-crisp topping.
Why You’ll Love This Recipe
- Incredibly Easy: Minimal prep and no special equipment—just a bowl, a pan, and a happy anticipation for dessert!
- Classic Comfort: This Peach Crisp captures the feeling of summer holidays and family gatherings in every cinnamony, golden bite.
- Make-ahead Friendly: You can prep Peach Crisp ahead of time and bake it right before guests arrive for maximum wow-factor.
- Customizable: It’s easy to swap in different fruits or adjust the topping, so you can truly make it your own.
Ingredients You’ll Need
The secret to a memorable Peach Crisp lies in just a handful of real, honest ingredients—each one adding its own magic, from fresh, juicy peaches to the toasty oats that provide the ultimate crunchy topping. Here’s why every element deserves its spot!
- Fresh Peaches: Ripe and juicy, they bring sweetness, color, and sunshine flavor—don’t skimp on quality fruit.
- Granulated Sugar: Just enough to enhance the natural peachy sweetness, without overwhelming it.
- All-Purpose Flour: Used in both the filling and topping—it thickens the fruit juices and adds body to the crisp.
- Cornstarch: Ensures the peach layer is luscious, not runny, by absorbing extra moisture.
- Ground Cinnamon: Divided between the peaches and crumble, for cozy, irresistible aroma and flavor.
- Salt: A pinch wakes up all the other flavors and keeps the sweetness balanced.
- Light Brown Sugar: Makes the topping slightly caramelly and helps it bake into perfect clusters.
- Salted Butter: Soft butter binds the topping and gives it those crave-worthy golden edges.
- Old-Fashioned Oats: They form the hearty base of the crisp, baking up toasty and delightfully textured.
Variations
One of the best parts about making homemade Peach Crisp is how easy it is to customize. With just a few tweaks, you can make it dairy-free, gluten-free, or even experiment with new flavors for a twist on tradition.
- Gluten-Free Crisp: Swap the all-purpose flour for your favorite gluten-free blend and make sure to use gluten-free oats—every spoonful will still be addictively crisp.
- Berries and Peach Combo: Mix in a cup or two of blueberries, blackberries, or raspberries for a medley of summer fruit flavor and gorgeous color.
- Dairy-Free Option: Use your go-to plant-based butter and enjoy every warm, melty crumble.
- Nutty Upgrade: Stir in a handful of chopped pecans or almonds into the topping for extra crunch and a lovely toasted note.
How to Make Peach Crisp
Step 1: Prep Your Pan and Preheat
Set the mood for baking by preheating your oven to 400°F—it’s the perfect temperature for bubbling peaches and a golden crisp topping. Butter a 9×9-inch baking pan to keep cleanup easy and ensure every serving slips out perfectly.
Step 2: Make the Peach Filling
In a large bowl, gently toss together your peeled, sliced peaches with granulated sugar, 2 tablespoons of flour, cornstarch, a teaspoon of cinnamon, and a pinch of salt. You’ll notice the peaches look gleaming and juicy—this is exactly what you want! Spread them into your prepared pan and set aside while you make the topping.
Step 3: Prepare the Oat Topping
Using the same bowl (no need to wash—hooray for fewer dishes!), beat together the brown sugar, remaining flour, soft butter, and the remaining teaspoon of cinnamon. When it’s all mixed, add the oats and use your hands to work everything into a crumbly, clumpy mixture that bakes up crispy and golden.
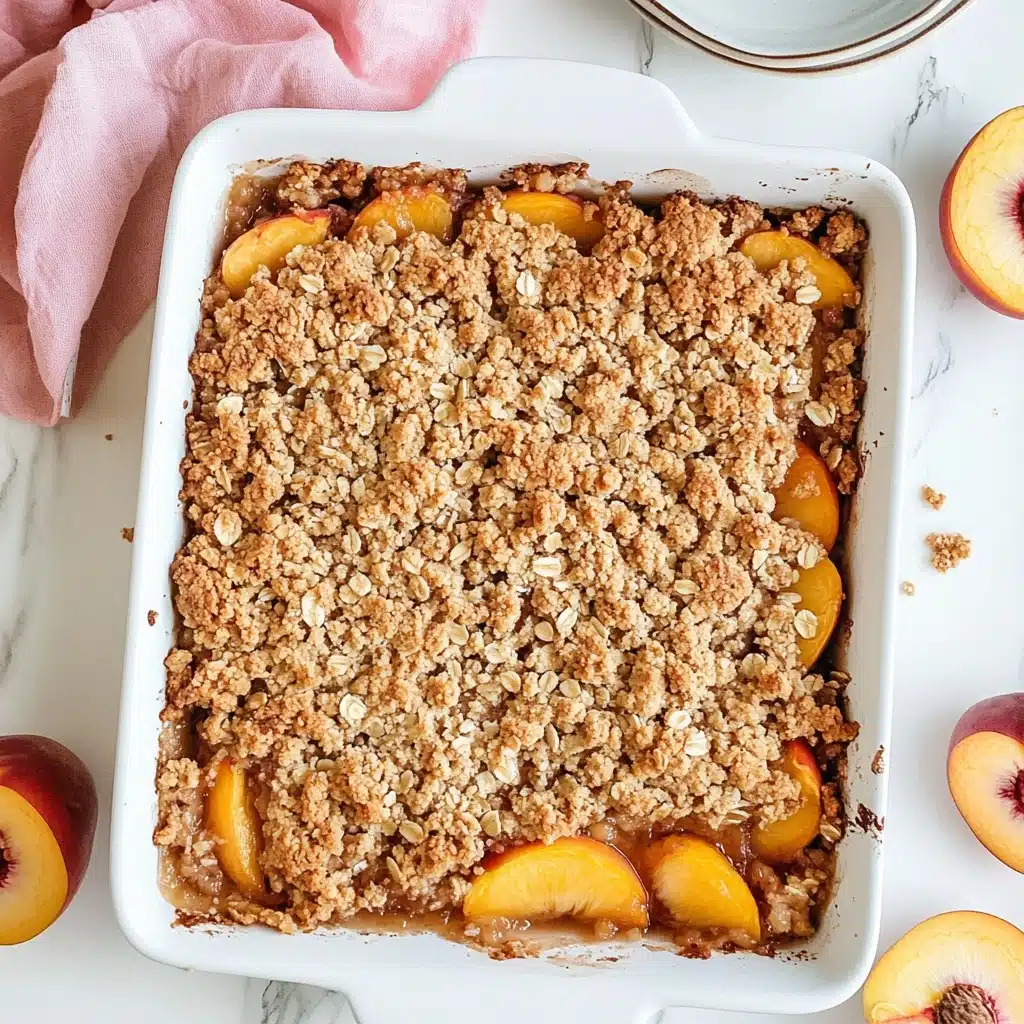
Step 4: Assemble and Bake
Crumble the topping evenly over the peaches, pressing gently so you get those big, chunky pieces everyone loves. Bake for 20 to 25 minutes—when the oats turn golden and you see peach bubbles peeking around the edges, it’s ready! Let your Peach Crisp cool for 10 minutes before serving; this helps the fruit set and keeps hungry fingers from getting burned.
Pro Tips for Making Peach Crisp
- Choosing Perfect Peaches: Look for peaches that give slightly to pressure and have a fragrant aroma—too firm, and they’ll stay tart; too soft and they’ll fall apart in baking.
- Hands-On Topping: Don’t be afraid to get your hands in there when mixing the oat topping—this helps you create those coveted craggy clusters and keeps the texture rustic.
- Crisp, Not Soggy: Letting the crisp rest for 10 minutes after baking allows the fruit layer to set slightly, making serving neat and ensuring every bite has both juicy and crispy elements.
- Make It Your Own: Add a pinch of nutmeg or a splash of vanilla to the filling to further elevate your Peach Crisp’s aroma and depth.
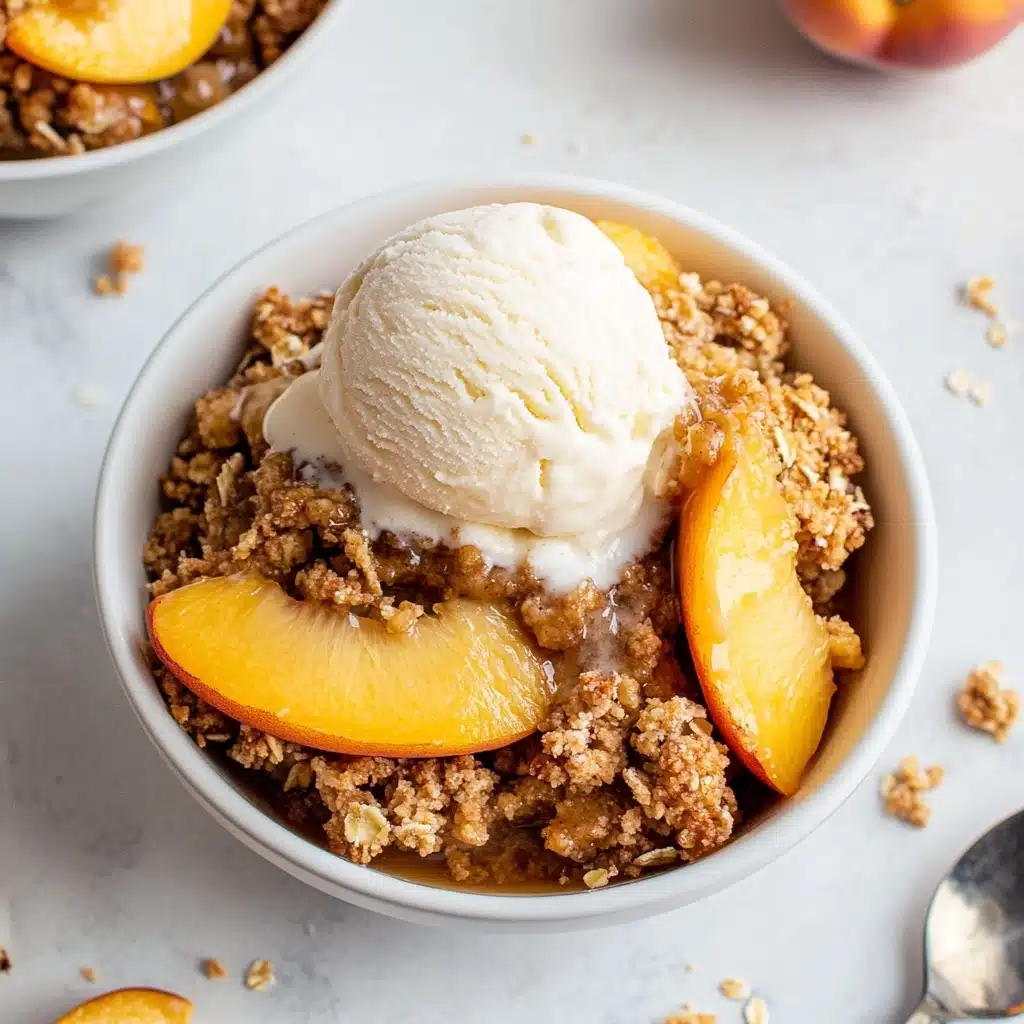
How to Serve Peach Crisp
Garnishes
Nothing completes Peach Crisp like a generous scoop of vanilla ice cream melting into its warm nooks and crannies. For a little extra glamour, try a cloud of whipped cream or a quick sprinkle of toasted nuts—each one adds creaminess and a fun crunch.
Side Dishes
If you want to serve Peach Crisp as a show-stopping finale, a fresh fruit salad or a simple pitcher of peach iced tea will keep the menu feeling light and summery. And if you’re having a brunch gathering, it goes beautifully alongside yogurt and strong coffee.
Creative Ways to Present
Try baking individual Peach Crisps in ramekins for an adorable, personalized treat—or serve family-style, letting everyone dig in with big spoons for that extra-homemade feel. For special occasions, add a drizzle of caramel sauce or tuck the crisp into mason jars for a rustic picnic-ready surprise.
Make Ahead and Storage
Storing Leftovers
Leftover Peach Crisp will keep happily in the refrigerator for up to 3 days. Simply cover the pan with foil or transfer any remaining portions to an airtight container to keep the topping from absorbing too much moisture.
Freezing
To freeze, allow your Peach Crisp to cool completely, then wrap it tightly. It’s best to freeze just the filling and topping separately if you want ultra-crispy results when baking from frozen, but you can also freeze baked leftovers for up to 3 months.
Reheating
To keep the topping crisp, reheat Peach Crisp uncovered in a 350°F oven for about 15-20 minutes until warmed through. If you’re in a pinch, pop a serving in the microwave for a minute or two—but know the oven is the way to go for crunchy perfection.
FAQs
-
Can I use canned or frozen peaches instead of fresh?
Yes! While fresh peaches offer unbeatable flavor, canned peaches (well-drained) or frozen ones (thawed and patted dry) work in a pinch—just keep an eye on extra liquid, as it can make the filling runnier.
-
How do I peel peaches easily for Peach Crisp?
The quickest method is to score an “X” on the bottom of each peach, dunk them in boiling water for 30 seconds, then pop them into an ice bath. The skins should slip right off!
-
Can I double this recipe for a crowd?
Absolutely! Simply double all the ingredients and bake your Peach Crisp in a 9×13-inch pan. You may need to add a few extra minutes of baking time to ensure it’s golden and bubbling.
-
Why is my crisp topping not crunchy?
If your topping isn’t crunchy, it might be due to too much moisture (from juicy peaches or steamy storage). Make sure to use the right ratio of butter to flour/oats, and bake until it’s really golden on top.
Final Thoughts
If you love simple, crowd-pleasing desserts, this Peach Crisp is absolutely worth making. It’s a warm, cozy hug of a recipe that’s always a hit, and just one forkful will have you coming back for more—don’t be surprised if it becomes your new summertime tradition.
Print
Peach Crisp Recipe
- Prep Time: 10 minutes
- Cook Time: 20 minutes
- Total Time: 40 minutes
- Yield: 6 1x
- Category: Dessert
- Method: Baking
- Cuisine: American
- Diet: Vegetarian
Description
Indulge in the sweet and comforting flavors of this delicious Peach Crisp. Made with fresh peaches and a crispy oat topping, it’s the perfect dessert for any occasion.
Ingredients
Filling:
- 8 cups peeled and thinly sliced fresh peaches
- 1/2 cup granulated sugar
- 1/2 cup + 2 tablespoons all-purpose flour, divided
- 1 tablespoon cornstarch
- 2 teaspoons ground cinnamon, divided
- 1/4 teaspoon salt
Topping:
- 3/4 cup packed light brown sugar
- 1/2 cup (1 stick) salted butter, room temperature
- 1 3/4 cup old-fashioned oats
Instructions
- Preheat the oven: Preheat the oven to 400°F. Butter a 9×9 baking pan and set aside.
- Mix the peaches: In a large bowl, combine peaches, granulated sugar, 2 tablespoons flour, cornstarch, 1 teaspoon cinnamon, and salt. Pour into the prepared pan.
- Prepare the topping: In the same bowl, mix brown sugar, ½ cup flour, butter, and 1 teaspoon cinnamon. Add oats and combine until crumbly. Spread over the peaches.
- Bake: Bake for 20-25 minutes until golden around the edges. Rest for 10 minutes before serving warm, with ice cream if desired.
Notes
- You can use a mix of yellow and white peaches for a varied flavor.
- Experiment with adding a dash of nutmeg or ginger to the topping for extra warmth.
Nutrition
- Serving Size: 1 serving
- Calories: 375
- Sugar: 38g
- Sodium: 150mg
- Fat: 14g
- Saturated Fat: 7g
- Unsaturated Fat: 6g
- Trans Fat: 0g
- Carbohydrates: 61g
- Fiber: 5g
- Protein: 4g
- Cholesterol: 30mg


