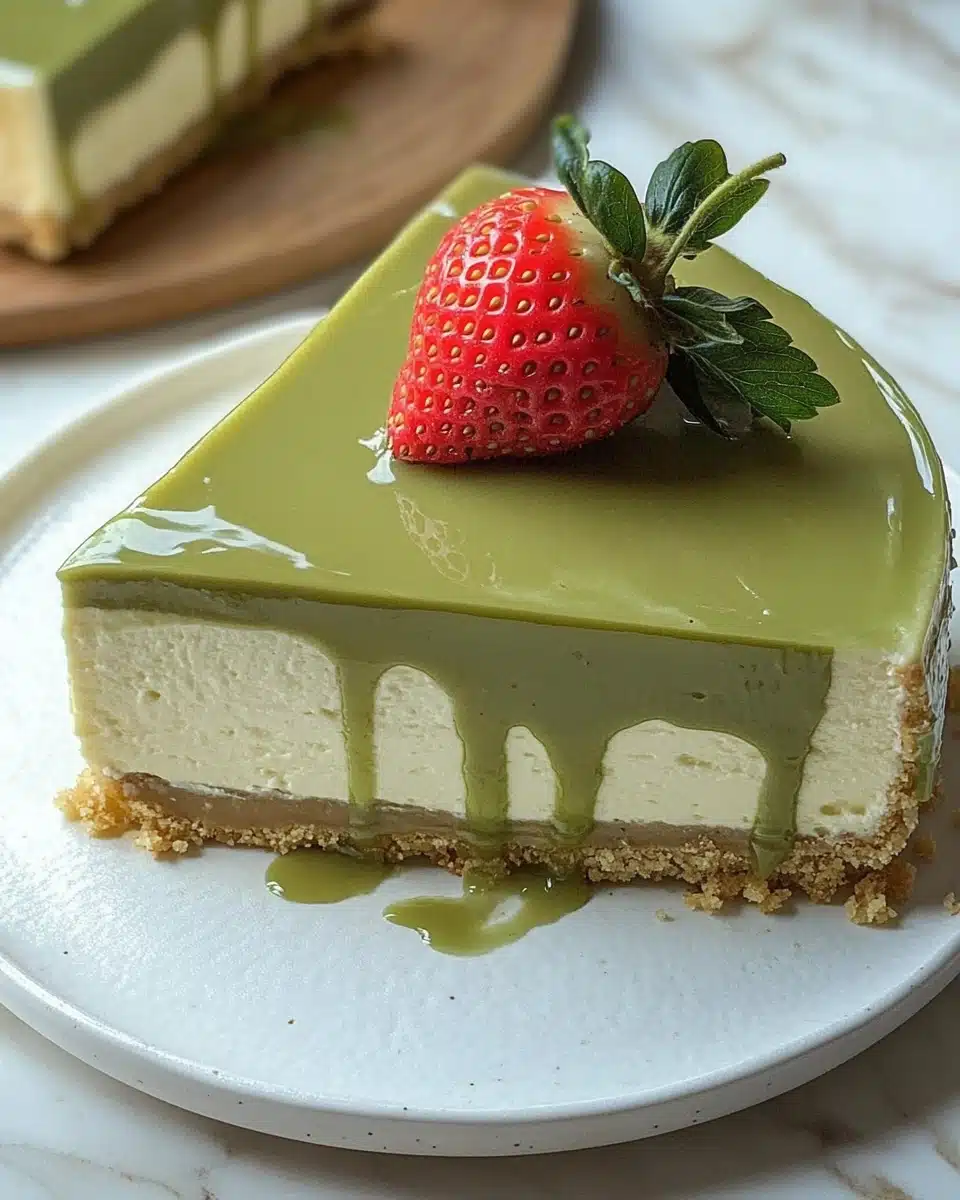
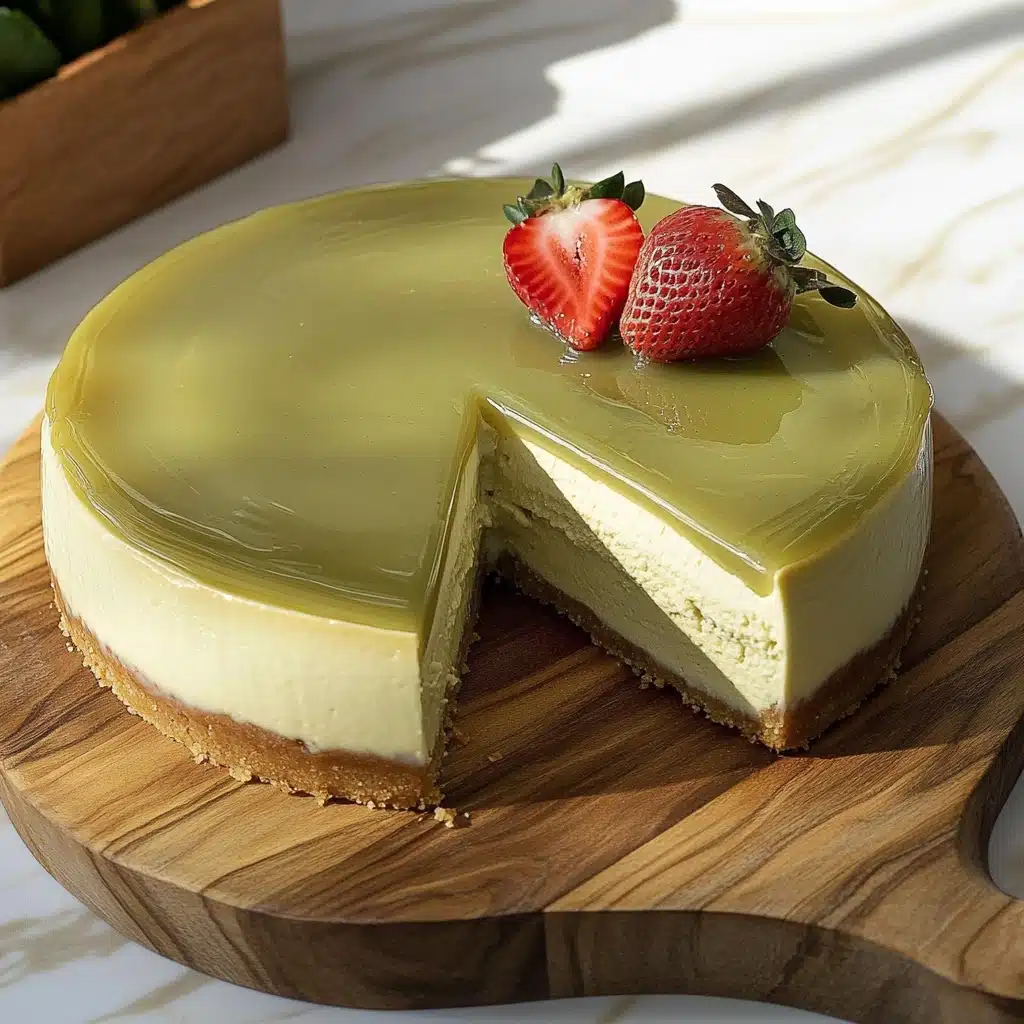
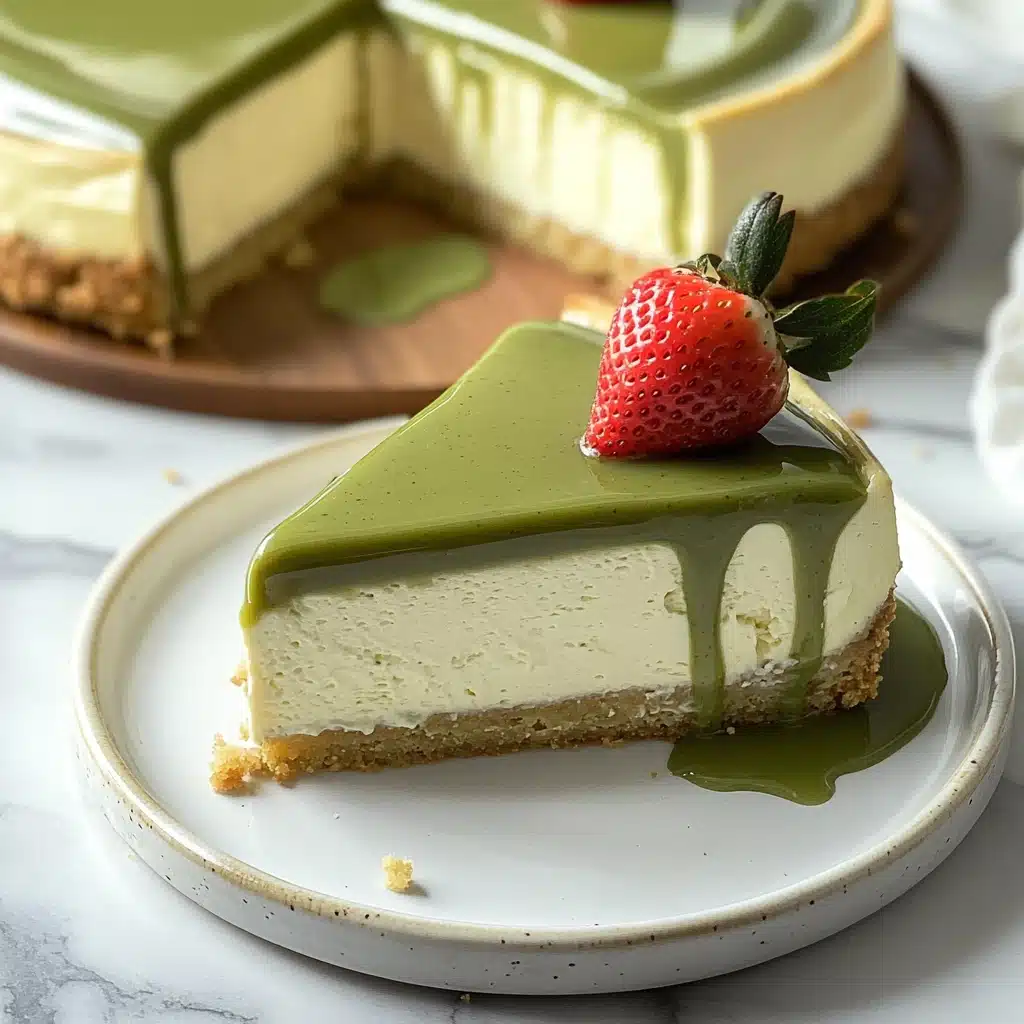
If you dream of rich, creamy cheesecake with vibrant pistachio flavor, but dread turning on the oven, this No Bake Pistachio Cheesecake is your dessert soulmate. Silky, nutty, and crowned with a glossy pistachio layer, it’s pure luxury in every bite—without a moment of baking!
Why You’ll Love This Recipe
- Absolutely No Oven Required: Stay cool while making this decadent dessert that sets entirely in the fridge.
- Ultra Creamy Texture: The perfect combination of whipped cream and cream cheese keeps every slice dreamy and light.
- Showstopper Presentation: That shine from the pistachio spread on top and a pop of fresh strawberry make this cheesecake party-ready.
- Customizable for Every Crowd: From adding different crusts to trying fun fruit toppings, you can easily tailor this cheesecake for any occasion.
Ingredients You’ll Need
Every bite of No Bake Pistachio Cheesecake relies on a few key players, and each ingredient brings something magical—whether it’s a crisp base, the creamiest filling, or that unmistakable pistachio flavor. Here’s why you won’t want to skip a thing:
- Biscuits: Classic tea biscuits, graham crackers, or digestive biscuits work perfectly; they form the sturdy (and delightfully crunchy) foundation for your cheesecake.
- Melted Butter: This is what binds our biscuit crumbs together, ensuring the crust holds its shape and delivers a rich, golden flavor.
- Cream Cheese: It’s the backbone of a truly lush and velvety cheesecake; room temperature cream cheese guarantees a super smooth blend.
- Pistachio Spread: The star ingredient—for both the filling and glossy topping—this paste delivers vibrant pistachio taste and that irresistible green hue.
- Powdered Sugar: For subtle, smooth sweetness that dissolves right into every creamy bite.
- Heavy Whipping Cream (35%): Whipped just right, it brings that essential lightness and helps your No Bake Pistachio Cheesecake set up beautifully.
- Fresh Strawberries: A juicy, colorful contrast for garnish that also adds a touch of summer to your plate.
Variations
The wonderful thing about this No Bake Pistachio Cheesecake is how endlessly adaptable it is! With just a few tweaks, you can make it suit any craving, dietary preference, or the ingredients you have on hand.
- Nutty Crunch Upgrade: Stir a handful of chopped pistachios or toasted almonds directly into the crust for extra flavor and texture.
- Gluten-Free Option: Swap regular biscuits for your favorite gluten-free cookie or biscuit to keep things friendly for everyone.
- Fresh Berry Topping: Skip strawberries and go big with a berry medley—think blueberries, raspberries, or blackberries for a colorful finish.
- Chocolate Swirl: Drizzle melted chocolate over the top layer or swirl cocoa powder into the filling for a chocolate-pistachio vibe.
How to Make No Bake Pistachio Cheesecake
Step 1: Prepare the Biscuit Crust
Start by crushing your biscuits into fine crumbs—use a food processor for the speediest route, or tuck them in a zip-top bag and bash with a rolling pin if you’re feeling old-school. Melt the butter, then stir it into the crumbs until you’ve got a texture like damp sand. This mixture is what gives your No Bake Pistachio Cheesecake that crave-worthy crunch at the base, so don’t skimp on mixing!
Step 2: Press and Freeze the Crust
Grease your cheesecake pan lightly (a springform pan works like magic here!). Pour in the buttery biscuit mixture and firm it down evenly across the base and just a little bit up the sides. Press firmly with a flat-bottomed glass or your fingers—this helps create a crust that slices beautifully. Pop the pan in the freezer while you get on with the creamy filling.
Step 3: Make the Silky Pistachio Filling
Add the softened cream cheese and pistachio spread to a large bowl. Using either a hand mixer or a sturdy spatula, whip these together until silky-smooth and fully incorporated. This is your pistachio power-move: it creates the most luscious, nutty cheesecake base without a single lump in sight.
Step 4: Whip the Cream with Sugar
In a separate cold bowl, pour in the heavy whipping cream and sprinkle over the powdered sugar. Whisk until soft peaks form—think billowing clouds, not stiff peaks. You want the whipped cream airy and luscious, so watch it closely to stop right at the sweet spot!
Step 5: Fold for Fluffiness
Carefully fold the whipped cream into the pistachio and cream cheese mixture in three additions. Patience here pays off—gentle folding keeps the air in, making your No Bake Pistachio Cheesecake filling ultra-light and melt-in-your-mouth perfect. No harsh stirring, just tender swoops with a spatula!
Step 6: Fill and Chill
Spoon the airy pistachio cheesecake filling onto your chilled crust and smooth out the surface with the back of a spoon or offset spatula. Cover the pan and set it in the refrigerator for at least 8 hours (overnight is best!)—the wait ensures your cake slices clean, holds its shape, and the flavors fully bloom.
Step 7: Decorate and Enjoy
Once the cheesecake is set, gently pour the remaining pistachio spread over the top and tilt the pan to coat the surface with a glossy green layer. Add fresh strawberries or sprinkle extra chopped pistachios for that celebratory wow factor. Slice, serve, and bask in all the compliments!
Pro Tips for Making No Bake Pistachio Cheesecake
- Room-Temperature Cream Cheese: Let your cream cheese sit out before mixing—this ensures a lump-free, ultra-smooth filling.
- Chill Your Bowl and Whisk: Whipping cream in a cold bowl helps it fluff up faster and hold its peaks for a light, airy mousse texture.
- Gentle Folding: Use a spatula and fold slowly—keeping your filling light (not deflated) is the secret to that cloud-like cheesecake.
- Overnight Chill Magic: Try to resist slicing too soon! Chilling overnight gives the cheesecake time to fully set and meld the flavors perfectly.
How to Serve No Bake Pistachio Cheesecake
Garnishes
A flourish of extra pistachio spread over the top brings color and glossy appeal, while fresh strawberries add sweetness and contrast. For a touch more crunch, scatter crushed pistachios or a sprinkle of edible rose petals—your No Bake Pistachio Cheesecake will look straight out of a Parisian bakery!
Side Dishes
This lusciously rich cheesecake pairs beautifully with a pot of dark espresso, hot tea, or a glass of sweet dessert wine. For a bolder twist, serve with a citrusy fruit salad or fresh berries on the side that cut through the rich creaminess.
Creative Ways to Present
You can easily spoon the filling into individual dessert glasses for parfait-style treats (no slicing needed!) or cut bite-sized squares for a party platter. For special occasions, pipe little rosettes of whipped cream or alternate layers with fresh berries inside a trifle bowl for major wow-factor.
Make Ahead and Storage
Storing Leftovers
Any leftover No Bake Pistachio Cheesecake stores happily in the fridge! Just cover the pan or transfer slices into an airtight container, and they’ll stay dreamy and fresh for up to 4 days. (Good luck having any left, though!)
Freezing
You can freeze the cheesecake (whole or in slices) with excellent results. Wrap tightly with plastic wrap and then foil, and it’ll keep for up to a month—perfect for make-ahead entertaining or a late-night treat!
Reheating
Reheating isn’t necessary for a no-bake cheesecake. If frozen, simply thaw overnight in the refrigerator before serving—your creamy pistachio delight will be ready to enjoy just as deliciously as day one.
FAQs
-
Can I make this No Bake Pistachio Cheesecake ahead of time?
Absolutely! In fact, this cheesecake sets best if made the day before you plan to serve it. An overnight chill not only firms up the texture but also lets the flavors intensify, making each bite even dreamier.
-
What can I use instead of pistachio spread?
If you don’t have pistachio spread, you can use homemade pistachio butter or even swap for almond or hazelnut spreads for a fun twist—this will alter the flavor profile but still deliver a silky, nutty cheesecake.
-
Can I use a different type of biscuit for the crust?
Yes! Digestive biscuits, graham crackers, or even vanilla wafers are fantastic choices. Just aim for a crisp, neutral cookie that’s not overly sweet and crushes down well for a solid base.
-
How can I get clean, tidy slices of No Bake Pistachio Cheesecake?
The secret to sharp slices is a very sharp knife wiped clean between cuts. For extra neatness, dip your knife in hot water and dry before slicing—repeat for every piece and you’ll get perfect, bakery-worthy cheesecake slices!
Final Thoughts
This No Bake Pistachio Cheesecake is the kind of dessert that surprises and delights, every single time. It’s easy enough for beginners, elegant enough for special occasions, and a guaranteed crowd-pleaser for pistachio lovers and cheesecake fans alike—give it a whirl and prepare to fall head over heels!
Print
No Bake Pistachio Cheesecake Recipe
- Prep Time: 25 minutes
- Total Time: 8 hours
- Yield: 8 Portions 1x
- Category: Dessert
- Method: No-Bake
- Cuisine: American
- Diet: Vegetarian
Description
Indulge in the rich and creamy goodness of this no-bake pistachio cheesecake. A buttery biscuit crust holds a luscious pistachio-infused filling, topped with a decadent pistachio spread and fresh strawberries.
Ingredients
CRUST:
- 200 grams biscuits
- 45 grams melted butter
CHEESECAKE FILLING:
- 500 grams cream cheese
- 150 grams pistachio spread
- 100 grams powder sugar
- 200 grams heavy whipping cream (35%)
DECORATE:
- 100 grams pistachio spread
- strawberry
Instructions
- Prepare the Biscuit Crust for Your No-Bake Cheesecake Start by crushing biscuits in a food processor, blender, or even with a rolling pin. Once the biscuits are finely crushed, melt the butter in the microwave or stovetop. Add the melted butter to the crushed biscuits and mix them together until the mixture resembles wet sand. This forms the base of your no-bake cheesecake, which will be both buttery and crispy when set. Make sure the crumbs are evenly coated with butter to create a solid crust. No-bake pistachio cheesecake crust made with broken biscuits and melted butter, ready for the creamy pistachio filling
- Press the Biscuit Crust into the Pan and Freeze Grease your cheesecake pan lightly to ensure easy removal later. Pour the prepared biscuit crust mixture into the pan, then press it down firmly, making sure to spread it evenly across the bottom and up the sides slightly. This helps create a solid, even crust. Once pressed, place the pan in the freezer while you prepare the creamy pistachio cheesecake filling, allowing the crust to firm up before adding the filling. Pressed pistachio cheesecake crust in a pan, ready to be frozen for a firm and stable base.
- Prepare the Creamy Pistachio Cheesecake Filling In a clean and dry bowl, add the room-temperature cream cheese and smooth pistachio spread. Mix them together until fully incorporated, ensuring a creamy and smooth texture. This will form the rich, flavorful base of your no-bake pistachio cheesecake filling. The mixture should be smooth and free of lumps for a perfect cheesecake consistency. Creamy cream cheese and pistachio spread in a bowl, ready to be mixed for a smooth and delicious no-bake pistachio cheesecake filling.
- Whip the Heavy Cream for the Perfect Texture In a clean, dry, and cold bowl, pour the heavy cream and add the powdered sugar. Whip the mixture until it reaches soft peaks and is almost whipped. Be careful not to over-whip it, as it will continue to whip once you fold it into the cheesecake filling. This step ensures a light and airy texture for the creamy no-bake pistachio cheesecake. Set it aside until ready to combine with the rest of the ingredients. A bowl of freshly whipped cream, ideal for making a creamy no-bake pistachio cheesecake filling.
- Fold in the Whipped Cream for a Light and Fluffy Filling Carefully fold the whipped cream into the cream cheese and pistachio spread mixture in three parts. Be gentle while folding to retain the airiness of the whipped cream and keep the no-bake pistachio cheesecake light and fluffy. Avoid over-mixing, as this will deflate the filling and affect the texture. The goal is a smooth, airy filling that will set perfectly when refrigerated. No bake pistachio cheesecake filling in a bowl, creamy and fluffy texture, pistachio flavor, easy no-bake cheesecake recipe
- Chill the No-Bake Pistachio Cheesecake to Set Pour the creamy pistachio cheesecake filling into the prepared pan with the chilled biscuit crust. Smooth the top using a spoon to create an even layer. Once smoothed, cover the pan with a tray or plastic wrap to prevent any contaminants from reaching the cheesecake. Place the pan in the refrigerator and let it chill for at least 8 hours, or overnight, to allow the cheesecake to fully set and develop its rich flavors. No-bake pistachio cheesecake with a smooth creamy filling on a crunchy crust, ready to be refrigerated and set.
- Garnish and Serve Your No-Bake Pistachio Cheesecake Once the no-bake pistachio cheesecake has fully set, pour the pistachio spread over the top, tilting the pan to let it flow evenly across the surface. For a decorative touch, add fresh strawberries or sprinkle crushed pistachios for extra flavor and a beautiful presentation. Slice and serve this creamy, indulgent dessert that’s sure to impress!
Notes
- Make sure the cream cheese is at room temperature for smoother mixing.
- Feel free to adjust the sweetness by adding more or less powdered sugar to the filling.
- Decorate with additional pistachios or whipped cream for a personalized touch.
Nutrition
- Serving Size: 1 slice
- Calories: 380
- Sugar: 18g
- Sodium: 260mg
- Fat: 28g
- Saturated Fat: 16g
- Unsaturated Fat: 9g
- Trans Fat: 0g
- Carbohydrates: 30g
- Fiber: 1g
- Protein: 6g
- Cholesterol: 90mg


