
If you’ve ever wished that making a comforting dessert could be easier, you’ve just found your new favorite. This 3-Ingredient Skillet Apple Crisp Recipe is not only incredibly simple to whip up but absolutely delicious—no fuss, no fancy ingredients, just pure cozy goodness. I love this because it happens so quickly and still feels like a homemade, from-scratch treat that your whole family will adore. Trust me, once you try it, you’ll find yourself coming back to this recipe whenever you want that warm apple dessert fix in a flash.
Why You’ll Love This Recipe
- Super Simple: Only three everyday ingredients and minimal steps make this recipe approachable for any skill level.
- Speedy Prep: I can have this crisp ready to bake in just 10 minutes, perfect for busy weeknights or last-minute guests.
- Comfort Food Classic: It has that warm, homey apple-and-cinnamon vibe that makes everyone feel cozy and satisfied.
- Minimal Cleanup: Using one skillet (cast iron is best!) means fewer dishes and more time to enjoy.
Ingredients You’ll Need
These three ingredients work together beautifully to deliver maximum flavor with zero hassle. When I first started making this, I was amazed how using flavored instant oatmeal as the topping adds such a nice crunch and taste without any extra effort—definitely a game changer in the pantry.
- Flavored instant oatmeal: I love using varieties like Maple & Brown Sugar or Cinnamon & Spice since they bring warmth and sweetness without adding sugar separately.
- Cold salted butter: Using cold butter helps create that perfect crumbly topping texture when mixed into the oats.
- Apples: Choose firm, tart apples like Granny Smith or Honeycrisp to balance sweetness and maintain a great texture after cooking.
Variations
I love that this recipe is so adaptable! Over the years, I’ve played around with different oatmeal flavors and types of apples to keep it fresh. Don’t hesitate to tweak it to your taste—you might find a new favorite twist.
- Use different oatmeal flavors: When I tried Pumpkin Spice oatmeal in fall, it added an extra cozy vibe that my family went nuts for.
- Add nuts or dried fruit: Tossing in walnuts or dried cranberries can add more texture and a flavor pop if you want to dress it up.
- Go gluten-free: Use gluten-free instant oatmeal packets to make this crisp suitable for gluten sensitivities—just double-check your oats are certified gluten-free.
- Swap the apples: Mixing tart apples like Granny Smith with sweeter ones lets you control the final flavor balance your family prefers.
How to Make 3-Ingredient Skillet Apple Crisp Recipe
Step 1: Prep Your Topping
Start by combining the flavored instant oatmeal and 6 tablespoons of the cold butter in a bowl. Press it together with your fingertips until it turns into moist crumbs. This step might seem simple, but getting the butter evenly distributed means your topping will bake up just right—crispy and golden without being greasy. Then pop that bowl into the fridge to chill while you work on the apples. This little trick keeps the topping from melting too fast in the oven.
Step 2: Sauté the Apples to Perfection
Melt the remaining 2 tablespoons of butter in a 10-inch oven-safe skillet over medium-high heat. When you add your peeled, cored, and chopped apples, keep things moving! Stir occasionally to get a nice caramelization on the apple pieces—they’ll develop those golden spots that add fantastic flavor. This usually takes about 5 to 7 minutes, and if they seem to be browning too quickly, just turn the heat down to medium. I found that this step really elevates the dessert’s depth, making it feel homemade in the best way.
Step 3: Add the Topping and Bake
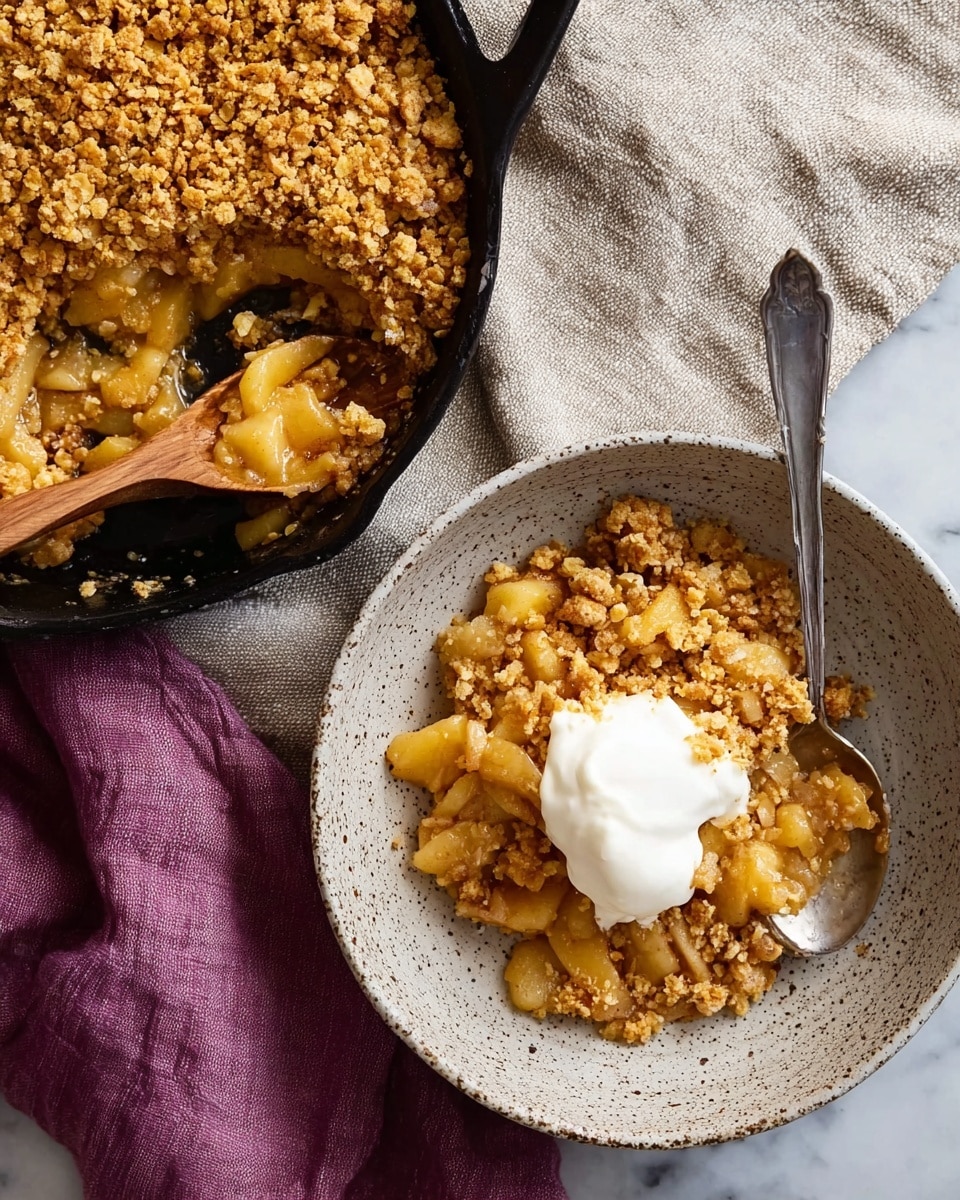
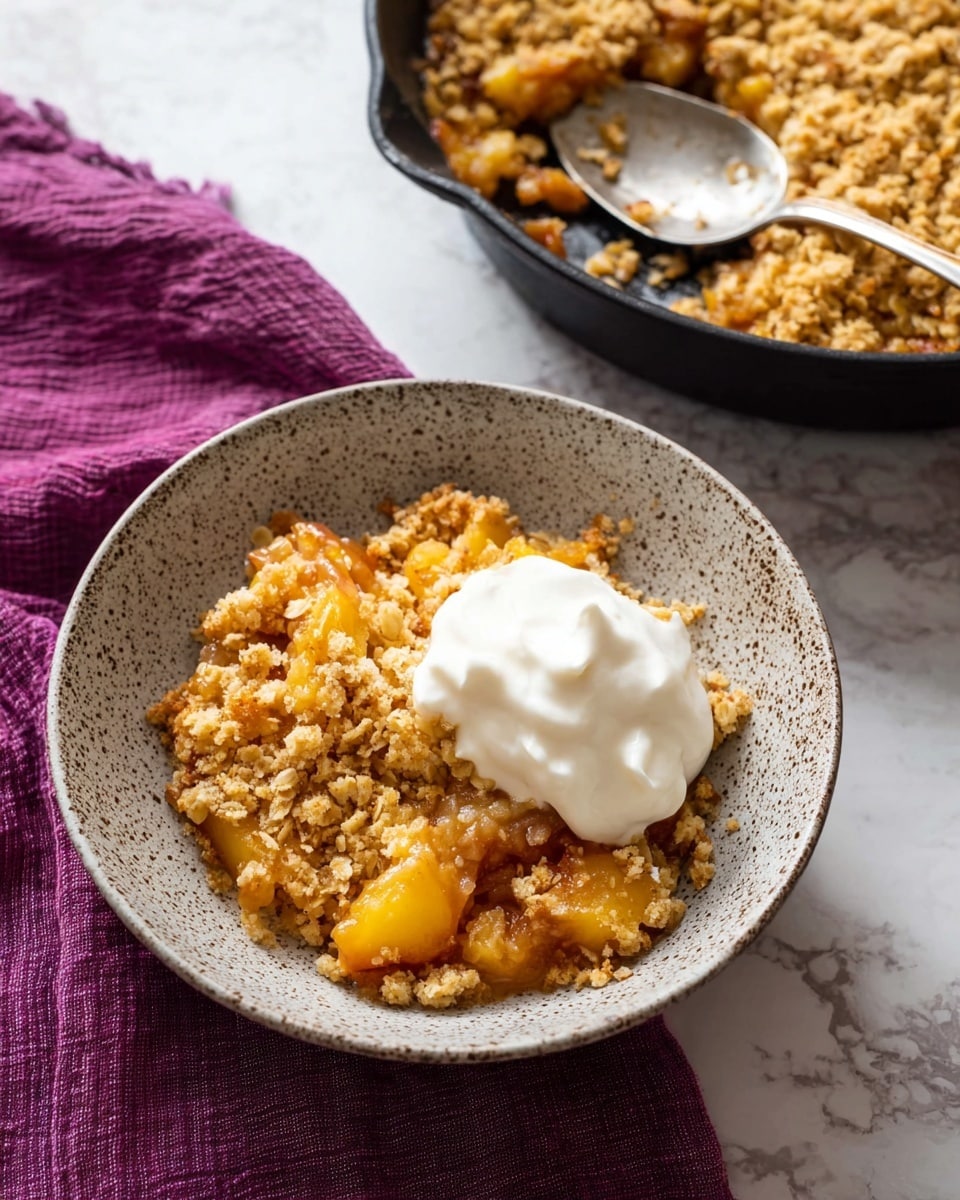
Once the apples soften and get those lovely caramelized spots, remove the skillet from heat. If your skillet isn’t oven-safe, no worries—just transfer the apples into a 2-quart baking dish. Scatter your chilled oat topping evenly over the apples. It probably won’t cover every inch, but that’s okay because it bakes up into a rustic, crisp topping that’s perfect. Pop it into your preheated 425°F oven and bake for about 18 to 24 minutes, until you see bubbly juices bubbling along the edges and the topping is gloriously golden brown.
Step 4: Let It Cool Just Enough
Once out of the oven, I like to let this crisp rest for about 10 minutes. It’s tempting to dig in right away, but that little pause lets the juices thicken slightly and the crisp topping set up so every bite has the right texture. You’ll love how everything melds together perfectly after this short rest!
Pro Tips for Making 3-Ingredient Skillet Apple Crisp Recipe
- Use a cast iron skillet: It evenly distributes heat and can go straight from stovetop to oven, cutting down on mess and cooks more evenly.
- Keep butter cold: Cold butter mixed into the oats creates a superior crumbly texture in the topping, so resist softening it before you start.
- Don’t skip sautéing: Cooking the apples before baking develops caramelized flavors and avoids that raw apple texture you sometimes get with crisps.
- Watch your baking time: Baking a little too long can dry the apples out; aim for a bubbling sauce around the edges as your cue to check doneness.
How to Serve 3-Ingredient Skillet Apple Crisp Recipe
Garnishes
I’m a big fan of topping this apple crisp with a scoop of vanilla ice cream—melting into the warm crisp feels like a little hug in dessert form. Sometimes, a dollop of whipped cream or a sprinkle of chopped toasted pecans adds a nice crunch and richness that elevates the experience even more.
Side Dishes
This crisp can stand alone, but when I’m serving it for a bigger brunch or dinner, it pairs wonderfully with a simple cup of hot coffee or tea. I’ve also enjoyed it alongside roasted pork or chicken for a comforting autumn dinner highlight.
Creative Ways to Present
If you want to impress guests, try serving the crisp in individual small skillets or ramekins. I even like making mini crisps in mason jars for parties—it’s adorable, portable, and guests love the rustic charm.
Make Ahead and Storage
Storing Leftovers
When I’ve had leftovers, I cover them tightly with plastic wrap or transfer into an airtight container and refrigerate for up to 3 days. The texture stays pretty good, though the topping softens a bit. It’s quick to revive with a little reheat!
Freezing
I’ve frozen this crisp twice with decent success. I let it cool completely, then wrap it tightly with foil and freeze for up to 2 months. When thawed and reheated, it’s close to fresh thanks to the hearty oat topping, though I tend to enjoy it freshest straight from the oven.
Reheating
To warm up leftovers, I pop them into a 350°F oven for 10-15 minutes until heated through and the topping crisps back up. Microwaving works in a pinch but can make the topping mushy, so I only do that when I’m really in a hurry.
FAQs
-
Can I use fresh oatmeal instead of instant flavored oatmeal?
While fresh rolled oats work in a traditional crisp recipe, I recommend sticking with flavored instant oatmeal here because it adds seasoning and sweetness without extra steps. If you use plain oats, consider adding cinnamon and a bit of sugar to mimic the flavor profile.
-
What kinds of apples are best for this skillet apple crisp?
Tart and firm apples like Granny Smith, Honeycrisp, or Braeburn hold up well during cooking and provide a nice balance to the sweet topping. Mixing a couple of varieties can add complexity to the flavor and texture.
-
Can I make this recipe vegan?
Absolutely! Swap out the butter for a plant-based vegan butter or coconut oil to keep the crispy topping rich and crumbly. Make sure the oatmeal flavoring fits your dietary needs.
-
Is it necessary to sauté the apples before baking?
While you could bake the apples raw, I highly suggest sautéing them first to bring out their natural sweetness and ensure a tender, caramelized texture. It’s a small extra step that makes a big difference.
-
What’s the best way to reheat leftover apple crisp?
Reheating in the oven at 350°F for 10-15 minutes helps revive the crisp topping and warms the apples evenly. Microwaving is faster but often sacrifices texture.
Final Thoughts
This 3-Ingredient Skillet Apple Crisp Recipe holds a special place in my kitchen because it delivers all the comforting flavors of a traditional apple crisp without complicated steps or hard-to-find ingredients. I used to struggle to make a good crisp that my family loved without spending hours, but this little shortcut changed everything. It’s quick, tasty, and perfect for those moments when you want homemade dessert without the fuss. Give it a try, and I’m pretty sure you’ll be making it again and again!
Print
3-Ingredient Skillet Apple Crisp Recipe
- Prep Time: 10 mins
- Cook Time: 25 mins
- Total Time: 35 mins
- Yield: 4 to 6 servings 1x
- Category: Dessert
- Method: Baking
- Cuisine: American
Description
This 3-Ingredient Skillet Apple Crisp is a quick, delicious dessert combining tender, caramelized apples with a buttery oatmeal topping. Using instant flavored oatmeal and simple pantry staples, it creates a comforting crisp with minimal effort and maximum flavor, perfect for an easy treat any time of the year.
Ingredients
Topping
- 1 1/3 cups flavored instant oatmeal (about 4 packets; Maple & Brown Sugar or Cinnamon & Spice recommended)
- 6 tablespoons cold salted butter, cut into 1 tablespoon-sized pieces (from 1 stick)
Apple Filling
- 2 pounds apples (4 large or 5 medium), peeled, cored, and cut into 1-inch chunks
- 2 tablespoons cold salted butter (remaining from the 1 stick), cut into pieces
Instructions
- Preheat the Oven. Preheat your oven to 425°F and position a rack in the center to ensure even baking of your apple crisp.
- Make the Topping. In a medium bowl, combine the instant oatmeal with 6 tablespoons of the cold salted butter. Using your fingertips, press and squeeze the butter into the oats until you achieve moist crumbs. Place this topping mixture in the refrigerator to chill while you prepare the apples.
- Sauté the Apples. Heat the remaining 2 tablespoons of butter in a 10-inch oven-safe skillet (cast iron preferred) over medium-high heat. Add the peeled and chopped apples, cooking and stirring occasionally until the apples caramelize in spots and soften slightly, about 5 to 7 minutes. If they brown too quickly, reduce the heat to medium. Remove the skillet from the heat once done.
- Add the Topping. If your skillet is not oven-safe, transfer the sautéed apples to a 2-quart baking dish. Evenly scatter the chilled oatmeal topping over the apples; it may not completely cover the fruit.
- Bake the Crisp. Place the skillet or baking dish in the preheated oven. Bake until the juices around the edges bubble, the apples are tender, and the topping is golden brown and crisp, approximately 18 to 24 minutes.
- Cool and Serve. Remove from the oven and let the apple crisp cool for about 10 minutes before serving to allow the juices to thicken slightly and flavors to meld. Enjoy your easy, flavorful dessert!
Notes
- Use flavored instant oatmeal like Maple & Brown Sugar or Cinnamon & Spice for added depth and sweetness.
- Ensure the butter is cold when mixing into the oatmeal topping to create crumbly texture.
- Cast iron skillets work best for caramelizing apples and can go straight into the oven, but if unavailable, transfer apples to an oven-safe baking dish before baking.
- The topping might not fully cover the apples but will crisp beautifully during baking.
- Let the crisp cool slightly before serving to avoid burning and help set the dessert.
- For a dairy-free option, substitute butter with a plant-based alternative, though texture may vary.
Nutrition
- Serving Size: 1/6 of recipe
- Calories: 320
- Sugar: 28g
- Sodium: 150mg
- Fat: 18g
- Saturated Fat: 11g
- Unsaturated Fat: 6g
- Trans Fat: 0g
- Carbohydrates: 38g
- Fiber: 4g
- Protein: 2g
- Cholesterol: 45mg


